Web App Manager
Many classes have shortcut names used when creating (instantiating) a class with a
configuration object. The shortcut name is referred to as an alias (or xtype if the
class extends Ext.Component). The alias/xtype is listed next to the class name of
applicable classes for quick reference.
Framework classes or their members may be specified as private or protected. Else,
the class / member is public. Public, protected, and private are access
descriptors used to convey how and when the class or class member should be used.
Public classes and class members are available for use by any other class or application code and may be relied upon as a stable and persistent within major product versions. Public classes and members may safely be extended via a subclass.
Protected class members are stable public members intended to be used by the
owning class or its subclasses. Protected members may safely be extended via a subclass.
Private classes and class members are used internally by the framework and are not intended to be used by application developers. Private classes and members may change or be omitted from the framework at any time without notice and should not be relied upon in application logic.
static label next to the
method name. *See Static below.Below is an example class member that we can disect to show the syntax of a class member (the lookupComponent method as viewed from the Ext.button.Button class in this case).
Let's look at each part of the member row:
lookupComponent in this example)( item ) in this example)Ext.Component in this case). This may be omitted for methods that do not
return anything other than undefined or may display as multiple possible values
separated by a forward slash / signifying that what is returned may depend on the
results of the method call (i.e. a method may return a Component if a get method calls is
successful or false if unsuccessful which would be displayed as
Ext.Component/Boolean).PROTECTED in
this example - see the Flags section below)Ext.container.Container in this example). The source
class will be displayed as a blue link if the member originates from the current class
and gray if it is inherited from an ancestor or mixed-in class.view source in the example)item : Object in the example).undefined a "Returns" section
will note the type of class or object returned and a description (Ext.Component in the
example)Available since 3.4.0 - not pictured in
the example) just after the member descriptionDefaults to: false)The API documentation uses a number of flags to further commnicate the class member's function and intent. The label may be represented by a text label, an abbreviation, or an icon.
classInstance.method1().method2().etc();false is returned from
an event handler- Indicates a framework class
- A singleton framework class. *See the singleton flag for more information
- A component-type framework class (any class within the Ext JS framework that extends Ext.Component)
- Indicates that the class, member, or guide is new in the currently viewed version
- Indicates a class member of type config
- Indicates a class member of type property
- Indicates a class member of type
method
- Indicates a class member of type event
- Indicates a class member of type
theme variable
- Indicates a class member of type
theme mixin
- Indicates that the class, member, or guide is new in the currently viewed version
Just below the class name on an API doc page is a row of buttons corresponding to the types of members owned by the current class. Each button shows a count of members by type (this count is updated as filters are applied). Clicking the button will navigate you to that member section. Hovering over the member-type button will reveal a popup menu of all members of that type for quick navigation.
Getting and setter methods that correlate to a class config option will show up in the methods section as well as in the configs section of both the API doc and the member-type menus just beneath the config they work with. The getter and setter method documentation will be found in the config row for easy reference.
Your page history is kept in localstorage and displayed (using the available real estate) just below the top title bar. By default, the only search results shown are the pages matching the product / version you're currently viewing. You can expand what is displayed by clicking on the button on the right-hand side of the history bar and choosing the "All" radio option. This will show all recent pages in the history bar for all products / versions.
Within the history config menu you will also see a listing of your recent page visits. The results are filtered by the "Current Product / Version" and "All" radio options. Clicking on the button will clear the history bar as well as the history kept in local storage.
If "All" is selected in the history config menu the checkbox option for "Show product details in the history bar" will be enabled. When checked, the product/version for each historic page will show alongside the page name in the history bar. Hovering the cursor over the page names in the history bar will also show the product/version as a tooltip.
Both API docs and guides can be searched for using the search field at the top of the page.
On API doc pages there is also a filter input field that filters the member rows
using the filter string. In addition to filtering by string you can filter the class
members by access level and inheritance. This is done using the checkboxes at the top of
the page. Note that filtering out private members also filters the API class
navigation tree.
Clicking on an empty search field will show your last 10 searches for quick navigation.
Each API doc page (with the exception of Javascript primitives pages) has a menu view of metadata relating to that class. This metadata view will have one or more of the following:
Ext.button.Button class has an alternate class name of Ext.Button). Alternate class
names are commonly maintained for backward compatibility.Runnable examples (Fiddles) are expanded on a page by default. You can collapse and expand example code blocks individually using the arrow on the top-left of the code block. You can also toggle the collapse state of all examples using the toggle button on the top-right of the page. The toggle-all state will be remembered between page loads.
Class members are collapsed on a page by default. You can expand and collapse members using the arrow icon on the left of the member row or globally using the expand / collapse all toggle button top-right.
Viewing the docs on narrower screens or browsers will result in a view optimized for a smaller form factor. The primary differences between the desktop and "mobile" view are:
The class source can be viewed by clicking on the class name at the top of an API doc page. The source for class members can be viewed by clicking on the "view source" link on the right-hand side of the member row.
Sencha Web Application Manager lets you manage user and group access to web apps that run in Sencha Web Application Client. Sencha hosts Sencha Web Application Manager app at http://manage.sencha.com.
Sencha Web Application Manager enables secure access to an enterprise's authentication and authorization server.
Sencha Web Application Manager Browser Support
The Manager application works on:
Client Support
Users obtain their Sencha Web Application Client apps from the Apple App Store, Google Play, or BlackBerry World Apps market.
The Manager application side menu contains these buttons:
| Icon | Description |
|---|---|
 |
Dashboard - Monitors organization Sencha Web Application Client usage and user device and location |
 |
Applications - Lists, adds, and removes applications |
 | Devices - Lists, assigns device ownership, blocks or deauthorizes a device, and wipes Sencha Web Application Client info from a device |
 |
Users - Lists, adds, and removes user access to Sencha Web Application Client |
 |
Groups - Lists, adds, and removes group access to Sencha Web Application Client |
 |
VPN Services - Manages VPN services |
 |
Reports - Provides interactive reports for:
|
 |
Billing - Provides settings for:
|
 |
Settings - Provides settings for:
|
Buttons:
These buttons provide additional controls on tabs:
| Icon | Description |
|---|---|
 | Search current tab. |
 |
Plus Icon - Add an entry |
| Refresh - Refreshes the current screen | |
 |
Grid View - Grid View is the default view for pages such as Applications, Devices, Groups, etc. Information is laid out in sortable rows and columns. |
 |
Map View - Map View shows a global map, which displays the location of all activated devices. This view is available under the Devices tab. |
The Dashboard tab allows you to monitor system usage and evaluate active devices.
The initial chart shows user activity for the current month.
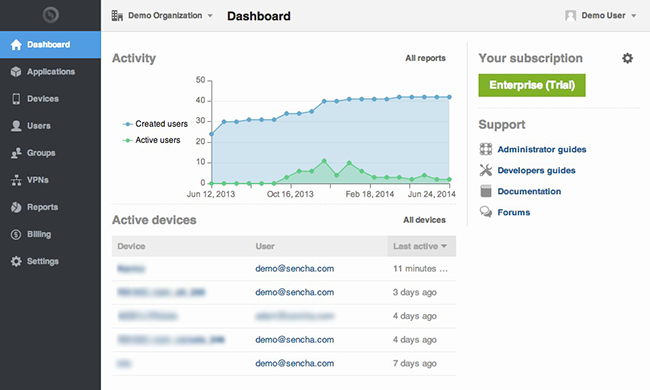
This tab lists:
If a user loses a mobile device, you can disable Sencha Web Application Client access to the device by clicking the "block" icon found within the user's profile:

You are prompted to be sure you want to immediately terminate the user's session.
Blocking a user's device sends this message to Sencha Web Application Client device:
Error
This user has had their access
revoked indefinitely by an
administrator

OK
To reactivate the device:
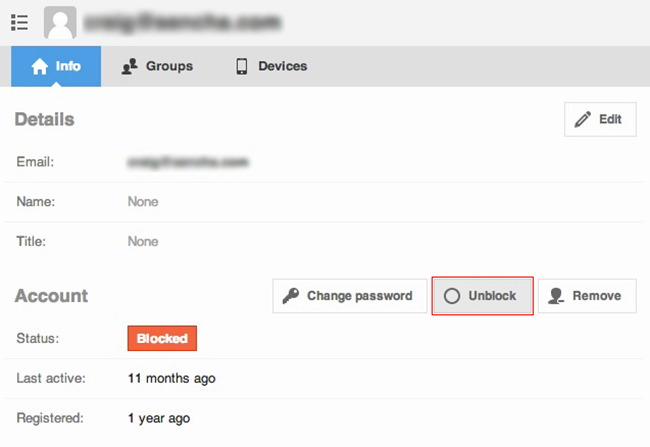
Sencha Web Application Manager prompts to be sure you want to unblock the device.
Note: Blocking the device only affects the one device. The user can access Sencha Web Application Client from another device.
You can also remove all Sencha Web Application Client data from a device by Wiping the device, or you can also remove Sencha Web Application Client data and deauthorize the device. For more information, see Device Information menu.
The Applications tab lists all apps that can run on a Sencha Web Application Client. Click an application to view more information about the application. You can give each user a different set of applications within your organization.
The first application you set for a user becomes the first screen they see when they log into Sencha Web Application Client. As administrator, you can use a web page as the starting application, for example, as a welcome screen with ways for users to get help or learn how to use their client.
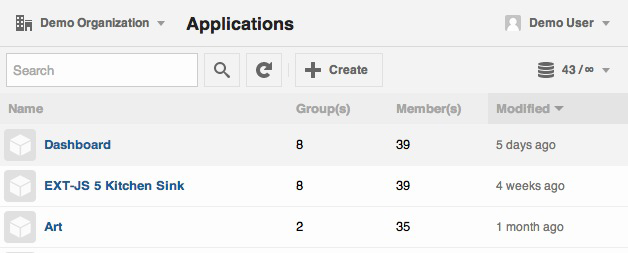
The Applications tab lists:
View the HTML web applications that can run in Sencha Web Application Client app. The web applications can be served using HTTP or HTTPS.
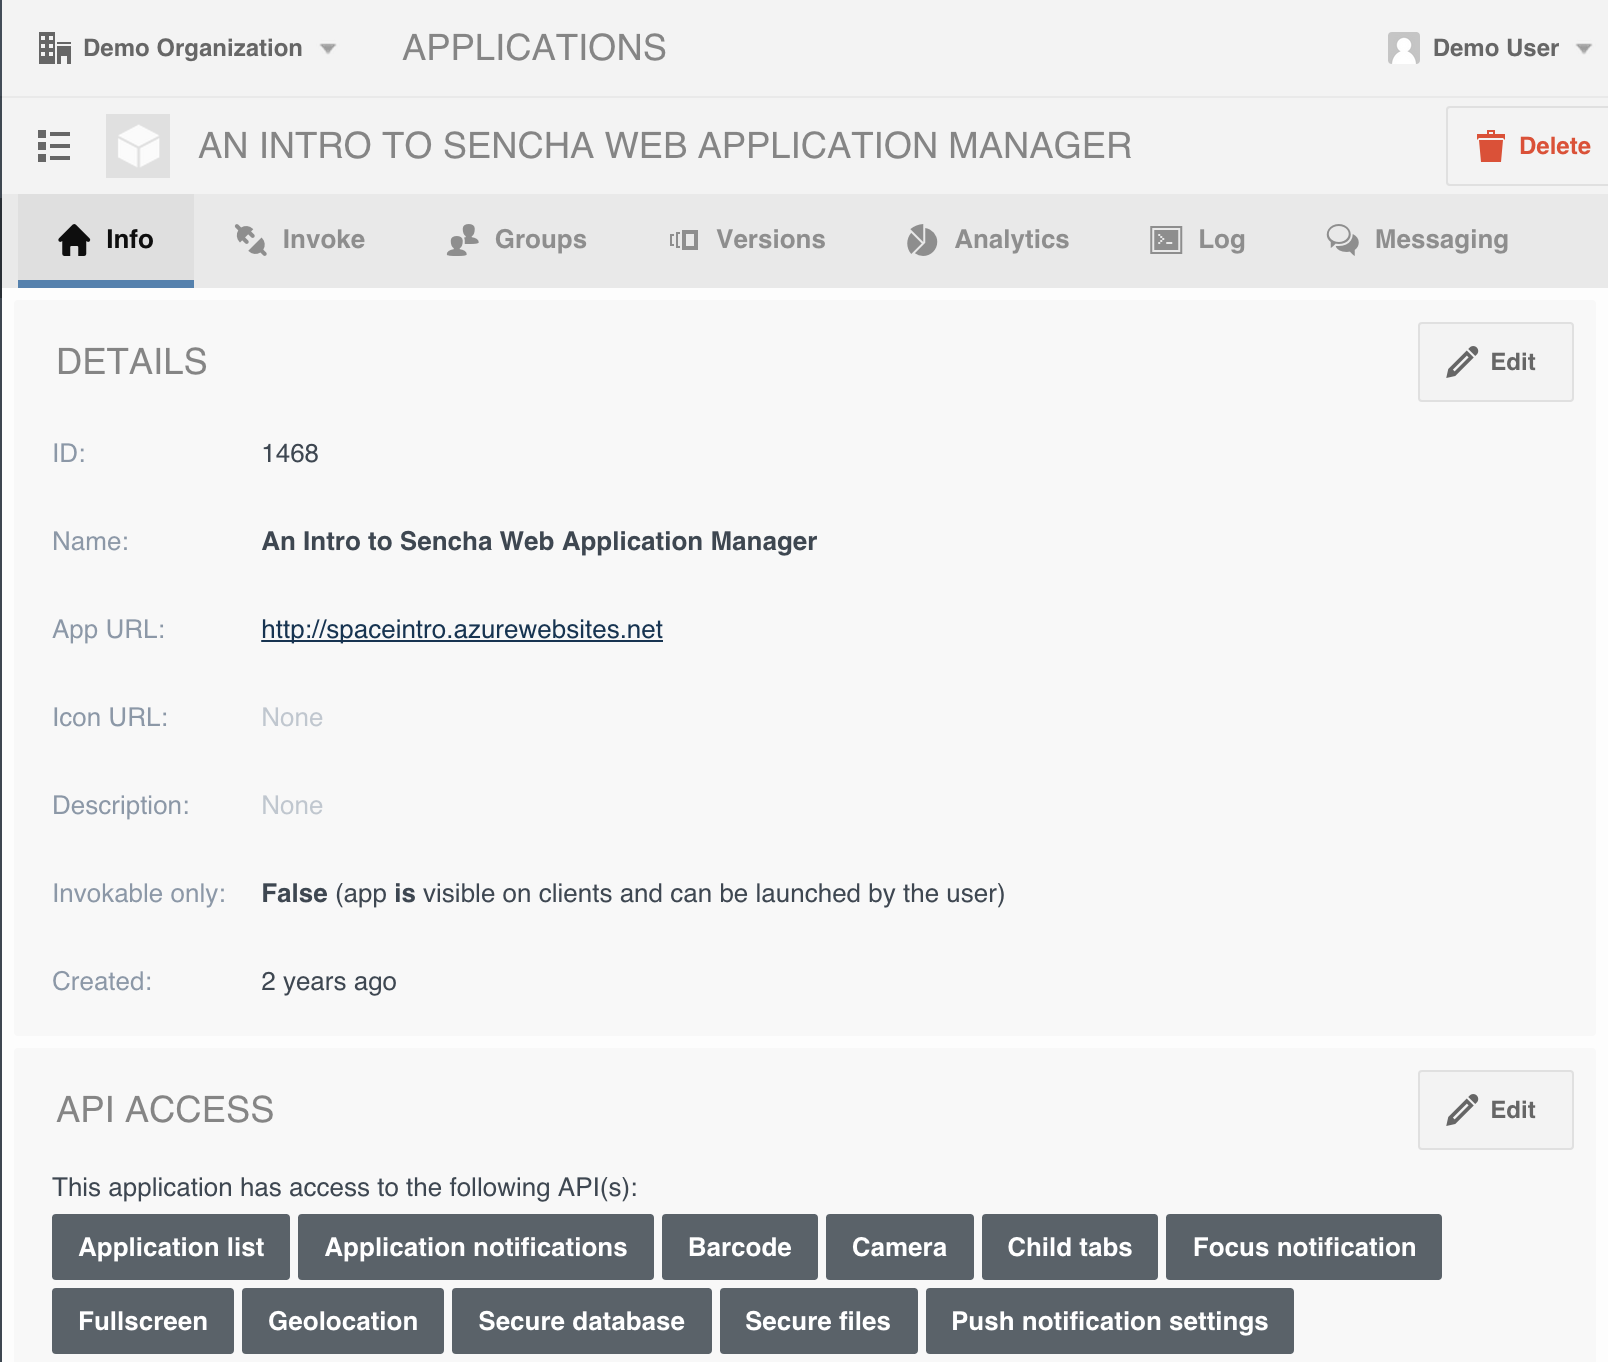
Info tab:
Lists application information:
Invoke tab:
Groups tab:
Lists group information about the application:
Versions tab:
Allows creation and management of application versions
Analytics tab:
Log tab:
The Add an App menu lets you bring a web app into Sencha Web Application Client environment so that the app can be accessed by Sencha Web Application Clients.
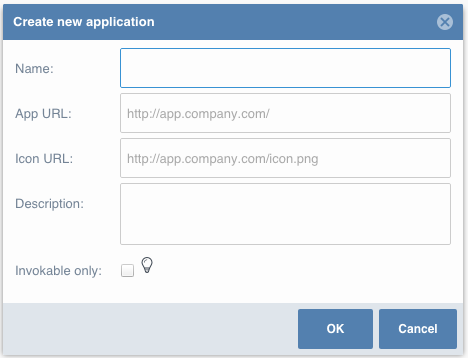
Note: To give users access to an app, see Add an App to a Group (you need to add an app to a group, and then add the user to the group).
Lists, assigns device ownership, blocks a device, and wipes Sencha Web Application Client info from a device.

Tasks:
Lists:
Click a device to view and edit device information. This menu also lets you wipe Sencha Web Application Client organization data from a device.
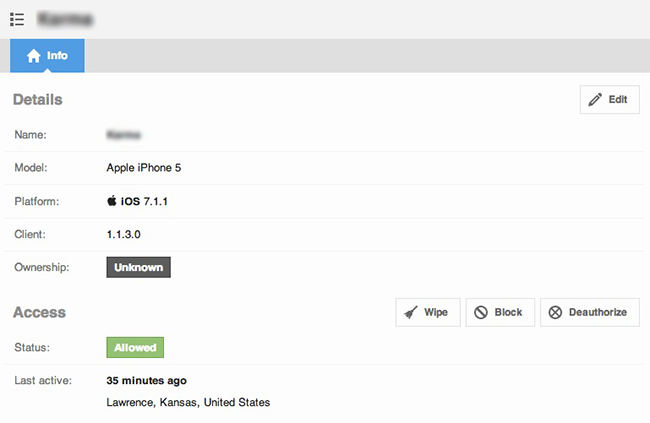
Device Information:
Device Actions:
Wipe Device - Removes all Sencha Client organizational data from the device - the user is logged out of Sencha Web Application Client, but the user can just log back in on this device.
Block Device - Removes the ability of the device of a user to access Sencha Web Application Client. The user is logged out of Sencha Web Application Client. You must unblock the device before the user can log in again on the same device.
Deauthorize Device - Removes the ability for the device to be logged into Sencha Web Application Client, wipes its Sencha Web Application Client data, and logs the user out of the current organization. You must reauthorize the user before the user can log in again on the same device.
The De-authorize prompt changes to Authorize. Note The user continues to have the same group affiliation while unauthorized, and after being reauthorized, regains access to the same apps as previously accessed.
Note: De-authorizing a device removes a device from a user's device quota. If a user's quota is available, a device can be brought back to access Sencha Web Application Client. Without quota, a deauthorized device cannot be returned to service.
Quota depends on the Subscription setting. If your organization has a Team or Workforce subscription, users can have up to 5 devices each; therefore, with these subscriptions, if a user has 4 or fewer devices, you can restore a deauthorized device. If your organization has an Enterprise subscription, users can have any number of devices, so you can always restore a deauthorized device with an Enterprise subscription.
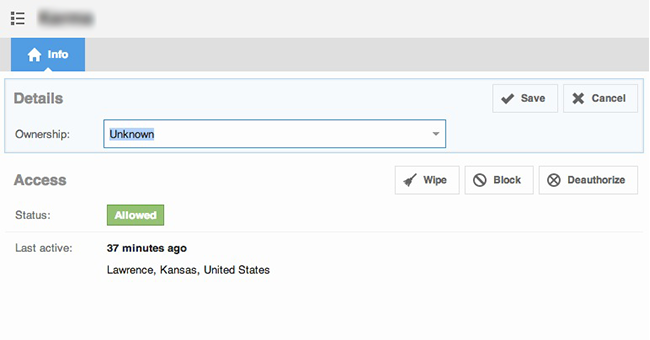
Edit device information to change the ownership, block a device, or wipe (remove) Sencha Web Application Client data from a device.
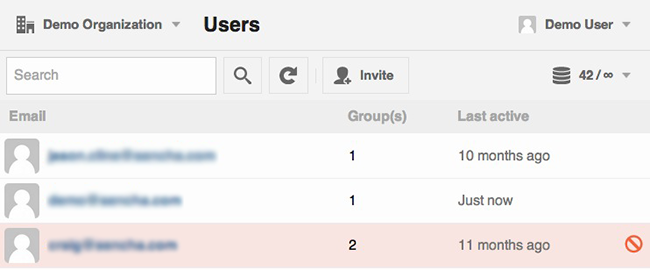
Lists which users can log into Sencha Web Application Client and run applications. You can also use this tab to add users, block users, change a login password, and remove a user.
Note: To give users access to an app, see Add an App to a Group (you need to add an app to a group, and then add the user to the group).
Tasks:
Lists:
Click a user in the Users tab to view information.
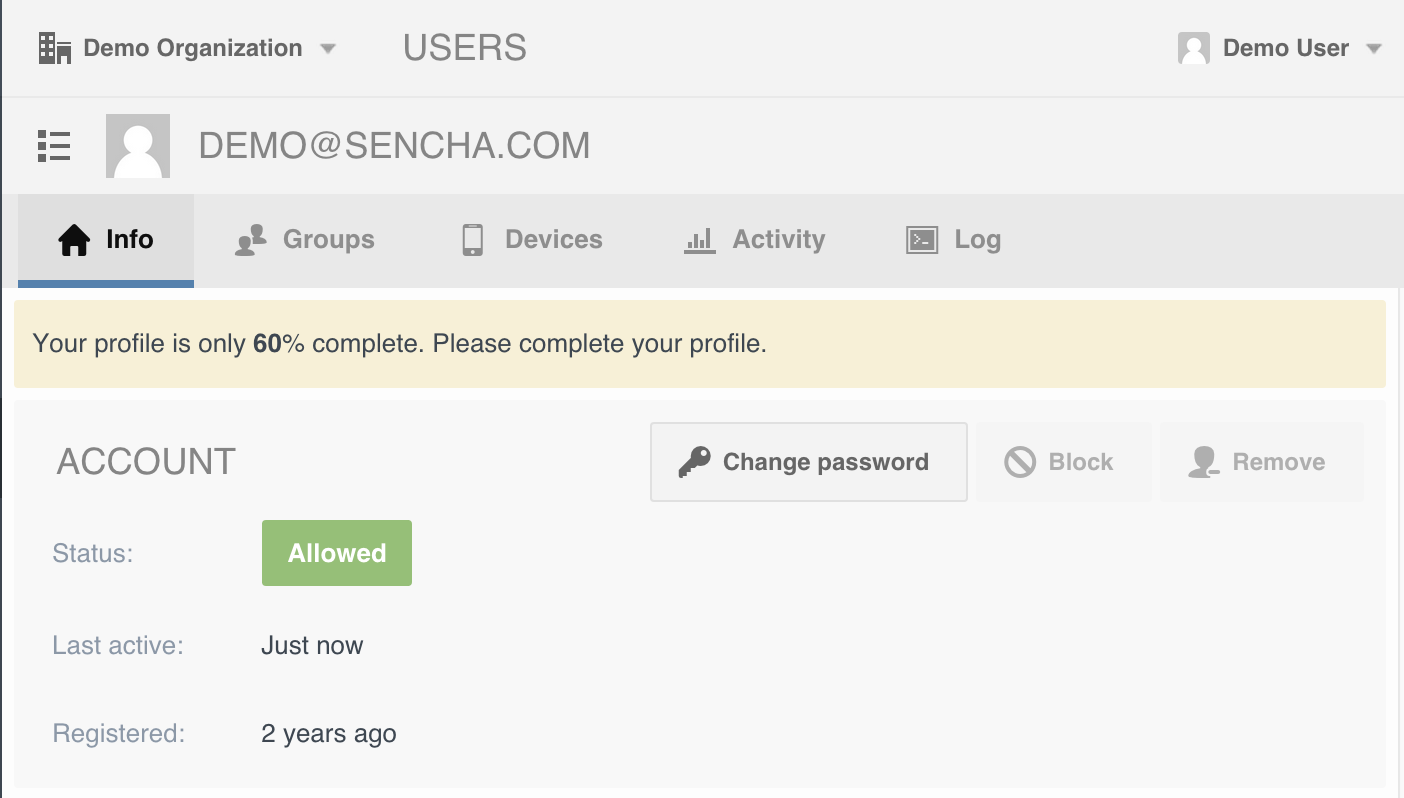
Info tab:
Groups tab:
Devices tab:
Activity tab:
Log tab:
Click the plus icon on the Users tab to invite a user to participate in Sencha Web Application Client. You can add additional users from the Invite Users menu, specifying each address separately and click the plus icon to add the address to the list of invitees.
The users you invite receive an email with information about how to obtain the Client app and how to log into Sencha Web Application Client. The emails are sent from Sencha Web Application Manager as do not reply messages.
To invite a user:

You can invite a user more than once if needed.
To import a list of users:
Sencha Web Application Manager's import tool anticipates a CSV delmited by line breaks. Ensure that your file is structured as follows:
 [email protected]
 [email protected]
 [email protected]
To remove a user:
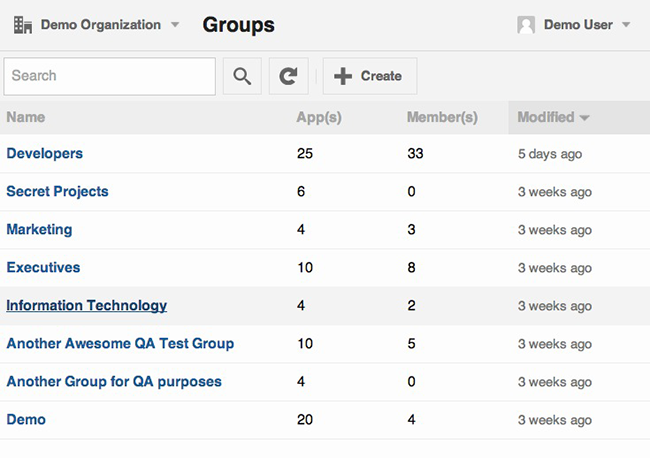
Groups lets you organize users into organizational units, such as support, accounting, management, development, and so on, and assign each group specific apps for their exclusive use.
The Groups tab creates or removes a group. Applications can be associated with a group or a user.
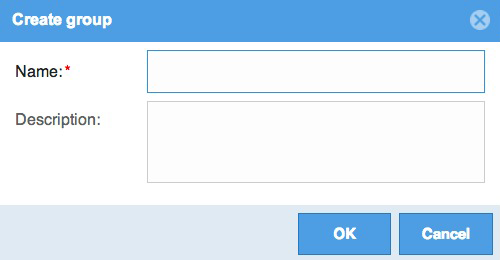
To add a new group:
To give users access to an application, you first add an app to a group, and then add the user to the group.
To add an app to a group:
Click the Groups tab.
Click the group to which you want the user to belong.
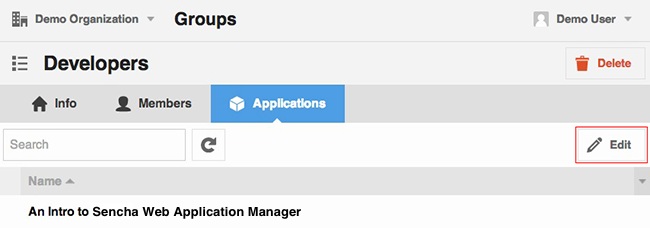
Click the Applications tab and click Edit:
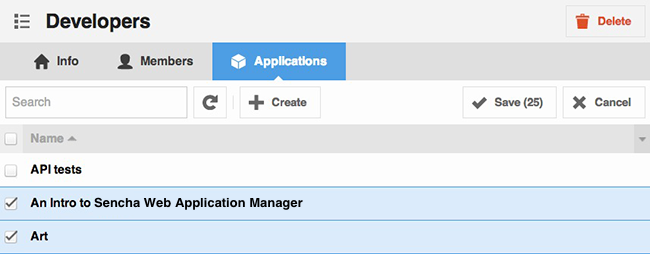
Click Create to add a new application (see Add an App).
Otherwise choose from the existing unchecked applications and check the apps you want for the group and click Save:
Click the the group to which you want to add a user.
Click the Members tab.
Click Edit tab
Click Invite to invite new users, or check the checkbox next to a user's name who is already in Sencha Web Application Manager.
If you choose to add existing users, check one or more users to add to the group:
When finished, click Save.
The VPN Services tab lets you add or change the VPN service provider.
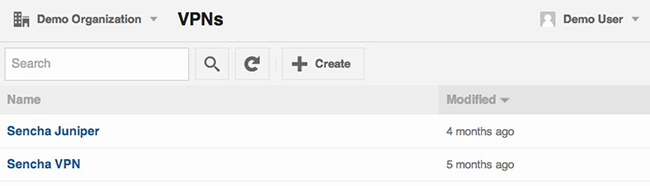
This tab lists:
To add a VPN service:
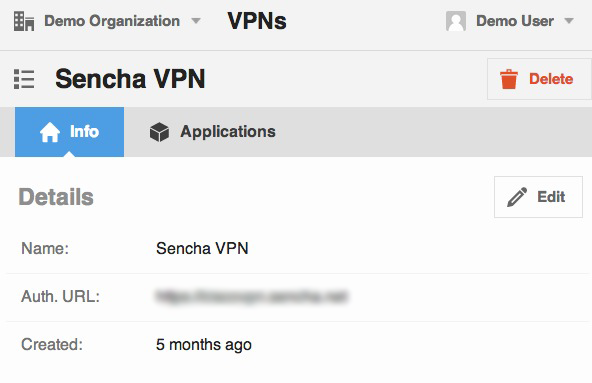
To modify a VPN service:
To add an application to a VPN service:
Provides interactive reports for:
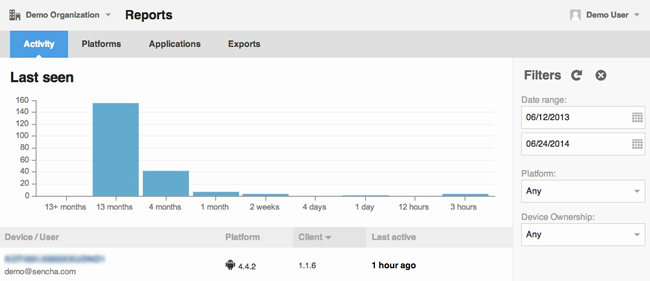
Number of users logging in. Lets you filter by duration, date range, platform OS, and ownership. Also lists recent logins.
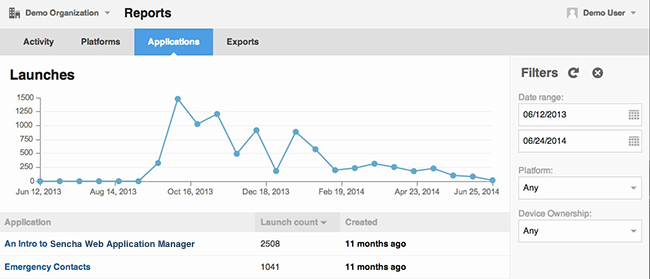
Number of app launches with filters for date range, platform OS, and ownership. Also lists the available apps by usage, with columns for when the app was created (made available to your organization).
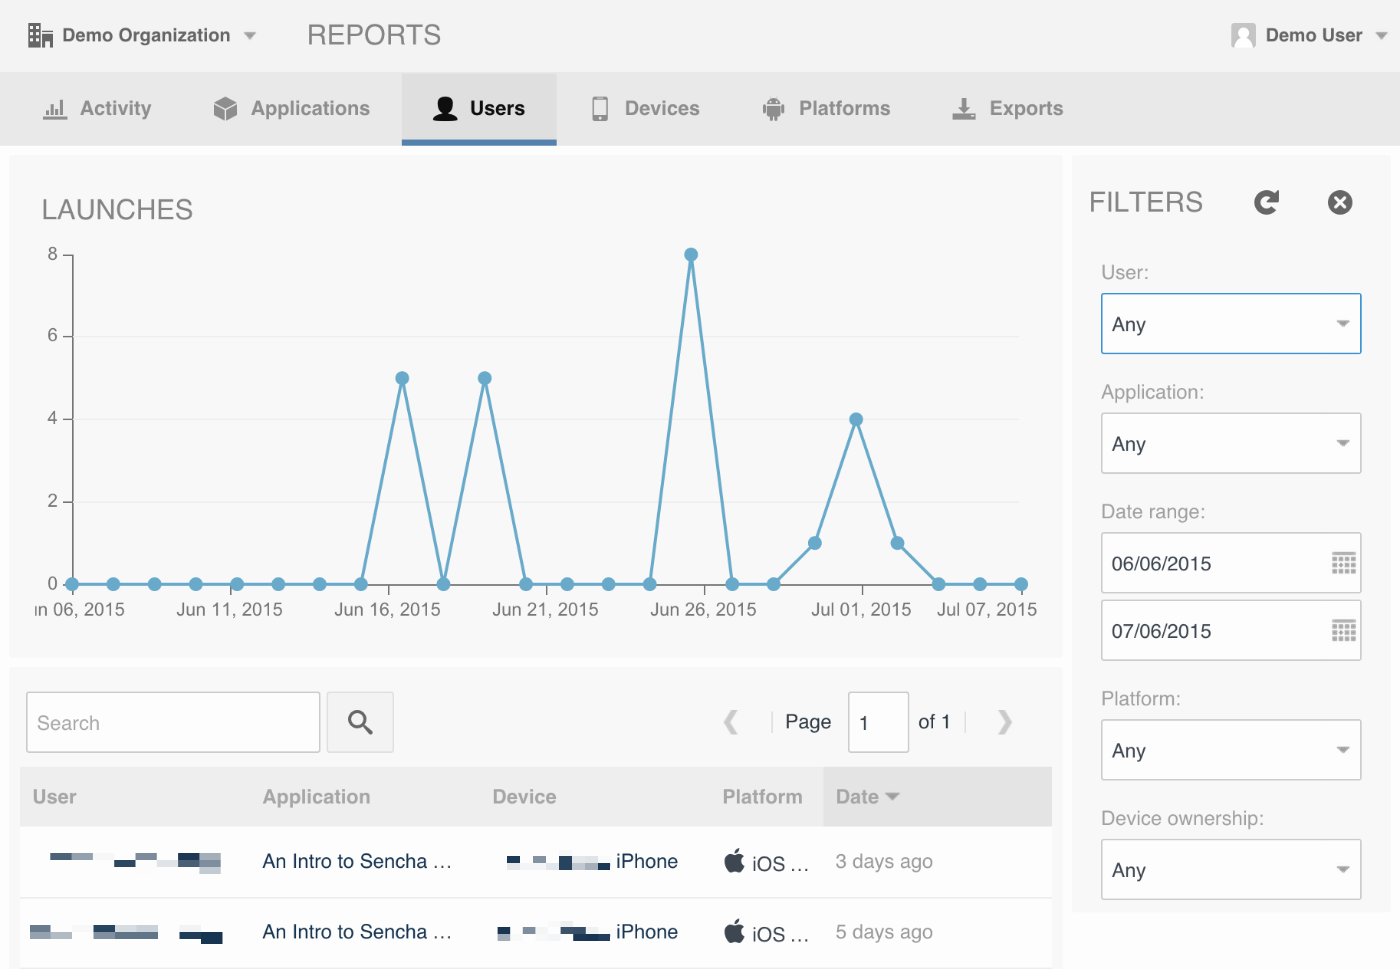
Line chart showing user(s) activity (application launches) over time, along with a grid showing user activity details (launch date, application, device used, etc). Filterable on a per-user basis, with controls for date range, platform OS, and device ownership.
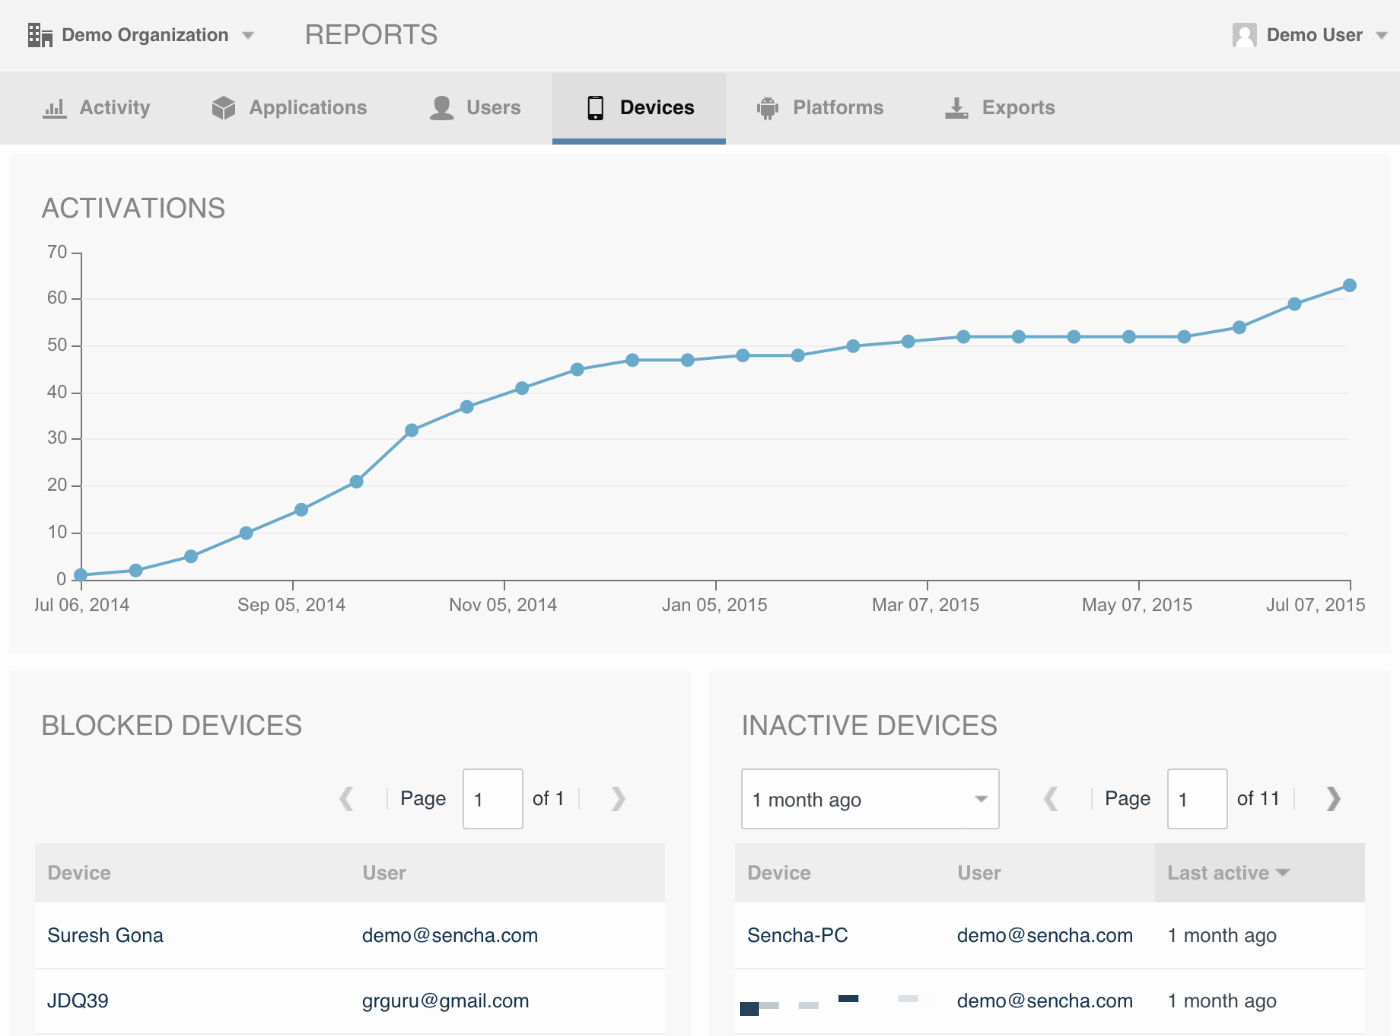
Line chart showing device activiations over time (last year), a list of blocked devices, and a list of inactivate devices modifiable by preset inactivate time periods (1 month, 2 months, 3 months, 6 months, and 1 year).
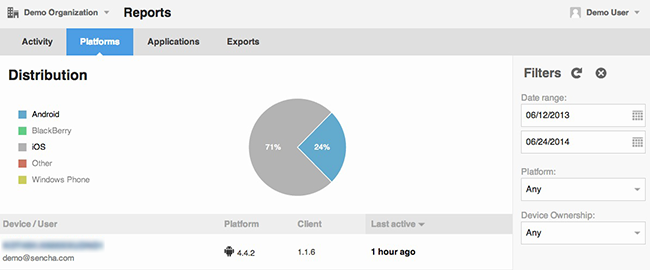
Pie chart by device platform with filters for date range, platform OS, and device ownership. Also lists current devices.
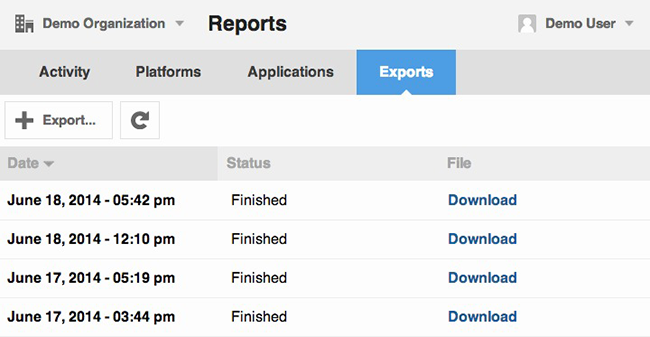
Export a CSV report of all information making up the preceding charts. Once an export has been made, it becomes a historical record and may be re-downloaded in the future.
Lets you change your Sencha Web Application Manager subscription, which depends on how many users, users per device, and apps your organization requires.

To upgrade or downgrade, click Downgrade or Upgrade for the subscription option you require.
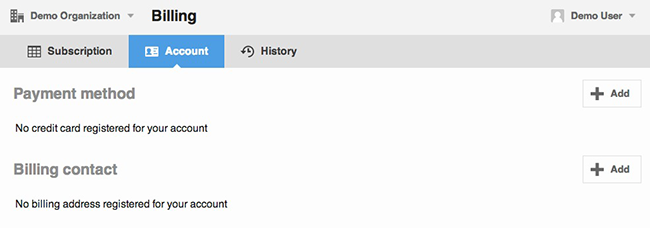
Information about your Sencha Web Application Manager subscription:
The history tab provides a log of all of your account transactions. This log includes:
The Settings section allows you to modify general information, manage your security policy, set authentication requirements, and customize the look and feel of the view.
Settings sections:
Lets you set:
mailto links per the
email method you select. A Native pattern starts with mailto,whereas a Good Enterprise pattern starts with the gdmailto
or ggmailto value.Note: When you change any of the options in the Security Policy, all users are sent a notice when they log in that they need to change their PIN.
Lets you set:
| Value | Description | Example |
|---|---|---|
| None (not recommended) | Users don't use a PIN to access Sencha Web Application Client. Only use this setting during debugging. | - |
| Digits only | Require users to enter a numeric PIN. The numeric keypad appears and only permits values of 0 1 2 3 4 5 6 7 8 9. | 1234 |
| Letters only | Require users to specify a PIN consisting of at least 4 letters. Users see the device's default keyboard. | abcdef |
| Letters and numbers | Require users to enter a PIN consisting of at least 4 letters and numbers. Users see the device's default keyboard. | a1b2c3d4 |
| Letters, numbers, and special characters | Require a secure PIN that has a combination of letters, numbers, and special characters. A PIN must consist of at least 4 characters, have at least one number, letter, and special character, and can be any length. Users see the device's default keyboard. | !MyP1n |
Notes:
Lets you set:
Default group if
it exists. The Default group is automatically created when an organization
is created.
    -----BEGIN CERTIFICATE-----
    Insert your certificate here
    -----END CERTIFICATE-----
The Integrations section under Authentication allows you to import LDIF files in order to quickly add users to your Sencha Web Application organization. LDIF records must contain an email field for our import system to properly map the record to a user. Each record may optionally contain fields for:
Upon clicking the "Import LDIF" button, you will be asked to point to your local LDIF file. You will additionally be asked to help us map your email (required), first name, last name, and group name attributes to fit your naming schemes. For instance, many LDIF records contain a field called "mail" that contains the user's email value. If this is your case, you would add "mail" as the "Email attribute".
Once you confirm your field mappings and file name, you can click "OK" and Sencha Web Application Manager will automatically generate user accounts for the correspoding LDIF records.
The Customize section allows administrators to modify the look and feel of Sencha Web Application Client.
You can read more about customizing Sencha Web Application Manager by reviewing our customization guide.
The API section allows administrators to create, delete, and edit API keys and secrets. These pieces allow applications to utilize the Administration API in addition to application push notifications.
The following issues affect use of Sencha Web Application Client applications and Sencha Web Application Manager:
<!-- BROW-1676 --><!-- BROW-1577 --><!-- BROW-1351 --> <!-- BROW-1761 -->


 Sencha Web Application Manager 6.0.0 | Terms of Use
