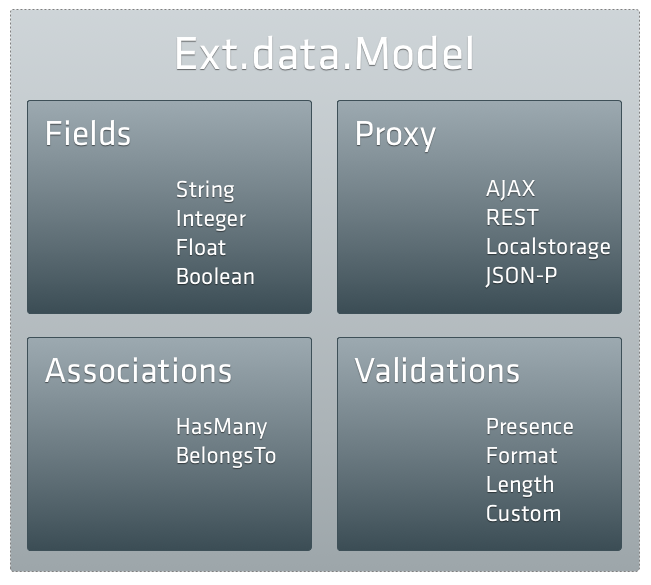
At its simplest, a Model is only a set of fields and their data. In this guide we are going to look at four of the principal parts of Ext.data.Model — Fields, Proxies, Associations and Validations.
The following code sample illustrates the creation of a model:
Ext.define('User', {
    extend: 'Ext.data.Model',
    config: {
        fields: [
            { name: 'id', type: 'int' },
            { name: 'name', type: 'string' }
        ]
    }
});
Using Proxies
Proxies are used by stores to handle the loading and saving of model data. There are two types of proxy: client and server. Examples of client proxies include Memory for storing data in the browser’s memory and Local Storage which uses the HTML 5 local storage feature when available. Server proxies handle the marshaling of data to some remote server, and examples include Ajax, JsonP, and Rest.
Proxies can be defined directly on a model, as shown in the following code sample:
Ext.define('User', {

    extend: 'Ext.data.Model',

    config: {
        fields: ['id', 'name', 'age', 'gender'],
        proxy: {
            type: 'rest',
            url : 'data/users',
            reader: {
                type: 'json',
                root: 'users'
            }
        }
    }
});

// Uses the User Model's Proxy
Ext.create('Ext.data.Store', {
    model: 'User'
});
This way of defining models provides two benefits. First, since it is likely that every store that uses the User model will need to load its data the same way, we avoid duplicating the proxy definition for each store. Second, we can load and save model data without calling a store:
// Gives us a reference to the User class
var User = Ext.ModelMgr.getModel('User');

var ed = Ext.create('User', {
    name: 'Ed Spencer',
    age : 25
});

// We can save Ed directly without having to add him to a Store first because we
// configured a RestProxy which will automatically send a POST request to the url /users
ed.save({
    success: function(ed) {
        console.log("Saved Ed! His ID is "+ ed.getId());
    }
});

// Load User 1 and do something with it (performs a GET request to /users/1)
User.load(1, {
    success: function(user) {
        console.log("Loaded user 1: " + user.get('name'));
    }
});
There are also proxies that take advantage of the new capabilities of HTML5 - LocalStorage and SessionStorage. Although older browsers do not support these new HTML5 APIs, these are so useful that a lot of applications will benefit enormously by using them.
Associations
Models can be linked together using the Associations API. Most applications deal with many different models, and the models are almost always related. A blog authoring application might have models for User, Post, and Comment. Each user creates posts and each post receives comments. We can express those relationships as shown in the following example:
Ext.define('User', {
    extend: 'Ext.data.Model',
    config: {
        fields: ['id', 'name'],
        proxy: {
            type: 'rest',
            url : 'data/users',
            reader: {
                type: 'json',
                root: 'users'
            }
        },

        hasMany: 'Post' // shorthand for { model: 'Post', name: 'posts' }
    }
});

Ext.define('Comment', {
    extend: 'Ext.data.Model',

    config: {
        fields: ['id', 'post_id', 'name', 'message'],
        belongsTo: 'Post'
    }
});

Ext.define('Post', {
    extend: 'Ext.data.Model',

    config: {
        fields: ['id', 'user_id', 'title', 'body'],

        proxy: {
            type: 'rest',
            url : 'data/posts',
            reader: {
                type: 'json',
                root: 'posts'
            }
        },
        belongsTo: 'User',
        hasMany: { model: 'Comment', name: 'comments' }
    }
});
As illustrated by this example, it is easy to express rich relationships between different models in your application. Each model can have any number of associations with other models, and your models can be defined in any order. Once you have a model instance, you can easily traverse the associated data. For example, to log all comments made on each post for a given user, use code as in the following example:
// Loads User with ID 1 and related posts and comments using User's Proxy
User.load(1, {
    success: function(user) {
        console.log("User: " + user.get('name'));

        user.posts().each(function(post) {
            console.log("Comments for post: " + post.get('title'));

            post.comments().each(function(comment) {
                console.log(comment.get('message'));
            });
        });
    }
});
Each of the hasMany associations we created above automatically adds a new function to the Model. We declared that each User model hasMany Posts, which added the user.posts() function used in the snippet above. Calling user.posts() returns a Store configured with the Post model. In turn, the Post model gets a comments() function because of the hasMany Comments association that we have set up.
Associations are not only helpful for loading data, they can also be used for creating new records:
user.posts().add({
    title: 'Ext JS 4.0 MVC Architecture',
    body: 'It\'s a great Idea to structure your Ext JS Applications using the built in MVC Architecture...'
});

user.posts().sync();
In this example we instantiated a new Post, then called sync() to save the new Post via its configured proxy. This is an asynchronous operation to which you can pass a callback, if you want to be notified when the operation completes.
The belongsTo association also generates new methods on the model. The following example shows how to use that functionality:
// get the user reference from the post's belongsTo association
post.getUser(function(user) {
    console.log('Just got the user reference from the post: ' + user.get('name'));
});

// try to change the post's user
post.setUser(100, {
    callback: function(product, operation) {
        if (operation.wasSuccessful()) {
            console.log('Post\'s user was updated');
        } else {
            console.log('Post\'s user could not be updated');
        }
    }
});
Once more, the loading function (getUser) is asynchronous and requires a callback function to get at the user instance. The setUser method then updates the foreign_key (user_id in this case) to 100 and saves the Post model. As usual, you can pass in callbacks that will be triggered when the save operation has completed, whether successfully or not.
Validations
Models have rich support for validating their data. To demonstrate this, we build upon the previous example that illustrated associations. First, let us add some validations to the User model:
Ext.define('User', {
    extend: 'Ext.data.Model',

    config: {
        fields: [
            // ...
        ],

        validations: [
            { type: 'presence',  field: 'name' },
            { type: 'length',    field: 'name', min: 5 },
            { type: 'format',    field: 'age', matcher: /\d+/ },
            { type: 'inclusion', field: 'gender', list: ['male', 'female'] },
            { type: 'exclusion', field: 'name', list: ['admin'] }
        ],

        proxy: [
            // ...
        ]
    }
});
Validations follow the same format as field definitions. In each case, we specify a field and a type of validation. The validations in our example are expecting the name field to be present and to be at least five characters in length, the age field to be a number, the gender field to be either “male” or “female”, and the username to be anything but “admin”. Some validations take additional optional configuration - for example the length validation can take min and max properties, format can take a matcher, and so on. There are five validations built into Sencha Touch, and adding custom rules is easy.
The following validation are built in:
presenceensures that the field has a value. Zero counts as a valid value but empty strings do not.lengthensures that a string has a lenght that is between a minimum and a maximum value. Both constraints are optional.formatensures that a string matches a regular expression format. In the example above we ensure that the age field is a number.inclusionensures that a value is within a specific set of values (for example, we ensure that gender is either male or female).exclusionensures that a value is none of the specific set of values (for example, we could be blacklisting usernames like ‘admin’).
Now that we have an understanding of the different validations, let us use them to validate a User instance. In the following example, we create a user instance and run the validations against it, noting any failures:
// now lets try to create a new user with as many validation errors as we can
var newUser = Ext.create('User', {
    name: 'admin',
    age: 'twenty-nine',
    gender: 'not a valid gender'
});

// run some validation on the new user we just created
var errors = newUser.validate();

console.log('Is User valid?', errors.isValid()); // returns 'false' as there were validation errors
console.log('All Errors:', errors.items); // returns the array of all errors found on this model instance

console.log('Age Errors:', errors.getByField('age')); // returns the errors for the age field
The key function here is validate(), which runs all of the configured validations and returns an errors object. This simple object is a collection of any errors that were found, plus some convenience methods such as isValid(), which returns true if there were no errors on any field, and getByField(), which returns all errors for a given field.