Sencha Touch is optimized for building apps that work across multiple platforms. To make writing apps as simple as possible, we provide a simple but powerful app architecture that leverages the Model View Controller (MVC) pattern. This approach keeps your code clean, testable, and easy to maintain, and provides you with a number of benefits when it comes to writing your apps:
- History Support: Enables you to navigate within your apps using back button support, and access any part of your app that can be linked to
- Deep Linking: Enables you to share deep links that open any screen in your app, just like linking to a web page
- Device Profiles: Enables you to easily customize your app’s UI for phones, tablets, and other devices, while sharing common code
Anatomy of an App
An app is a collection of Models, Views, Controllers, Stores, and Profiles, plus additional metadata for app-related entities, such as application icons and launch screen images.
Note In this guide, Application indicates an instance of Ext.application, whereas application or app is the program you’re coding.
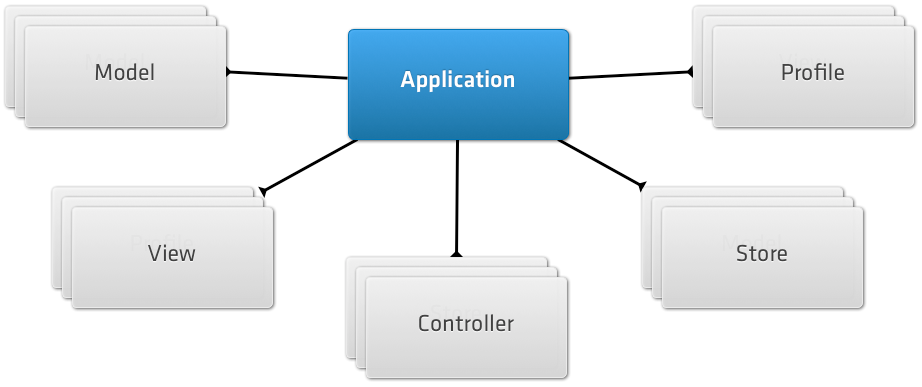
- Models: represent a type of data object in your app - for example an e-commerce app might have models for User, Product, and Order
- Views: are responsible for displaying data to your users and for leveraging the built-in components in Sencha Touch
- Controllers: handle interaction with your application, by listening for user interactions, such as taps and swipes, and taking action accordingly
- Stores: are responsible for loading data into your app and for powering components such as Lists and DataViews
- Profiles: enable you to easily customize your app’s UI for tablets and phones, while sharing as much code as possible
Application is usually the first entity you define in a Sencha Touch app, for example:
Ext.application({
    name: 'MyApp',
    models: ['User', 'Product', 'nested.Order'],
    views: ['OrderList', 'OrderDetail', 'Main'],
    controllers: ['Orders'],

    launch: function() {
        Ext.create('MyApp.view.Main');
    }
});
The name is used to create a single global namespace for your entire app, including all of its models, views, controllers, and other classes. For example, an app called MyApp should have its constituent classes follow the pattern MyApp.model.User, MyApp.controller.Users, MyApp.view.Main, and so on. This keeps the entire app under a single global variable, thus minimizing the chance of other code on the same page conflicting with it.
The app uses the defined models, views and controllers configurations to automatically load these classes into your app. The classes follow a simple file structure convention - models are expected to be in the app/model directory, controllers in the app/controller directory and views inside the app/view directory - for example app/model/User.js, app/controllers/Orders.js and app/view/Main.js.
Note that one of the models we previously specified is different than the others, in the sense that we specified its full class name (“MyApp.model.nested.Order”). We are able to specify the full class name for any of these configurations, if we do not follow the normal naming conventions. See the Dependencies section of the Ext.app.Application docs for details on how to specify custom dependencies.
Controllers
Controllers are the glue that bind an app together. Controllers listen for events fired by the UI and take an action based on the event. Using Controllers helps keep your code clean and readable, and separates the view logic from the control logic.
For example, let’s assume you require users to log in to your app via a login form. The view in this case is the form with all its fields and other controls. A controller should listen to the tap event on the form’s submit button and perform the authentication itself. Anytime we deal with manipulating data or state, the controller should be the class that activates that change, not a view.
Controllers expose a small but powerful set of features, and follow a few simple conventions. Each Controller in your app is a subclass of Ext.app.Controller - although you can subclass existing Controllers, as long as they inherit from Ext.app.Controller at some point. Controllers exist in the MyApp.controller.* namespace. For example, if your app has a Sessions controller, it would be called MyApp.controller.Sessions and would exist in the file, app/controller/Sessions.js.
Although each Controller is a subclass of Ext.app.Controller, each one is instantiated only once by the Application that loaded it. At any time, there is only one instance of each Controller and the set of Controller instances are managed internally by the Application. Using an app’s controllers config (as previously shown) loads all of the Controllers and instantiates them automatically.
A Simple Example
Here is how we might quickly define the Sessions controller we described previously. We are using two Controller configurations:
Refs are an easy way to find Components on your page - in this case the Controller looks for all Components that match the formpanel xtype and assigns the first one found to the loginForm property. We subsequently use that property in the doLogin function.
The second configuration is control. Similar to the ref’s config, this uses a ComponentQuery selector to find all formpanel xtypes that contain a button (for example, this finds the Submit button in our hypothetical login form). Whenever a button of this type fires its tap event, our Controller’s doLogin function is called:
Ext.define('MyApp.controller.Sessions', {
    extend: 'Ext.app.Controller',

    config: {
        refs: {
            loginForm: 'formpanel'
        },
        control: {
            'formpanel button': {
                tap: 'doLogin'
            }
        }
    },

    doLogin: function() {
        var form   = this.getLoginForm(),
            values = form.getValues();

        MyApp.authenticate(values);
    }
});
The doLogin function itself is straightforward. Because we defined a loginForm ref, the Controller automatically generates a getLoginForm function that returns the formpanel that it matches. Once we have that form reference, we pull out its values (username and password) and pass them to an authenticate function. That is mostly what a Controller does - listens for events that fire (usually by the UI) and initiate some action, in this case authenticating.
For more information on Controllers and their capabilities see the controllers guide.
Stores
Stores are an important part of Sencha Touch and power most of the data-bound widgets. At its simplest, a Store is not much more than an array of Model instances. Data-bound Components such as List} and [[touch:Ext.DataView DataView
render one item for each Model instance contained in the Store. As Model instances are added or removed from the Store, events fire, which the data-bound Components listen to and use to update themselves.
See the Stores guide for more information on Stores, how they fit with Components in your app, and specific integration points with your Application instance that you should be aware of.
Device Profiles
Sencha Touch operates across a wide range of devices with differing capabilities and screen sizes. A user interface that works well on a tablet may not work very well on a phone and vice versa, so it makes sense to provide customized views for different device types. However, we do not want to have to write our app multiple times just to provide a different UI, but we would like to share as much code as possible.
Device Profiles are simple classes that enable you to define the different types of devices supported by your app and how they should be handled differently. They are optional, meaning you can develop your app without profiles at first and add them in later, or never use them at all. Each profile simply defines an isActive function that should return true if that profile should be active on the current device, plus a set of additional models, views, and controllers that load if that profile is detected.
To add Profile support to your app, you need to tell your Application about the Profiles and create Ext.app.Profile subclasses for each, for example:
Ext.application({
    name: 'MyApp',
    profiles: ['Phone', 'Tablet']

    // as before
});
By defining the Phone and Tablet profiles, the Application loads the app/profile/Phone.js and app/profile/Tablet.js files. Let’s assume that the tablet version of the app supports additional capabilities, for example managing groups. This example shows how you can define a Tablet profile:
Ext.define('MyApp.profile.Tablet', {
    extend: 'Ext.app.Profile',

    config: {
        controllers: ['Groups'],
        views: ['GroupAdmin'],
        models: ['MyApp.model.Group']
    },

    isActive: function() {
        return Ext.os.is.Tablet;
    }
});
The isActive function returns true whenever the app runs on what Sencha Touch determines to be a tablet. This is a slightly subjective determination because there is a near-continuous spectrum of device shapes and sizes with no clear distinction between phones and tablets. Because there is no secure way to state which devices are tablets and which are phones, Sencha Touch’s Ext.os.is.Tablet is set to true when running on an iPad and false otherwise. If you need more fine-grained control, it is easy to provide any implementation you like inside your isActive function, as long as it returns true or false.
You should ensure that only one of your Profiles returns true from its isActive function. If more than one profile returns true, only the first one is used and the rest are ignored. The first profile that returns true sets the Application’s currentProfile, which you can query at any time.
If the detected currentProfile defines additional models, views, controllers, and stores, these are automatically loaded by the Application, along with all of the models, views and controllers defined on the Application itself. However, all of the dependencies named in the Profile are prepended with the Profile name, unless the fully-qualified class name is provided. For example:
- views: [‘GroupAdmin’] loads app/view/tablet/GroupAdmin.js
- controllers: [‘Groups’] loads app/controller/tablet/Groups.js
- models: [‘MyApp.model.Group’] loads app/model/Group.js
Most of the time, a Profile only defines additional controllers and views, as the models and stores are typically shared between all variants of the app. For a more detailed discussion of Profiles see the device profiles guide.
Launch Process
Each Application can define a launch function, which is called as soon as all of your app’s classes have been loaded and the app is ready to launch. This is usually the best place to place any app startup logic, typically creating the main view structure for your app.
In addition to the Application launch function, there are two other places where you can place app startup logic. First, each Controller is able to define an init function, which is called before the Application launch function. Second, if you are using Device Profiles, each Profile can define a launch function, which is called after the Controller init functions, but before the Application launch function.
Note Only the active Profile has its launch function called - for example if you define profiles for Phone and Tablet and then launch the app on a tablet, only the Tablet Profile’s launch function is called.
The launch order is:
- Controller#init functions called
- Profile#launch function called
- Application#launch function called
- Controller#launch functions called
When using Profiles, it is common to place most of the bootup logic inside the Profile launch function, because each Profile has a different set of views that need to be constructed at startup.
Routing and History Support
Sencha Touch has full Routing and History support. Several of the SDK examples, including the Kitchen Sink application, use history support to enable the back button for easily navigating between screens. This is especially useful on Android devices.
Further Reading
The following guides provide additional information on using the Sencha Touch application architecture: