First Mobile Application
Many classes have shortcut names used when creating (instantiating) a class with a
configuration object. The shortcut name is referred to as an alias (or xtype if the
class extends Ext.Component). The alias/xtype is listed next to the class name of
applicable classes for quick reference.
Framework classes or their members may be specified as private or protected. Else,
the class / member is public. Public, protected, and private are access
descriptors used to convey how and when the class or class member should be used.
Public classes and class members are available for use by any other class or application code and may be relied upon as a stable and persistent within major product versions. Public classes and members may safely be extended via a subclass.
Protected class members are stable public members intended to be used by the
owning class or its subclasses. Protected members may safely be extended via a subclass.
Private classes and class members are used internally by the framework and are not intended to be used by application developers. Private classes and members may change or be omitted from the framework at any time without notice and should not be relied upon in application logic.
static label next to the
method name. *See Static below.Below is an example class member that we can disect to show the syntax of a class member (the lookupComponent method as viewed from the Ext.button.Button class in this case).
Let's look at each part of the member row:
lookupComponent in this example)( item ) in this example)Ext.Component in this case). This may be omitted for methods that do not
return anything other than undefined or may display as multiple possible values
separated by a forward slash / signifying that what is returned may depend on the
results of the method call (i.e. a method may return a Component if a get method calls is
successful or false if unsuccessful which would be displayed as
Ext.Component/Boolean).PROTECTED in
this example - see the Flags section below)Ext.container.Container in this example). The source
class will be displayed as a blue link if the member originates from the current class
and gray if it is inherited from an ancestor or mixed-in class.view source in the example)item : Object in the example).undefined a "Returns" section
will note the type of class or object returned and a description (Ext.Component in the
example)Available since 3.4.0 - not pictured in
the example) just after the member descriptionDefaults to: false)The API documentation uses a number of flags to further commnicate the class member's function and intent. The label may be represented by a text label, an abbreviation, or an icon.
classInstance.method1().method2().etc();false is returned from
an event handler- Indicates a framework class
- A singleton framework class. *See the singleton flag for more information
- A component-type framework class (any class within the Ext JS framework that extends Ext.Component)
- Indicates that the class, member, or guide is new in the currently viewed version
- Indicates a class member of type config
- Indicates a class member of type property
- Indicates a class member of type
method
- Indicates a class member of type event
- Indicates a class member of type
theme variable
- Indicates a class member of type
theme mixin
- Indicates that the class, member, or guide is new in the currently viewed version
Just below the class name on an API doc page is a row of buttons corresponding to the types of members owned by the current class. Each button shows a count of members by type (this count is updated as filters are applied). Clicking the button will navigate you to that member section. Hovering over the member-type button will reveal a popup menu of all members of that type for quick navigation.
Getting and setter methods that correlate to a class config option will show up in the methods section as well as in the configs section of both the API doc and the member-type menus just beneath the config they work with. The getter and setter method documentation will be found in the config row for easy reference.
Your page history is kept in localstorage and displayed (using the available real estate) just below the top title bar. By default, the only search results shown are the pages matching the product / version you're currently viewing. You can expand what is displayed by clicking on the button on the right-hand side of the history bar and choosing the "All" radio option. This will show all recent pages in the history bar for all products / versions.
Within the history config menu you will also see a listing of your recent page visits. The results are filtered by the "Current Product / Version" and "All" radio options. Clicking on the button will clear the history bar as well as the history kept in local storage.
If "All" is selected in the history config menu the checkbox option for "Show product details in the history bar" will be enabled. When checked, the product/version for each historic page will show alongside the page name in the history bar. Hovering the cursor over the page names in the history bar will also show the product/version as a tooltip.
Both API docs and guides can be searched for using the search field at the top of the page.
On API doc pages there is also a filter input field that filters the member rows using the filter string. In addition to filtering by string you can filter the class members by access level, inheritance, and read only. This is done using the checkboxes at the top of the page.
The checkbox at the bottom of the API class navigation tree filters the class list to include or exclude private classes.
Clicking on an empty search field will show your last 10 searches for quick navigation.
Each API doc page (with the exception of Javascript primitives pages) has a menu view of metadata relating to that class. This metadata view will have one or more of the following:
Ext.button.Button class has an alternate class name of Ext.Button). Alternate class
names are commonly maintained for backward compatibility.Runnable examples (Fiddles) are expanded on a page by default. You can collapse and expand example code blocks individually using the arrow on the top-left of the code block. You can also toggle the collapse state of all examples using the toggle button on the top-right of the page. The toggle-all state will be remembered between page loads.
Class members are collapsed on a page by default. You can expand and collapse members using the arrow icon on the left of the member row or globally using the expand / collapse all toggle button top-right.
Viewing the docs on narrower screens or browsers will result in a view optimized for a smaller form factor. The primary differences between the desktop and "mobile" view are:
The class source can be viewed by clicking on the class name at the top of an API doc page. The source for class members can be viewed by clicking on the "view source" link on the right-hand side of the member row.
This guide shows you how to build an example mobile app using the Sencha Touch framework and the Sencha Architect development tool.
In this tutorial, we build the City Bars application, which you can use to find bars near your current position using data from the Yelp API.
This tutorial provides a working mobile application using the Sencha Touch framework, and a basic understanding of how to use Architect to build a mobile app.
An archive of this project and the accompanying CSS file are part of the GitHub examples released with Architect:
.xda file for the
completed project.Notes
The tutorial in this guide provides a skeletal application to help you learn Sencha development tools. We invite you to build out the app further - and, if you do, share your results by posting them to the [Architect forum](http://www.sencha.com/forum/forumdisplay.php?99-Sencha-Architect-Forums).
You must have administrator access to your computer to install the web server portion of this tutorial and to serve your application on your computer.
Refer to the Installation and Set-Up guide for information about installing Architect, installing Java, setting up a web server, creating a project directory, and launching Architect.
Get a Yelp API Key. Register for your free Yelp API key in the Yelp Developer Program. You need to create an account, supply the URL for a publicly available web site, explain how you want to use Yelp's API, and agree to Yelp's Terms of Use. For test purposes, the web site URL can be a top-level domain name like example.com. You need a Yelp API key to load Yelp's data into your application. The Controller section later in this guide describes how to add the Yelp data to your application.
To begin a project:
To start Architect:
Start Architect on your computer and if necessary, register or continue a trial subscription. You may also be informed of an Architect version upgrade.
Click an existing project, or for a new project, click Create New.
Choose your framework: Click Sencha Touch 2.4 at the top of the window.
Choose a project format: Click the Blank Project and click Create.
Familiarize yourself with the areas described in this guide:
| Area | Description | View |
|---|---|---|
| Toolbar | Project actions. Buttons to Create a New Project, Open an Existing Project, Save, Preview, and Build buttons. | 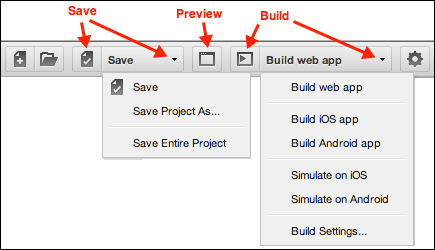 . . |
| Toolbox | Lists Components you can drag to the Canvas or to the Project Inspector. Type the name of a property in the Filter search box to find a component quickly. | 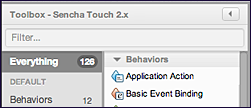 |
| Canvas | Shows the current design or code of a project. | 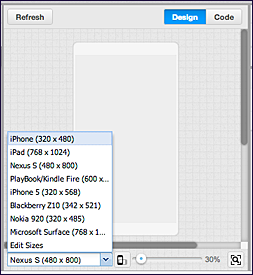 |
| Project Inspector | Lists project classes. The name of this area is sometimes shortened to "Inspector" in other Architect guides. | 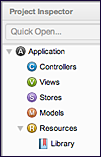 |
| Config | Set values for properties. Type the name of a property in the Filter search box to find a property quickly. | 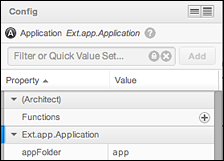 |
The first step in creating an Architect project is to name the application in the Application node.
To name the application:
Click Application in the Project Inspector.
Click the Config tab.
Under Ext.app.Application, change the name from MyApp to CityBars:
name: CityBars
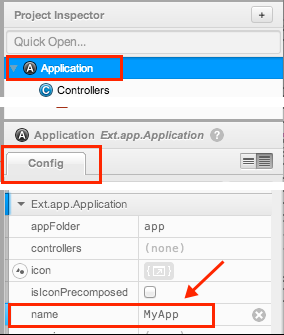
It is traditional to use a camel case name for your application name.
Save your project by clicking Save in the Toolbar.
Architect prompts you for the path to save your project, the name of your application, and the name of your project.
If you are not using the Sencha Cmd web server, the location where you save a project needs to be where your web server can serve your project. If the Save Path location doesn't point to where your web server's directory, click Browse to change directory to the directory you previously created. If you are using the Sencha Cmd web server, you can pick any directory to save your project.
Identify the name of your application, which appears in the namespace for your project. The App Name is not part of the Save path for a project. For more information on how the namespace affects your application, see Working With Classes.
Specify the name of the project directory where you want to store your project. The Project Name value is appended to the Save Path value. Use a meaningful name - this is the name of the directory where Architect stores all the files for the project.
The convention is to use a lowercase version
of the application name you assigned in the previous step
so, in this case, name the folder citybars.
You can use any name you choose for the directory
but this convention makes it easier to
to keep track of what you’re doing.
After specifying the save path, application name, and project name, click Save.
Architect prompts you select a license and enable build tools. Click Enable to develop your project as commercial and to enable build tools. (Commercial can be a free or paid app. The build tools help you save, preview, and build your project.
If you cannot save your application, check the following:
You can view your code at any time from within Architect. Use the Design and Code views above the left edge of the Canvas to toggle between the graphical design display and the code.
After installing Sencha Cmd, start the Sencha Cmd web server from the command line with this command and specify the folder you chose when you saved your project:
sencha fs web start -map <directory_name>
The Sencha Cmd web server serves from
http://localhost:1841/directory_name where directory_name
is the directory specified when you started the
Sencha Cmd web server.
The web server runs exclusively in the command line window until you end the process with CTRL+C.
You can also open an additional command line window and
type sencha fs web stop to stop the web server.
You can preview your project at any time. You can configure settings for previewing now or wait until you have added more to your app.
To preview your project, point Architect to the URL of where your project resides on your computer.
To set the URL prefix, click Settings in the Toolbar:

In the Settings window:
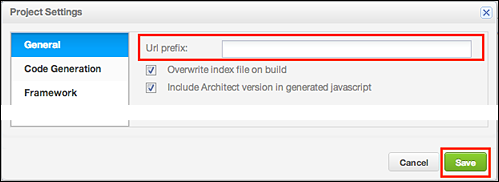
Edit the URL prefix field to point to the directory you created.
The field should contain a URL that looks something like
http://localhost/myprojects/sampleproject1
(replacing myprojects with the folder name you chose if it is something else).
Do this carefully or you won't be able to save your project correctly
or preview it in a browser. If you are using the Sencha Cmd web server, use the
http://localhost:1841/directory_name URL.
Other web servers may use a different port number after
"localhost" or no port number.
You must edit the URL prefix for each new project to save and preview the project correctly.
Construct the visual user interface for the City Bars application.
Click "Views" in the Toolbox to display a list of all the possible views.
In this section, we create a:
To configure Navigation View:
In the Views Toolbox category, select Navigation View.
Drag the Navigation View onto the Canvas.
In Project Inspector > Config, set the following:
userAlias: mainnav
userClassName: MainNav
Click the Save icon on the Toolbar to save your work.
You should save your project frequently.
To configure List View:
Scroll the Toolbox up to the Containers section and drag Container to the Views item in Project Inspector. By dragging the Container to the Project Inspector instead of to the Canvas, the Container becomes a top-level component in the Views:
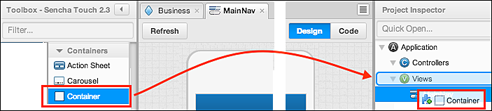
Set the following Config values for the Container:
userAlias: listcontainer
userClassName: ListContainer
layout: fit
Scroll the Toolbox back to the Views category and drag a List view to the ListContainer in the Project Inspector.
Set the following Config value for List:
id: dataList
Double-click the itemTpl item in Project Inspector. ("tpl" is an abbreviation for template.)
Copy the following HTML code and paste it over the existing text
and <div> tags in the Canvas Code view:
<img class="photo" src="{photo_url}" width="40" height="40"/>{name}<br/>
<img src="{rating_img_url_small}"/> <small>{address1}</small>
For more information about the tpl configuration and
templates, see the
Ext.Template
page.
In the Project Inspector, drag the ListContainer
onto the MainNav view.
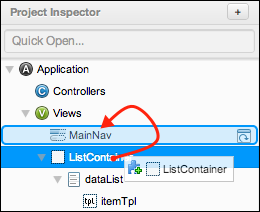
This creates a linked instance of the container
to the MainNav view.
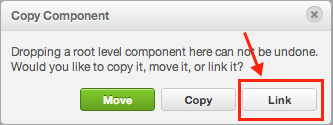
Select the Link option from the Copy Component dialog box:
The Project Inspector shows the container under MainNav:
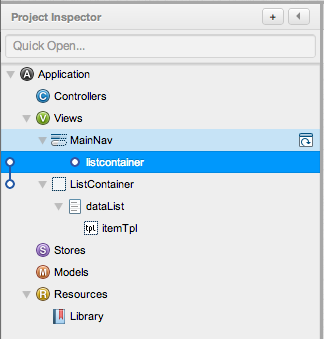
Select the linked instance of the container listcontainer under
MainNav and set the Config value:
title: City Bars
To configure details:
In the Toolbox Filter field, type Tab to locate the Tab Panel container.
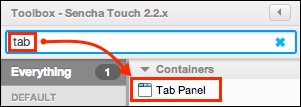
Drag the Tab Panel to the Views item in the Project Inspector so that the Tab Panel is a top-level component:
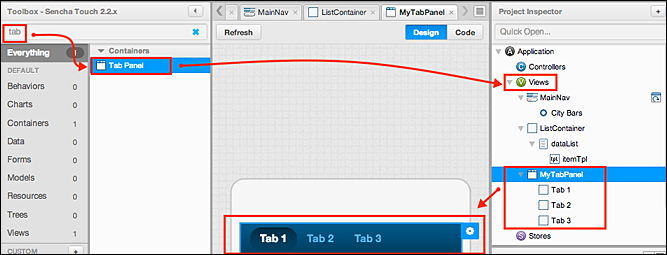
Set the following Config values:
userAlias: detailpanel
userClassName: DetailPanel
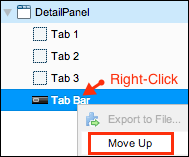
Find the Tab Bar Config property in Config and add a tab bar
under the tab panel (DetailPanel)
by clicking the add button (+).
Move the tab bar above the three tabs by right-clicking it in the Project Inspector and selecting Move Up three times:
Set the following Config values for the Tab Bar:
pack: center
docked: top
ui: light
To configure contacts:
Select Tab 1 in the Project Inspector.
Note: This is a Container (Ext.Container).
Set the following Config values:
id: contact
title: Contact
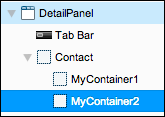
In the Project Inspector, drag Tab 2 and Tab 3 into
the contact container
to make them children of contact.
We are simply reusing containers that otherwise
would be deleted and re-added.
The Project Inspector for the DetailPanel should look like this:
Select MyContainer1 in the Project Inspector and
set the following Config values:
id: info
layout: hbox
padding: 10
tpl: - Click the plus (+) symbol to the right of the
tpl Config item to add a template.
Double-click the tpl item in the Project Inspector and add this code:
<img class="photo" src="{photo_url}" width="100" height="100"/>;
<h2>{name}</h2><div class="info">{address1}<br/>
<img src="{rating_img_url_small}"/></div>
Add a Component as a child of info. Find Component in the
Toolbox and drag it onto the info item in the Project Inspector.
Note: The Component is added as MyComponent
in the Project Inspector.
Set the following Config values:
id: photo
height: 100
width: 100
tpl: - Click the plus (+) symbol to the right of the
tpl Config item to add a template.
Double-click the tpl item in the Project Inspector and add this code:
<img class="photo" src="{photo_url}" width="100" height="100"/>
Add a second Component as a child of info and
set the following Config values:
id: data
padding: 10
tpl: - Click the plus (+) symbol to the right of the
tpl Config item to add a template.
Double-click the tpl item in the Project Inspector and add this code:
<h2>{name}</h2><div class="info">{address1}<br/>
<img src="{rating_img_url_small}"/></div>
Select MyContainer2 under the contact Container
and set the following Config values:
layout: hbox
pack: center
Add a Button to MyContainer2,
and set the button's Config values as follows:
text: Call
width: 100
Add a Spacer to MyContainer2 and
set the Spacer's Config value to:
width: 57
Add another Button to MyContainer2, and set the
button's Config values to:
text: More
width: 100
In this tutorial, we set up the buttons, but do not assign functionality to them. You are invited to add functionality to the buttons; if you do, please share your results on the Architect forum.
To configure the map tab:
Add a Map to the DetailPanel as a
sibling to contact
and set these Config values:
id: detailMap
title: Map
height: Be sure this remains unset
Now that we have defined views for the application, we need to provide some data to display in those views. The controller queries the Yelp database and creates a store, which in this case is a JSONP file that contains the relevant information. The model defines how this data is represented by your application.
First, we add a model to represent the data objects used in the application; think of it as sort of a schema definition for the data.
To add and configure a model:
In the Project Inspector, click the plus (+) sign and click Model:

The model appears as MyModel.
Set this Config value for MyModel:
userClassName: Business
Note: You can create several of the fields at once
by supplying a comma-separated list of fields rather
than adding them individually.
See Stores and Models
for more information.
Click the plus (+) sign for the fields Config item and add these fields to the model - you can copy the names here and paste them into the fields edit box:
id, name, latitude, longitude, address1, address2, address3, phone, city, state_code, zip, mobile_url, rating_img_url_small, photo_url
Individually, these fields are:
idnamelatitudelongitudeaddress1address2address3phonecitystate_codezipmobile_urlrating_img_url_smallphoto_urlNote: In this case, the model contains a number of fields that we are not using. You can extend this application later to use the fields we don't currently use.
For a simple application like this one, using a model rather than just directly accessing the data in the store may seem cumbersome but in real applications, the model supports the following and offers powerful ways to manage data within the application:
<ul>
    <li><b>Associations:</b> BelongsTo or HasMany</li>
    <li><b>ID Generators:</b> Sequential or UUID</li>
    <li><b>Proxies:</b> AJAX, Direct, REST, and so forth</li>
    <li><b>Validations:</b> Exclusion/Inclusion, Format, Length, etc</li>
</ul
The Store is a file that serves as a client-side data cache for the UI components. In this case, we are using a JSONP store, which is similar to a JSON store, but it can retrieve JSON data from a domain other than the one in which your application is running.
For more detail, see the Touch API documentation for Ext.data.JsonP.
You can also create array stores, XML stores, and tree stores.
To configure a store:
Click the Project Inspector (+) symbol and click Store > JsonP Store:
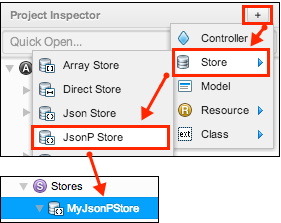 The JsonP Store appears in Project Inspector as
 MyJsonPStore.Set the MyJsonPStore Config values as follows:
userClassName: BusinessStore
storeId: BusinessStore
model: Business
Note: The Store's model: Business value associates the
Store with the Models > Business > userClassName value.
Until you set the model value, the JsonP Store displays a red warning
indicator:

The Store model and Model userClassName
values must be identical
and they are case sensitive. One of the most common mistakes
is having different names for these values.
Select MyJsonReader in the Inspector
and set its rootProperty Config to businesses.
Note A JsonP store is automatically configured with the Touch Ext.data.reader.Json and Ext.data.proxy.JsonP.
A controller implements the actual functionality for the app; in this case, it queries the Yelp database for a list of bars with their locations and saves that information in the JSONP store that we defined in the previous The Store section.
Important You need to first register for a Yelp API key before you can complete the steps in this section. For more information, see Step 4 in the Preliminary Steps section earlier in this guide.
To add a controller:
In the Project Inspector, click the plus (+) symbol and
click Controller - The new Controller appears in the Project
Inspector as MyController:

Rename MyController to Business by setting its
Config value:
userClassName: Business
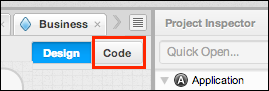
On the Canvas, click Code:
In the Project Inspector, click the plus (+) Add symbol for the Config launch value:
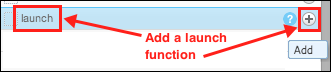
Click the launch Select icon to add text:

Insert the following code in the launch Code view to get the user's current location, use Yelp to get businesses, and display the list of bars:
    var me = this;

    Ext.Viewport.setMasked({ message: 'Loading...' });
    // Get the user's location
    me.getLocation(function (location) {

        // Use Yelp to get the business names
        me.getBusinesses(location, function (store) {

            // Bind data to the list and display it
            me.getDataList().setStore(store);

            Ext.Viewport.setMasked(false);
        });
    });
Add four controller references:
In the Project Inspector, click Business.
In Config, find References.
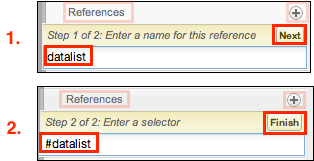
Click the plus (+) Add symbol for References to add the first controller reference.
Type the name as dataList, click Next,
type the Selector as #dataList and
click Finish:
Add three additional controller references using the same technique, as follows:
Name the second reference listCard and set its
selector to #listCard.
Name the third reference mainNav and set its
selector to mainnav.
Name the fourth reference detailCard and set its
selector to detailpanel.
Note: The first two references use an ID to
query - #listCard -
and the last two use an alias - mainnav.
In Project Inspector with the Business controller selected, add a function:
Locate Functions in Config and click the (+) icon.
Set its Config values:
Function: getLocation
Parameters: callback
Double-click the getLocation function in the Project Inspector, and insert the following code into the code editor:
    if (navigator && navigator.geolocation) {
        navigator.geolocation.getCurrentPosition(function(position) {
            callback(position);
        }, function(error) {
            // Handle the error
        });
    }
Add another function and set the Config values--double-click Business to return the Config values to where they can be set:
Function: getBusinesses
Parameters: location, callback
Double-click the getBusinesses function in the Inspector, and insert the following code into the code editor. This code obtains data for your app from Yelp - Insert your Yelp API key in the yelpKey = '' statement in this code:
    // Note: Obtain a Yelp API key by registering (for free)
    // with Yelp at http://www.yelp.com/developers
    // (in this app, we use the Review Search API v1.0)
    var store = Ext.data.StoreManager.lookup('BusinessStore'),
        yelpKey = '', // Enter your Yelp API key here
        url = 'http://api.yelp.com/business_review_search' +
        '?ywsid=' + yelpKey +
        '&term=Bars' +
        '&lat=' + location.coords.latitude +
        '&long=' + location.coords.longitude;
    store.getProxy().setUrl(url);
    store.load(function() {
        callback(store);
    });
Note If you don't have a Yelp API key, register (for free) with Yelp.
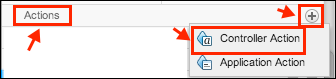
Add an Action to the controller to display the DetailPanel
when the user taps an item in the main list.
In the Project Inspector, click the Business controller.
In Config, click the Actions (+) symbol, and
click Controller Action:
In Config for the Controller Action, choose from the drop-down lists:
Target type: Ext.dataview.List
Event by name: itemtap
In Config, click the arrow to the right of the itemTap Action, or in the Project Inspector, double-click the itemtap onListItemTap Action, and enter these Config values:
controlQuery: #dataList
fn: onListItemTap
In Project Inspector, double-click the itemtap onListItemTap Action to open the code editor and add the following code:
    var map,
        info,
        details;

    if (record) {
        details = Ext.create('CityBars.view.DetailPanel', {
            title: 'Details'
        });

        // stash info for later use by the map card
        map = details.child('#detailMap');
        map._record = record;

        // set the info
        info = details.child('#contact').child('#info');
        info.child('#photo').setData(record.data);
        info.child('#data').setData(record.data);

        this.getMainNav().push(details);
    }
Add another Controller Action to the Business Controller to center
the map on the correct location when a user touches the Map tab.
In Config, click the (+) icon for Actions, and click Controller Action:
In Config, select these values from the drop-down menus:
Target type: Ext.Map
Event by name: activate
Click the activate action's arrow, or in Project Inspector, double-click the activate action, and set these Config values:
controlQuery: detailpanel > map
fn: onMapActivate
In Project Inspector, double-click the
activate onMapActivate action
to open the code editor and add the following code:
    var map = newActiveItem,
       record = map._record,
       lat = record.get('latitude'),
       lng = record.get('longitude'),
       centerMap = Ext.Function.createDelayed(function() {
           map.setMapOptions({
               zoom: 18
           });
           map.setMapCenter({
               latitude: lat,
               longitude: lng
           });
       }, 250),
       geocoder, loc;
    if (lat && lng) {
       centerMap();
    } else {
       geocoder = this._geocoder || (this._geocoder = new google.maps.Geocoder());
       geocoder.geocode(
           {address: [
               record.get('address1'),
               record.get('address2'),
               record.get('address3'),
               record.get('city'),
               record.get('state_code'),
               record.get('zip')
           ].join(', ')},
           function(results, status) {
               if (status == google.maps.GeocoderStatus.OK) {
                   loc = results[0].geometry.location;
                   lat = loc.lat();
                   lng = loc.lng();
                   record.set('latitude', lat);
                   record.set('longitude', lng);
                   centerMap();
               } else {
                   Ext.Msg.alert("Could not find location: " + status);
               }
           }
       );
    }
An important concept to grasp is that the view never calls the controller to invoke methods. Instead, the view generates an event and the controller responds to that event. After you build a view, you associate it with a controller by using a controller action that is set using the Config panel.
For more information, see Controllers.
To improve the look of the app, giving it an attractive theme, you need to add a style sheet.
To add a style sheet:
In the Project Inspector, click the add button (+) and choose Resource > CSS Resource. The Resources node displays a new CSS resource:
Select it there and set its url Config to
citybars.css.
Download the citybars.css.
Place the citybars.css file in the citybars folder
you set up at the beginning of the project to store your app.
Optionally, you can create a styles directory within the folder
and set the url config to styles/styles.css.
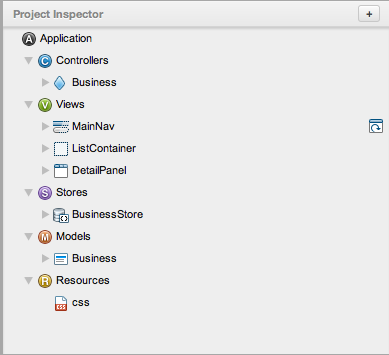
View the application in the Inspector and be sure it now has the following:
Models: Business
Store: BusinessStore
Views: MainNav, ListContainer, DetailPanel
Save your project.
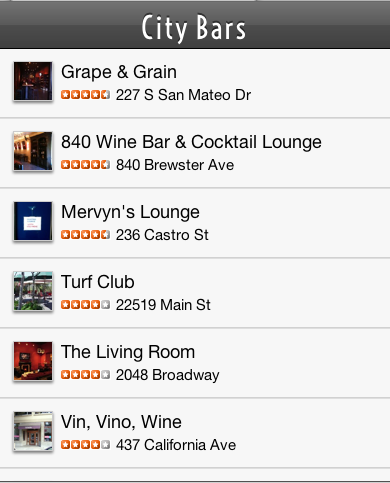
If you have not done so already, Point Architect to the URL of your web server, and open the app.html file for your project.
Here's what it should look like.
You can also deploy the project to a hosted location and view it there. You can then navigate using your browser to view the application. Chrome should work fine, or view it through a WebKit browser on a mobile device.
If the app does not work, check the following:
Ensure you are using Chrome or Safari, or if working from a mobile device, Chrome, Safari, or Windows Explorer 10 or later.
Be sure that you have your own Yelp API key and code it into the Controller of your application.
Check for typos in the userAlias and userClassName configurations for the views you defined and the code that calls them.
Check that the item IDs are set correctly.
Architect protects you against many common typos you can make in JavaScript such as missing semicolons but look carefully at what you typed.
You can also download the completed project from the City Bars code site at https://github.com/SenchaArchitect/CityBars and see where your code differs to find the problem.
Additional steps are required to build and package your application for production. See Save, Preview, and Build for more information.


 Architect | Terms of Use
