Quickstart: Create your first test
Many classes have shortcut names used when creating (instantiating) a class with a
configuration object. The shortcut name is referred to as an alias (or xtype if the
class extends Ext.Component). The alias/xtype is listed next to the class name of
applicable classes for quick reference.
Framework classes or their members may be specified as private or protected. Else,
the class / member is public. Public, protected, and private are access
descriptors used to convey how and when the class or class member should be used.
Public classes and class members are available for use by any other class or application code and may be relied upon as a stable and persistent within major product versions. Public classes and members may safely be extended via a subclass.
Protected class members are stable public members intended to be used by the
owning class or its subclasses. Protected members may safely be extended via a subclass.
Private classes and class members are used internally by the framework and are not intended to be used by application developers. Private classes and members may change or be omitted from the framework at any time without notice and should not be relied upon in application logic.
static label next to the
method name. *See Static below.Below is an example class member that we can disect to show the syntax of a class member (the lookupComponent method as viewed from the Ext.button.Button class in this case).
Let's look at each part of the member row:
lookupComponent in this example)( item ) in this example)Ext.Component in this case). This may be omitted for methods that do not
return anything other than undefined or may display as multiple possible values
separated by a forward slash / signifying that what is returned may depend on the
results of the method call (i.e. a method may return a Component if a get method calls is
successful or false if unsuccessful which would be displayed as
Ext.Component/Boolean).PROTECTED in
this example - see the Flags section below)Ext.container.Container in this example). The source
class will be displayed as a blue link if the member originates from the current class
and gray if it is inherited from an ancestor or mixed-in class.view source in the example)item : Object in the example).undefined a "Returns" section
will note the type of class or object returned and a description (Ext.Component in the
example)Available since 3.4.0 - not pictured in
the example) just after the member descriptionDefaults to: false)The API documentation uses a number of flags to further commnicate the class member's function and intent. The label may be represented by a text label, an abbreviation, or an icon.
classInstance.method1().method2().etc();false is returned from
an event handler- Indicates a framework class
- A singleton framework class. *See the singleton flag for more information
- A component-type framework class (any class within the Ext JS framework that extends Ext.Component)
- Indicates that the class, member, or guide is new in the currently viewed version
- Indicates a class member of type config
- Indicates a class member of type property
- Indicates a class member of type
method
- Indicates a class member of type event
- Indicates a class member of type
theme variable
- Indicates a class member of type
theme mixin
- Indicates that the class, member, or guide is new in the currently viewed version
Just below the class name on an API doc page is a row of buttons corresponding to the types of members owned by the current class. Each button shows a count of members by type (this count is updated as filters are applied). Clicking the button will navigate you to that member section. Hovering over the member-type button will reveal a popup menu of all members of that type for quick navigation.
Getting and setter methods that correlate to a class config option will show up in the methods section as well as in the configs section of both the API doc and the member-type menus just beneath the config they work with. The getter and setter method documentation will be found in the config row for easy reference.
Your page history is kept in localstorage and displayed (using the available real estate) just below the top title bar. By default, the only search results shown are the pages matching the product / version you're currently viewing. You can expand what is displayed by clicking on the button on the right-hand side of the history bar and choosing the "All" radio option. This will show all recent pages in the history bar for all products / versions.
Within the history config menu you will also see a listing of your recent page visits. The results are filtered by the "Current Product / Version" and "All" radio options. Clicking on the button will clear the history bar as well as the history kept in local storage.
If "All" is selected in the history config menu the checkbox option for "Show product details in the history bar" will be enabled. When checked, the product/version for each historic page will show alongside the page name in the history bar. Hovering the cursor over the page names in the history bar will also show the product/version as a tooltip.
Both API docs and guides can be searched for using the search field at the top of the page.
On API doc pages there is also a filter input field that filters the member rows using the filter string. In addition to filtering by string you can filter the class members by access level, inheritance, and read only. This is done using the checkboxes at the top of the page.
The checkbox at the bottom of the API class navigation tree filters the class list to include or exclude private classes.
Clicking on an empty search field will show your last 10 searches for quick navigation.
Each API doc page (with the exception of Javascript primitives pages) has a menu view of metadata relating to that class. This metadata view will have one or more of the following:
Ext.button.Button class has an alternate class name of Ext.Button). Alternate class
names are commonly maintained for backward compatibility.Runnable examples (Fiddles) are expanded on a page by default. You can collapse and expand example code blocks individually using the arrow on the top-left of the code block. You can also toggle the collapse state of all examples using the toggle button on the top-right of the page. The toggle-all state will be remembered between page loads.
Class members are collapsed on a page by default. You can expand and collapse members using the arrow icon on the left of the member row or globally using the expand / collapse all toggle button top-right.
Viewing the docs on narrower screens or browsers will result in a view optimized for a smaller form factor. The primary differences between the desktop and "mobile" view are:
The class source can be viewed by clicking on the class name at the top of an API doc page. The source for class members can be viewed by clicking on the "view source" link on the right-hand side of the member row.
This tutorial helps you to create your first UI test with Sencha WebTestIt. You are going to automate parts of our Demoshop example step by step and you can create all the source files by following this tutorial:
The resources for this tutorial are available in TypeScript, Java, and Python.
Follow these instructions if you have not created a new project yet:
Click the New Project link on the Welcome tab, or go to File > New Project.
In the Create new project dialog, specify a name and a location for your project, then select the scripting language you would like to use.
After clicking Save Sencha WebTestIt creates your project and set up the required components to run a test.
Note
Your choice of programming language defines the automation framework being set up for you. If you select TypeScript, Sencha WebTestIt generates a Protractor environment for you. If you select Java instead, a TestNg application is set up. If you choose Python, Sencha WebTestIt generates unittest environment.
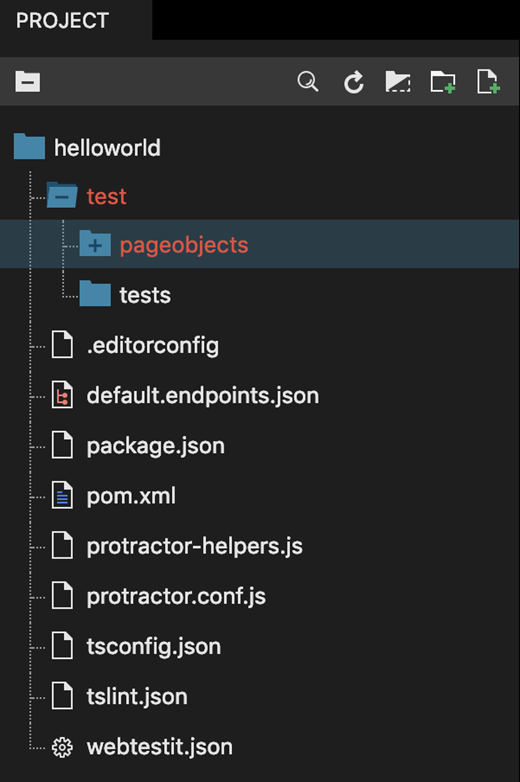
You can inspect your newly generated project’s structure in the Project tab. Sencha WebTestIt automatically created folders for your test suite and Page Objects. The files you can see in the project’s root directory are used for configuring your test and setting up your environment to run it. Noteworthy config files in the project are the following:
| Filename | Description |
|---|---|
.editorconfig |
Contains code-style settings for the Sencha WebTestIt code editor. Learn more about the editorconfig settings here |
*.endpoints.json |
Stores information about the endpoints that will execute your test. Click here to read more about endpoints |
webtestit.json |
Contains project specific options for Sencha WebTestIt test projects. All settings defined here are scoped to a single project as opposed to global settings, which you can access via the main menu File > Preferences > User Settings |
In this tutorial, we are going to automate the Demoshop. You can find it here. Go right ahead and have a look at it.
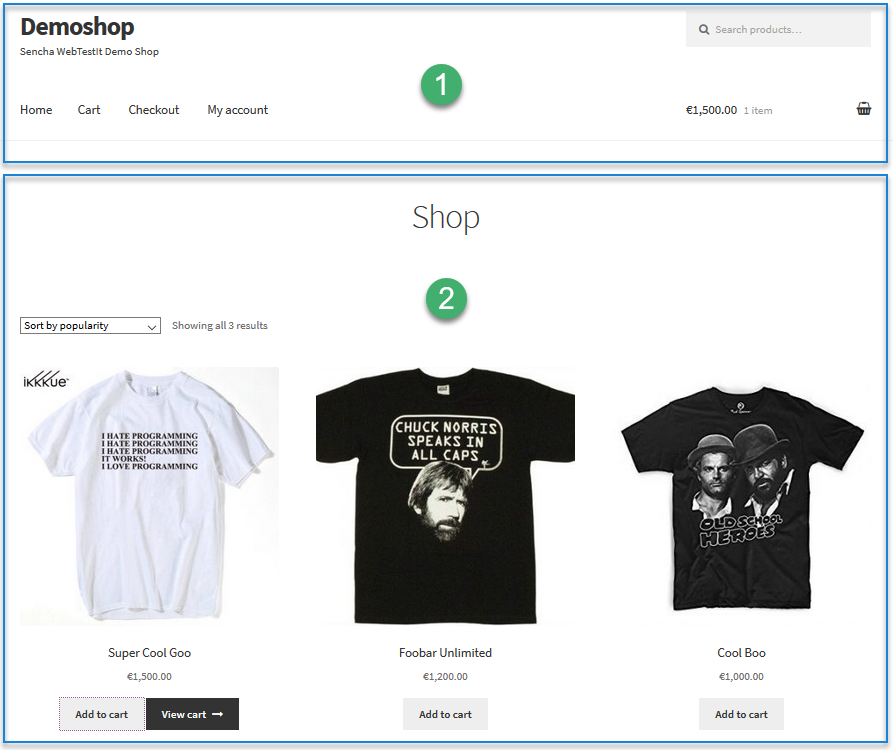
The main page of the Demoshop consists of different parts:
1 The header area with the menu and the search field
2 The content area with the products listed
The Demoshop contains various other pages. For this tutorial, search for a product and add it to the cart. Let’s create some test cases, which we will then automate:
| # | Title | Description |
|---|---|---|
| 1 | Search for an item | GIVEN the Demoshop is displayed WHEN the user enters "Super" as the search item and hits Enter THEN the detail page for "Super Cool Goo" is displayed And the product name equals "Super Cool Goo" And the price equals €1,500.00 |
| 2 | Add an item to the cart | GIVEN the detail page for "Super Cool Goo" is displayed WHEN the user clicks the "Add to cart" button THEN a confirmation message is displayed And the item counter displays 1 And the Subtotal in the cart area equals the product's price |
Hint
The test case description uses Gherkin syntax. It is a simple method of defining test cases. Every statement contains these three keywords:
- GIVEN describes the current state, also known as the precondition
- WHEN describes the user’s actions
- THEN describes the result of those actions, also known as assertions
The combination of those keywords is called a scenario. You can use logical operators (and/or) to link multiple statements in any of the blocks to create more complex scenarios.
When designing the test case, you only describe the expected behavior of the application. Any deviation from this is unexpected and therefore treated as a test failure.
Now, let’s automate these test cases using Sencha WebTestIt!
To access all the elements needed for the test cases you need to create selectors for them. Selectors are organized into Page Objects. You can read more about selectors here.
Since you do not have any Page Object files yet, you need to create one:
Page Objects not only contain selectors, but also the simulated user inputs. In fact, it is highly recommended to expose only the Page Object actions to the individual test cases. This is called the Page Object Pattern and described here.
Click New Page Object file inside the project tree toolbar. Sencha WebTestIt creates a new file in the pageobjects folder of your project and prompt you to name it.
Alternatively, right-click the pageobjects folder and create the file via the context-menu. Name the file, useHeaderPo.tsif you are using TypeScript, HeaderPo.java if you using Java, and if you are using Python, you need to use snake case (an underscore character and no spaces between characters), so the Page Object name should be header_po.py.
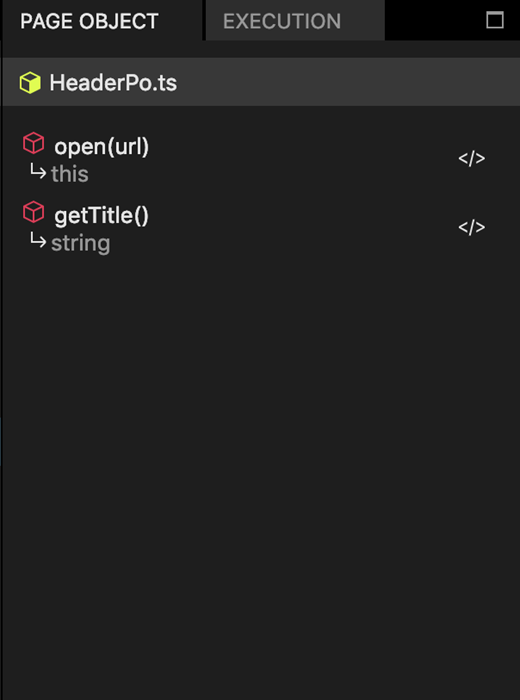
The newly created file comes with two default functions open and getTitle. The Page Object contains all the selectors and actions you need in the header of the Demoshop.
Reference
For better maintainable tests it’s crucial to analyze your website’s or app’s structure and compartmentalize it into Page Objects. You can read more about Page Objects in Chapter 3 of this guide
Now, create another Page Object for the detail page, following these steps:
pageobjects folder in the Project tab and select New > Page Object File from the context menu.DetailPagePo.ts if you are using TypeScript or DetailPagePo.java if you are using Java.
Again, since we use snake case in Python, name new Page Object detail_page_po.py.With all your selectors set up, you can now write some actions that the automation framework is going to execute.
Let’s start by searching for our t-shirt. In the real world, a user would click the search input and enter a search term. Remember that test automation is essentially simulating the user. That’s why you are going to do exactly the same.
HeaderPo (header_po) file from your project’s pageobjects folder.searchInput (_search_input) into the Code tab.insertSearchText (insert_search_text in Python).The generated method is a simple construct to quickly get started and save on the amount of code you have to write.
After sending the text, start the search by clicking the ENTER key. To do so, Sencha WebTestIt adds the sendKeys (send_keys) parameter to the method automatically. Your code should look like this:
public void insertSearchText(String text) {
  this.wait.until(ExpectedConditions.visibilityOfElementLocated(this.searchInput)).sendKeys(text, Keys.RETURN);
}
def insert_search_text(self, text):
    self.wait.until(EC.visibility_of_element_located(self._search_input)).send_keys(text)

    return self
public async insertSearchText(text: string): Promise {
  await browser.wait(ExpectedConditions.visibilityOf(element(this.searchInput)), browser.allScriptsTimeout, this.searchInput.toString());
  await element(this.searchInput).sendKeys(text, Key.ENTER);

  return this;
}
Generated Page Object actions are created from templates. You can customize the templates according to your website’s or application’s requirements. Read more about Customizing your templates in Chapter 3 of this guide.
From the remaining elements within the HeaderPo Page Object you want to get the text. Repeat the above actions, but this time use the option Get element’s text in the popup menu and return the text string, or copy the source code below to do so.
public String getCartAmount() {
  return this.wait.until(ExpectedConditions.visibilityOfElementLocated(this.cartAmount)).getText();
}

public String getCartCount() {
  return this.wait.until(ExpectedConditions.visibilityOfElementLocated(this.cartCount)).getText();
}
def get_cart_amount(self):
    cart_count_count = self.wait.until(EC.visibility_of_element_located(self._cart_count)).text

    return cart_count_count

def get_cart_count(self):
    cart_count_text = self.wait.until(EC.visibility_of_element_located(self._cart_count)).text

    return cart_count_text
public async getCartAmount(): Promise {
  await browser.wait(ExpectedConditions.visibilityOf(element(this.cartAmount)), browser.allScriptsTimeout, this.cartAmount.toString());

  return await element(this.cartAmount).getText();
}

public async getCartCount(): Promise {
  await browser.wait(ExpectedConditions.visibilityOf(element(this.cartCount)), browser.allScriptsTimeout, this.cartCount.toString());

  return await element(this.cartCount).getText();
}
Well done! Now select the DetailPagePo from your project’s pageobjects folder, and implement the following functions:
| Filename | Description |
|---|---|
getProductName |
Returns the text of the productName element. |
getProductPrice |
Returns the text of the productPrice element. |
addProductToCart |
Clicks the addToCartButton. |
getConfirmationMessage |
Returns the text of the cartConfirmationMessageelement. |
In Python, use snake case for functions’ names respectively
Eventually, the methods in your DetailPagePo should look like this:
public String getProductName() {
  return this.wait.until(ExpectedConditions.visibilityOfElementLocated(this.productName)).getText();
}

public String getProductPrice() {
  return this.wait.until(ExpectedConditions.visibilityOfElementLocated(this.productPrice)).getText();
}

public void addProductToCart() {
  this.wait.until(ExpectedConditions.visibilityOfElementLocated(this.addToCartButton)).click();
}

public String getConfirmationMessage() {
  return this.wait.until(ExpectedConditions.visibilityOfElementLocated(this.cartConfirmationMessage)).getText();
}
def get_product_name(self):
    product_name_text = self.wait.until(EC.visibility_of_element_located(self._product_name)).text

    return product_name_text


def get_product_price(self):
    product_price_text = self.wait.until(EC.visibility_of_element_located(self._product_price)).text

    return product_price_text

def add_product_to_cart(self):
    self.wait.until(EC.visibility_of_element_located(self._add_to_cart_button)).click()

    return self


def get_confirmation_message(self):
    cart_confirmation_message_text = self.wait.until(EC.visibility_of_element_located(self._cart_confirmation_message)).text

    return cart_confirmation_message_text
public async getProductName(): Promise {
  await browser.wait(ExpectedConditions.visibilityOf(element(this.productName)), browser.allScriptsTimeout, this.productName.toString());

  return await element(this.productName).getText();
}

public async getProductPrice(): Promise {
  await browser.wait(ExpectedConditions.visibilityOf(element(this.productPrice)), browser.allScriptsTimeout, this.productPrice.toString());

  return await element(this.productPrice).getText();
}

public async addProductToCart(): Promise {
  await browser.wait(ExpectedConditions.visibilityOf(element(this.addToCartButton)), browser.allScriptsTimeout, this.addToCartButton.toString());
  await element(this.addToCartButton).click();

  return this;
}

public async getConfirmationMessage(): Promise {
  await browser.wait(ExpectedConditions.visibilityOf(element(this.cartConfirmationMessage)), browser.allScriptsTimeout, this.cartConfirmationMessage.toString());

  return await element(this.cartConfirmationMessage).getText();
}
Now you are ready to automate test cases.
To create a new test file, right-click the tests folder in your project and select New > Test file from the context menu. Sencha WebTestIt generates a new class for you and wait for you to name it. Name the file Test1.ts when using TypeScript, or Test1.java when using Java. This time, you do not use snake case for Python. You use camelCase and name your test file test1.py.
The actual test file should orchestrate the actions being executed against your website or app. It is good practice to leave the actions themselves in the Page Objects to ensure good maintainability of your test.
The most important part of each Test Case is the assertion at the end of the block. You use it to verify that the website’s or application’s behavior matches your expected behavior and, therefore, define if the test fails or passes. For the assertion of elements, there are various Assertion Frameworks available.
Sencha WebTestIt bundles your project with an Assertion Framework depending on the scripting language you selected. If you choose to write tests in Java the TestNG framework is provided. In case you are using TypeScript, Protractor together with Jasmine is the default setup. For Python users, unittest environment is provided. You can, however, switch the individual components.
Depending on the automation framework and language in use, you create the three test cases as described in the table above.
@Test
public void SearchForItemTestCase() {
  // 1. Arrange
  // Create a new Page Object instance by right-clicking and
  // selecting "Instantiate Page Object" at the bottom
  HeaderPo header = new HeaderPo(driver);
  DetailPagePo detail = new DetailPagePo(driver);

  header.open("https://demoshop.webtestit.com");

  // 2. Act
  // Call an existing action from your initialized Page Object
  header.insertSearchText("Super");

  // 3. Assert
  // Use TestNG assertions to verify results.
  // e.g.:
  // Assert.assertEquals(title, "Test Automation for GUI Testing | Sencha");
  Assert.assertEquals(detail.getProductName(), "Super Cool Goo");
  Assert.assertEquals(detail.getProductPrice(), "€1,500.00");
}

@Test
public void AddItemToCartTestCase() {
  HeaderPo header = new HeaderPo(driver);
  DetailPagePo detail = new DetailPagePo(driver);

  detail.open("https://demoshop.webtestit.com/product/super-cool-goo/");

  detail.addProductToCart();

  Assert.assertTrue(detail.getConfirmationMessage().contains("“Super Cool Goo” has been added to your cart"));
  Assert.assertEquals(header.getCartCount(), "1 item");
  Assert.assertEquals(header.getCartAmount(), "€1,500.00");
}
def test_search_for_item(self):

    driver = self.get_driver()
    """
    1. Arrange
    Create a new Page Object instance by right-clicking into
    the code editor and selecting "Instantiate Page Object"
    at the bottom of the context menu
    """
    header = header_po(driver)
    detail = detail_page_po(driver)

    header.open("https://demoshop.webtestit.com")
    """
    2. Act
    Call an existing action from your Page Object instance
    """
    header.insert_search_text("Super")
    """
    3. Assert
    Use unittest assertions to verify results.
    e.g.:
    self.assertEqual(title, "Test Automation for GUI Testing | Sencha")
    """
    self.assertEqual(detail.get_product_name(), "Super Cool Goo")
    self.assertEqual(detail.get_product_price(), "€1,500.00")


def test_add_item_to_cart(self):

    driver = self.get_driver()

    header = header_po(driver)
    detail = detail_page_po(driver)
    detail.open("https://demoshop.webtestit.com/product/super-cool-goo/")

    detail.add_product_to_cart()

    self.assertTrue(detail.get_confirmation_message in "“Super Cool Goo” has been added to your cart")
    self.assertEqual(header.get_cart_count(), "1 item")
    self.assertEqual(header.get_cart_ammount(), "€1,500.00")
public async getProductName(): Promise {
  await browser.wait(ExpectedConditions.visibilityOf(element(this.productName)), browser.allScriptsTimeout, this.productName.toString());

  return await element(this.productName).getText();
}

public async getProductPrice(): Promise {
  await browser.wait(ExpectedConditions.visibilityOf(element(this.productPrice)), browser.allScriptsTimeout, this.productPrice.toString());

  return await element(this.productPrice).getText();
}

public async addProductToCart(): Promise {
  await browser.wait(ExpectedConditions.visibilityOf(element(this.addToCartButton)), browser.allScriptsTimeout, this.addToCartButton.toString());
  await element(this.addToCartButton).click();

  return this;
}

public async getConfirmationMessage(): Promise {
  await browser.wait(ExpectedConditions.visibilityOf(element(this.cartConfirmationMessage)), browser.allScriptsTimeout, this.cartConfirmationMessage.toString());

  return await element(this.cartConfirmationMessage).getText();
}
You ready to automate test cases.
Finally, it is time to verify that our experiment works. For this to happen you have to create an endpoint first. An endpoint is a set of configurations about the runtime environment of your test. It defines which browser or which operating system to use, and much more.
Thanks to Selenium WebDriver’s JsonWireProtocol the runtime environment can actually be anywhere in the world, as the commands for automation are being sent over HTTP.
We are going to create a local Chrome endpoint and execute our test on it.
Locate the Execution tab
Click the + button
In the Endpoint dialog enter the following information:
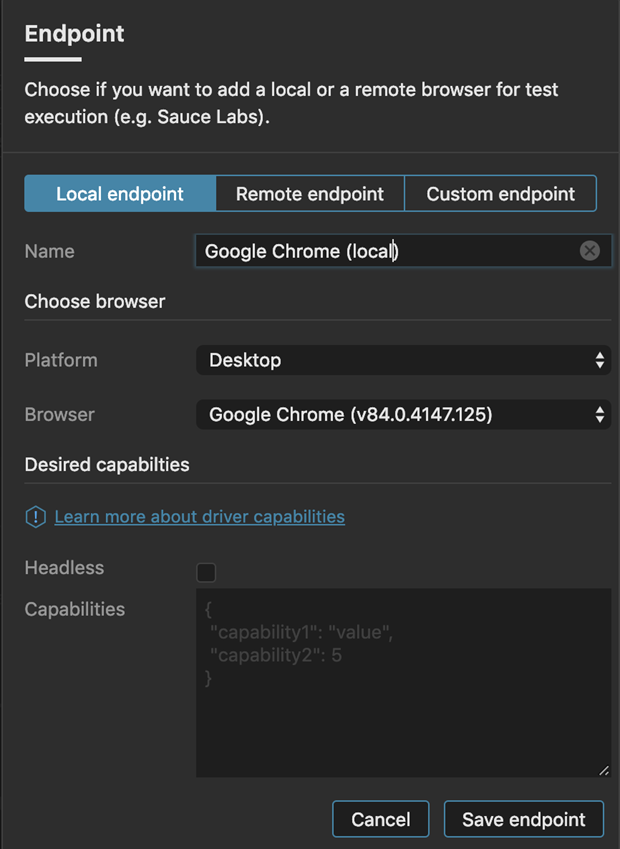
Click Save endpoint
You can learn more about Endpoints in Chapter 4 of this guide.
If you followed all the steps in this tutorial, your test cases should execute without errors. Sencha WebTestIt creates a new folder reports in your project. Clicking an XML file in there opens the Report tab showing you the results of your run.
You have also learned:
We have created some suggestions for you to read on:


 WebTestIt | Terms of Use
