WebDriver execution explained
Many classes have shortcut names used when creating (instantiating) a class with a
configuration object. The shortcut name is referred to as an alias (or xtype if the
class extends Ext.Component). The alias/xtype is listed next to the class name of
applicable classes for quick reference.
Framework classes or their members may be specified as private or protected. Else,
the class / member is public. Public, protected, and private are access
descriptors used to convey how and when the class or class member should be used.
Public classes and class members are available for use by any other class or application code and may be relied upon as a stable and persistent within major product versions. Public classes and members may safely be extended via a subclass.
Protected class members are stable public members intended to be used by the
owning class or its subclasses. Protected members may safely be extended via a subclass.
Private classes and class members are used internally by the framework and are not intended to be used by application developers. Private classes and members may change or be omitted from the framework at any time without notice and should not be relied upon in application logic.
static label next to the
method name. *See Static below.Below is an example class member that we can disect to show the syntax of a class member (the lookupComponent method as viewed from the Ext.button.Button class in this case).
Let's look at each part of the member row:
lookupComponent in this example)( item ) in this example)Ext.Component in this case). This may be omitted for methods that do not
return anything other than undefined or may display as multiple possible values
separated by a forward slash / signifying that what is returned may depend on the
results of the method call (i.e. a method may return a Component if a get method calls is
successful or false if unsuccessful which would be displayed as
Ext.Component/Boolean).PROTECTED in
this example - see the Flags section below)Ext.container.Container in this example). The source
class will be displayed as a blue link if the member originates from the current class
and gray if it is inherited from an ancestor or mixed-in class.view source in the example)item : Object in the example).undefined a "Returns" section
will note the type of class or object returned and a description (Ext.Component in the
example)Available since 3.4.0 - not pictured in
the example) just after the member descriptionDefaults to: false)The API documentation uses a number of flags to further commnicate the class member's function and intent. The label may be represented by a text label, an abbreviation, or an icon.
classInstance.method1().method2().etc();false is returned from
an event handler- Indicates a framework class
- A singleton framework class. *See the singleton flag for more information
- A component-type framework class (any class within the Ext JS framework that extends Ext.Component)
- Indicates that the class, member, or guide is new in the currently viewed version
- Indicates a class member of type config
- Indicates a class member of type property
- Indicates a class member of type
method
- Indicates a class member of type event
- Indicates a class member of type
theme variable
- Indicates a class member of type
theme mixin
- Indicates that the class, member, or guide is new in the currently viewed version
Just below the class name on an API doc page is a row of buttons corresponding to the types of members owned by the current class. Each button shows a count of members by type (this count is updated as filters are applied). Clicking the button will navigate you to that member section. Hovering over the member-type button will reveal a popup menu of all members of that type for quick navigation.
Getting and setter methods that correlate to a class config option will show up in the methods section as well as in the configs section of both the API doc and the member-type menus just beneath the config they work with. The getter and setter method documentation will be found in the config row for easy reference.
Your page history is kept in localstorage and displayed (using the available real estate) just below the top title bar. By default, the only search results shown are the pages matching the product / version you're currently viewing. You can expand what is displayed by clicking on the button on the right-hand side of the history bar and choosing the "All" radio option. This will show all recent pages in the history bar for all products / versions.
Within the history config menu you will also see a listing of your recent page visits. The results are filtered by the "Current Product / Version" and "All" radio options. Clicking on the button will clear the history bar as well as the history kept in local storage.
If "All" is selected in the history config menu the checkbox option for "Show product details in the history bar" will be enabled. When checked, the product/version for each historic page will show alongside the page name in the history bar. Hovering the cursor over the page names in the history bar will also show the product/version as a tooltip.
Both API docs and guides can be searched for using the search field at the top of the page.
On API doc pages there is also a filter input field that filters the member rows using the filter string. In addition to filtering by string you can filter the class members by access level, inheritance, and read only. This is done using the checkboxes at the top of the page.
The checkbox at the bottom of the API class navigation tree filters the class list to include or exclude private classes.
Clicking on an empty search field will show your last 10 searches for quick navigation.
Each API doc page (with the exception of Javascript primitives pages) has a menu view of metadata relating to that class. This metadata view will have one or more of the following:
Ext.button.Button class has an alternate class name of Ext.Button). Alternate class
names are commonly maintained for backward compatibility.Runnable examples (Fiddles) are expanded on a page by default. You can collapse and expand example code blocks individually using the arrow on the top-left of the code block. You can also toggle the collapse state of all examples using the toggle button on the top-right of the page. The toggle-all state will be remembered between page loads.
Class members are collapsed on a page by default. You can expand and collapse members using the arrow icon on the left of the member row or globally using the expand / collapse all toggle button top-right.
Viewing the docs on narrower screens or browsers will result in a view optimized for a smaller form factor. The primary differences between the desktop and "mobile" view are:
The class source can be viewed by clicking on the class name at the top of an API doc page. The source for class members can be viewed by clicking on the "view source" link on the right-hand side of the member row.
Selenium WebDriver utilizes a JSON-on-Wire Protocol (comparable to a REST service) which makes the automation framework communicate with a driver. A driver is an interface or executable that automates a web browser and ultimately your website or application.
Note
The WebDriver remote control interface is currently in recommendation state by the W3C. All major web browsers on a desktop, tablet, and mobile support WebDriver.
When you run a test, Selenium WebDriver connects to the configured host over IP. The automation framework retrieves information from the DOM of the website or app and returns which actions to execute.
The computer running the test (i.e. evaluating elements and orchestrating actions) is not necessarily the computer serving as a host for the browser automating the SUT.
Testing your website or application means to ensure correct behavior according to its specification. In terms of web-based technologies, you also have to ensure this on a wide array of different platforms and browsers. Though there exist standards for the Internet, implementation of those is always subject to the individual browser manufacturer. What’s more is that new versions of different browsers are released in short cycles, with alterations to those implementations. The computer you use for designing tests is usually not capable of verifying multiple versions of the same browser without great efforts.
Regardless of which platform/OS you use there is also no way to test across all browsers available on a single device. The simplest solution, therefore, is to have multiple platforms and browser versions at hand to automate your website or app on. Because Selenium WebDriver communicates with the browser driver over the network, you can switch seamlessly between local and remote execution. You can run the same test in different environments.
The Selenium Server is a host application running on a machine dedicated to testing. In its default configuration, it listens on port 4444 and accepts requests from automation frameworks to run tests. It serves as the bridge between your test and the web browser. You can set up your local network environment with multiple machines and target them individually. If you execute your test locally, Sencha WebTestIt launches a local Selenium Server instance and connects to it.
Selenium Grid is a technology that abstracts a group of Selenium Servers into a single interface called a hub. A grid is a network of computers with OS/browser combinations ready for testing. Selenium grids allow you to scale your tests across a large number of environments and even parallelize them.
Hint
You can either set up your own grid, or connect to grid providers. A grid provider is a service that operates a Selenium grid for you and takes care of all the necessary hard- and software to represent a sophisticated testing landscape.
Sencha WebTestIt integrates with Sauce Labs as a grid provider. You can provide your Sauce Labs user name and access key to get going. If you are using a different provider, you can manually configure the necessary authentications through capabilities.
In Sencha WebTestIt you can define multiple configurations for running your tests on. A set of these options is stored in an endpoint.
An endpoint is a JSON construct representing a collection of settings. These settings mainly consist of platform, browser and browser version. You can, however, narrow down on these attributes or set browser-specific options.
An endpoint hosts a set of configurations and options for the system under test. These configurations are referred to as capabilities. Every test scenario should be executed on some specific testing environments. Depending on the use case you can distinguish between required and desired capabilities. The desired capabilities help us to define which environment we are going to use in our test script. The automation framework will query the WebDriver to fulfil the capabilities specified and set up the target environment accordingly. If you, for example, specify Google Chrome as the browser, the target host will be searched for an instance of Chrome and launch it to automate the test on. If capabilities are not available on the local or remote host, your test run will fail.
Sencha WebTestIt allows you to configure local endpoints only with detected WebDrivers and browser instances. This way you avoid configuration errors when working locally.
You can find an overview of all capabilities supported by Selenium WebDriver here.
{ "platform": "macOS 10.12", "browserName": "safari", "version": "10.0" }
Example for defining capabilities to test on macOS 10.12 and Safari version 10
If you automate on a Selenium grid the capability handling is usually more flexible. With multiple devices connected to the hub, the environment is filtered and narrowed down to meet the capabilities requested. The grid behaviour for capabilities gives you a lot of flexibility. Ensuring your website or application works on all browsers against a grid is a matter of defining browsers and executing them regardless of their version against the hub. In addition to the environmental requirements, you can also use capabilities to define settings for the target environment. Some of them are browser specific, like the option to enable and disable extensions. You can find an overview of browser-specific capabilities here.
An endpoint can either target a single browser instance on your computer, or on a machine located remotely. Sencha WebTestIt differentiates between various types of endpoints that you can create and manage. The endpoints configured for your project can be found in the Execution tab.
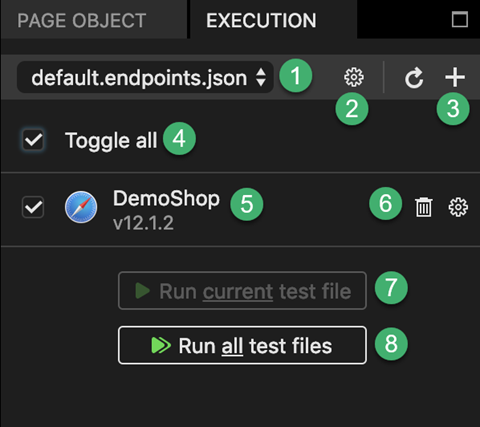
1 Endpoint file: The currently selected endpoint configuration file. You can create and edit multiple endpoint files per project.
2 Action Menu: Enables you to create a new endpoint file, or delete the current one.
3 + button: Click here to add a new endpoint to the current configuration file.
4 List selector: Click here to select or deselect all endpoints for execution.
5 Endpoint: A single endpoint.
6 Endpoint options: Click here to edit or remove the endpoint.
7 Run current test file: Click this button to execute the currently active test file on all selected endpoints. This button is only enabled if a test file is opened.
8 Run all test files: Click this button to execute all test files in your project on all selected endpoints.
Endpoints are stored in files that end with a
.endpoints.jsonsuffix. You can put them anywhere in your project structure. Sencha WebTestIt will locate and list them in the Execution tab for you.
To add a new endpoint to your project, click the + button in the Execution tab. If you want to edit an endpoint, click the gear icon next to it on the list. In the pop-up dialog switch to the endpoint type you want to create or edit. Fill the fields as described below and click Save endpoint to save your changes.
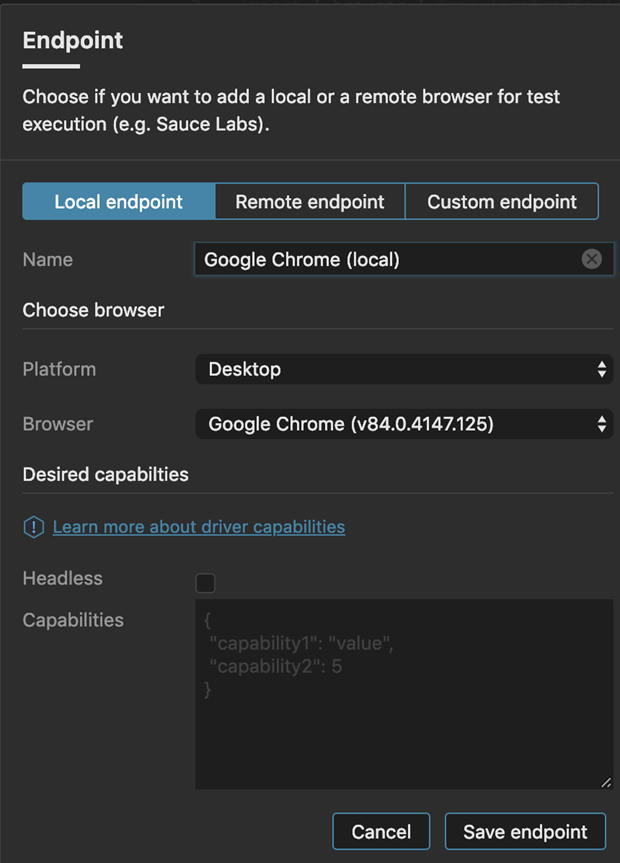
Create local endpoints for testing on the same computer as you’re writing your tests. Sencha WebTestIt automatically detects installed browsers and can even connect to Android devices through adb.
Reference
If you want to test on a mobile device, click here to read How to connect an Android device.
| Field | Description |
|---|---|
| Name | Provide a unique name for your endpoint. It will be displayed in the endpoint list and help you identify the endpoint. |
| Platform & Browser | Your endpoint is defined by the platform (operating system) and browser you want to test. You can choose between Desktop and Mobile platforms. Sencha WebTestIt automatically evaluates the browsers installed and lists them in the Browser dropdown. Note: For mobile testing, you need to have the Android Developer Tools and adb installed on your computer. |
| Desired capabilities | If you want to specify additional options for your environment configuration, you can type them as JSON code in this field. |
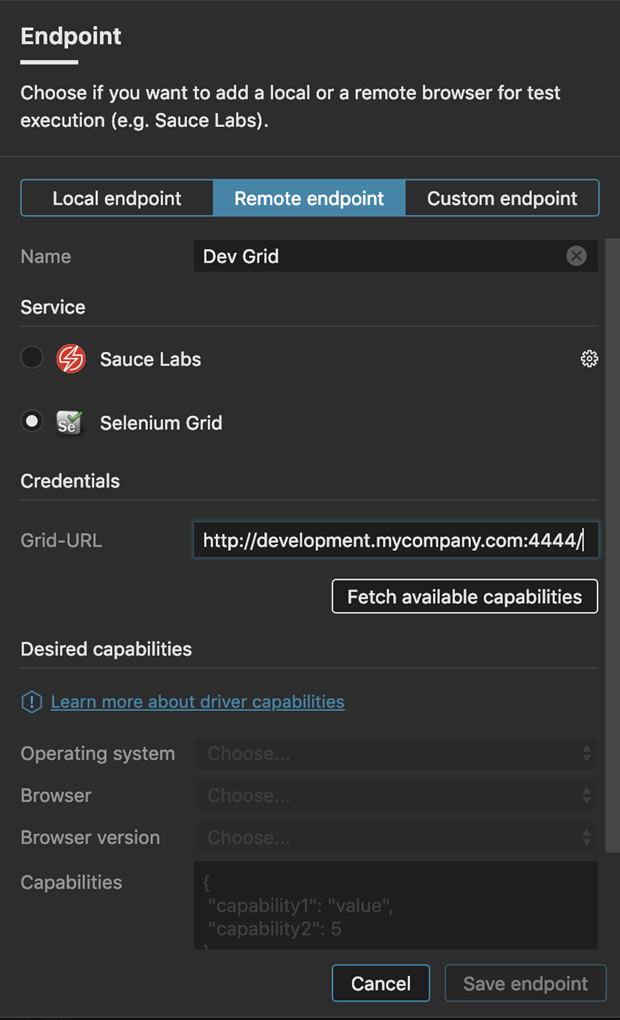
If you have test machines in your network running a Selenium Server or Grid, you can use this option to connect and execute tests. With this, you can access other operating systems and/or browser versions than the ones you have installed on your computer.
If you want to connect to a single remote machine, select the Selenium Grid option and specify the address to reach the computer without the trailing
/wd/hub.
| Field | Description |
|---|---|
| Name | Provide a unique name for your endpoint. It will be displayed in the endpoint list and help you identify the endpoint. |
| Provider Selector | Choose the provider of the hub you want to connect to. Sauce Labs requires additional authentication. If you choose Sauce Labs as the provider, you will be requested to enter your credentials. |
| Desired capabilities | Choose the environment you want to set up. Sencha WebTestIt automatically fills the available options after you click the Fetch available capabilities button. |
After entering the URL and credentials to your remote instance, click the Fetch available capabilities button. Sencha WebTestIt will query the endpoint for available OS/browser combinations.
If you want to execute on your grid in parallel, you can define multiple endpoints for the same URL with different capabilities.
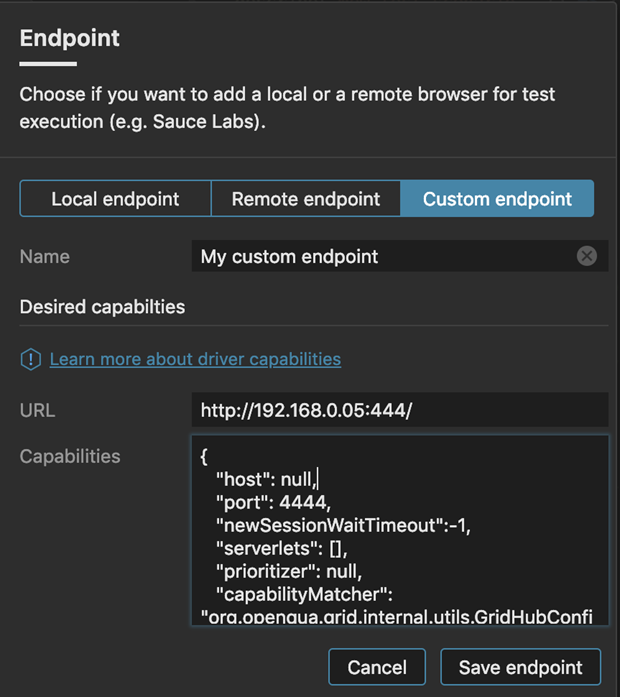
You can define a custom endpoint by providing a set of capabilities you expect from the remote system manually. Custom endpoints give you the flexibility to configure your remote machines exactly as you need them.
Imagine having a set of different machines in a Selenium grid. If you request the hub to run on Firefox without any further definition, the first available machine with an active Firefox instance will be taken. The OS and OS version will not be taken into consideration, as you have not specified the capability. Whether the actual test run is executed on a Windows 10 or Windows 7 machine is not guaranteed.


 WebTestIt | Terms of Use
