One of the most important benefits of native packaging is the access to native APIs. Sencha Touch provides access to native APIs through its Ext.device API. The Ext.device API does not itself provide the native API capabilities, it is just a wrapper that you can use to access native APIs powered by the Sencha Packager, or by third party solutions, such as Apache Cordova or an emulator or simulator.
Sencha Touch Ext.device provides the following APIs:
- Ext.device.Camera - Allows your app to take pictures or select images from the camera library (with a user’s permission).
- Ext.device.Connection - Indicates whether the device has a current connection to the Internet.
- Ext.device.Notification - Enables you to use native notification windows (the native version of Ext.Msg).
- Ext.device.Orientation - Provides information on the device’s current orientation.
You can also use Ext.device.Device to launch one application from another application.
Note: See Developing a Cordova App for the Apache Cordova Ext.device APIs for Accelerometer, Browser, Camera, Capture, Compass, Connection, Contacts, Device, FileSystem, Geolocation, Globalization, Media, Notification, Push, Splashscreen, and SQLite (storage). The Cordova guide also describes how to emulate and package your app for Android, iOS, and BlackBerry.
Getting Started
Because we want to keep our apps small, and because native APIs only apply in native packaged apps, the Ext.device API is not included in the standard build of Sencha Touch. When you want to use any of the Device APIs, you must require them using Ext.require:
Ext.require('Ext.device.Connection');

Ext.application({
    name: 'MyApp'
    // the rest of your app follows
});
Connection
The Connection API determines whether the device is currently online. This API exposes two main methods - isOnline and getType:
if (Ext.device.Connection.isOnline()) {
    Ext.Msg.alert('You are currently connected via ' + Ext.device.Connection.getType());
} else {
    Ext.Msg.alert('You are not currently connected');
}
This is probably the simplest of the APIs offered by Ext.device. If you load this code on a device or inside the simulator, you will see a Sencha Touch message box appearing, indicating that you are offline, or indicating your connection type (wifi, 2g, 3g, and so on), if you are online. See the Ext.device.Connection docs for a full list of possible connection types.
Notification
Notifications are used to show native dialog boxes. Notifications work very much like Ext.Msg and can be configured in many different ways. For example, the following example shows how to display a native notification box with a title and a message:
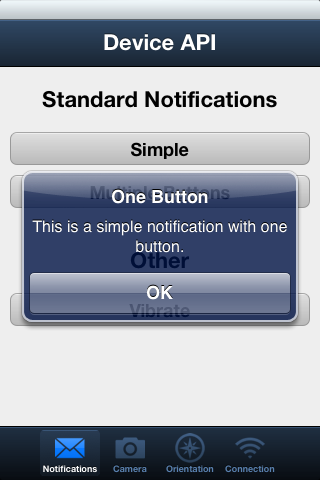
Ext.device.Notification.show({
    title: 'One Button',
    message: 'This is a simple notification with one button.'
});
This code causes a native notification window to appear as shown in the following image:
The following code displays a native message box with the configured title and message. It also adds an OK button, so the user can dismiss the message. When the user taps the button, the callback is called - in this example we respond to the button tap by opening a second notification:
Ext.device.Notification.show({
    title: 'One Button',
    message: 'This is a simple notification with one button.',

    callback: function(button) {
        //When the user taps a button, show another notification
        Ext.device.Notification.show({
            message: 'You pressed: "' + button + '"'
        });
    }
});
We did not provide a title for the second message, which is fine - it just shows the message and an OK button. We can customize the buttons that are presented to the user as follows:
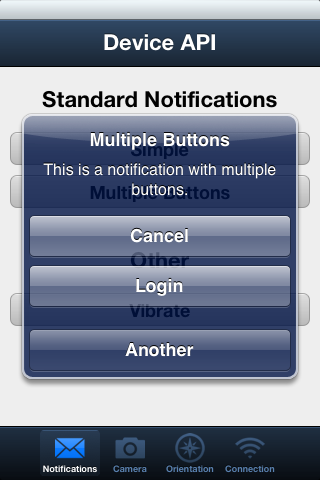
Ext.device.Notification.show({
    title: 'Multiple Buttons',
    message: 'This is a notification with multiple buttons.',
    buttons: ["Cancel", "Login", "Another"],

    callback: function(button) {
        //When the user taps a button, show another notification
        Ext.device.Notification.show({
            message: 'You pressed: "' + button + '"'
        });
    }
});
This time, we provide three button text strings in the buttons array. When we run this code we now see the buttons stacked on top of one another as shown by the following image:
Vibration
Another capability of the notification API is to vibrate the device. You can make this happen as shown in the following code:
Ext.device.notification.vibrate();This method call causes the device to vibrate for a short time, and can be called as often as desired.
Camera
The Camera API allows you to take pictures using the phone’s camera, or alternatively select an image from the existing photo library available on the phone. The following code sample shows how to take a new picture:
Ext.device.Camera.capture({
    source: 'camera',
    destination: 'file',

    success: function(url) {
        //show the newly captured image in a full screen Ext.Img component:
        Ext.create('Ext.Img', {
            src: url,
            fullscreen: true
        });
    }
});
In this example, we specified two options (apart from our success callback) - source and destination. We can set source to either ‘camera’ or ‘library’ - the first option opens the camera to take a new picture, the second opens a native photo browser window to select an existing image. This example opens the camera app and saves the new image to a file, finally calling our success function with the local URL to that file.
Other options that can be passed into the Ext.device.Camera#capture call are the following:
success- Calls if an image was successfully acquired.failure- Calls if an image could not be acquired.scope- Sets the value ofthisfor running thesuccessandfailurefunctions.quality- Provides a hint to the camera about the compression quality of the image (0-100).width- Indicates the desired width of the new image, in px.height- Indicates the desired height of the new image, in px.source- Indicates ‘camera’ or ‘library’ - ‘camera’ takes a new picture, ‘library’ chooses an existing one.destination- Indicates ‘file’ or ‘data’ - file returns a local url to the new image, ‘data’ returns a Base64 encoded string of the image.encoding- Indicates ‘jpeg’, ‘jpg’ or ‘png’ - the first two options encode the image as a JPEG, the third as a PNG.
Any number of options can be passed into your Ext.device.Camera#capture call.
Orientation
The orientation API yields information about the current orientation of the device. This example registers a handler function that is called every time a device orientation change is detected:
Ext.device.Orientation.on('orientation', function(e) {
    var alpha = Math.round(e.alpha),
        beta = Math.round(e.beta),
        gamma = Math.round(e.gamma);

    console.log(alpha, beta, gamma);
});
This example provides a stream of console messages with the alpha, beta, and gamma orientation of the device. These values correspond to the three dimensions the device can be pivoted around, and are expressed in degrees ranging from 0 to 360.
Custom Scheme URLs
You can use custom scheme URLs to launch one application from another:
Ext.application({
    name: 'Sencha',
    requires: ['Ext.device.Device'],
    launch: function() {
        if (Ext.device.Device.scheme) {
            // The application was opened via another application. Do something:
            alert('Applicaton opened via another application: ' + Ext.device.Device.scheme.url);
        }

        // Listen for future changes
        Ext.device.Device.on('schemeupdate', function(device, scheme) {
            // The application was launched, closed, and then launched another from another application
            // this means onReady is not called again (because the application is already running
            // in the background) - but this event will be fired
            alert('Applicated reopened via another application: ' + scheme.url);
        }, this);
    }
});
For this code to work, when packaging your application, add the custom URLs by adding the following code in the rawConfig property inside your package.json file (Sencha Native Packager configuration file):
{
    ...
    "rawConfig": "<key>CFBundleURLTypes</key><array><dict><key>CFBundleURLSchemes</key><array><string>sencha</string></array><key>CFBundleURLName</key><string>com.sencha.example</string></dict></array>"
    ...
}
You can change the available URL schemes and the application identifier from the previous example.
You can test the code by packaging and installing the application onto a device or iOS Simulator, opening Safari, and typing: sencha:testing. The application launches and an alert appears with the specified URL.
Note: This currently only works with the Sencha Native Packager. If you attempt to listen to this event when packaged with Apache Cordova or simply in the browser, it will not function. See Developing a Cordova App for Apache Cordova Ext.device.device.Cordova events.
Packaging
Now that you have an understanding of how to use the Ext.device API to access native device functionality, proceed to the guides on packaging your app for native packaging to start testing the app on a real device.