Sencha Eclipse Plugin
Many classes have shortcut names used when creating (instantiating) a class with a
configuration object. The shortcut name is referred to as an alias (or xtype if the
class extends Ext.Component). The alias/xtype is listed next to the class name of
applicable classes for quick reference.
Framework classes or their members may be specified as private or protected. Else,
the class / member is public. Public, protected, and private are access
descriptors used to convey how and when the class or class member should be used.
Public classes and class members are available for use by any other class or application code and may be relied upon as a stable and persistent within major product versions. Public classes and members may safely be extended via a subclass.
Protected class members are stable public members intended to be used by the
owning class or its subclasses. Protected members may safely be extended via a subclass.
Private classes and class members are used internally by the framework and are not intended to be used by application developers. Private classes and members may change or be omitted from the framework at any time without notice and should not be relied upon in application logic.
static label next to the
method name. *See Static below.Below is an example class member that we can disect to show the syntax of a class member (the lookupComponent method as viewed from the Ext.button.Button class in this case).
Let's look at each part of the member row:
lookupComponent in this example)( item ) in this example)Ext.Component in this case). This may be omitted for methods that do not
return anything other than undefined or may display as multiple possible values
separated by a forward slash / signifying that what is returned may depend on the
results of the method call (i.e. a method may return a Component if a get method calls is
successful or false if unsuccessful which would be displayed as
Ext.Component/Boolean).PROTECTED in
this example - see the Flags section below)Ext.container.Container in this example). The source
class will be displayed as a blue link if the member originates from the current class
and gray if it is inherited from an ancestor or mixed-in class.view source in the example)item : Object in the example).undefined a "Returns" section
will note the type of class or object returned and a description (Ext.Component in the
example)Available since 3.4.0 - not pictured in
the example) just after the member descriptionDefaults to: false)The API documentation uses a number of flags to further commnicate the class member's function and intent. The label may be represented by a text label, an abbreviation, or an icon.
classInstance.method1().method2().etc();false is returned from
an event handler- Indicates a framework class
- A singleton framework class. *See the singleton flag for more information
- A component-type framework class (any class within the Ext JS framework that extends Ext.Component)
- Indicates that the class, member, or guide is new in the currently viewed version
- Indicates a class member of type config
- Indicates a class member of type property
- Indicates a class member of type
method
- Indicates a class member of type event
- Indicates a class member of type
theme variable
- Indicates a class member of type
theme mixin
- Indicates that the class, member, or guide is new in the currently viewed version
Just below the class name on an API doc page is a row of buttons corresponding to the types of members owned by the current class. Each button shows a count of members by type (this count is updated as filters are applied). Clicking the button will navigate you to that member section. Hovering over the member-type button will reveal a popup menu of all members of that type for quick navigation.
Getting and setter methods that correlate to a class config option will show up in the methods section as well as in the configs section of both the API doc and the member-type menus just beneath the config they work with. The getter and setter method documentation will be found in the config row for easy reference.
Your page history is kept in localstorage and displayed (using the available real estate) just below the top title bar. By default, the only search results shown are the pages matching the product / version you're currently viewing. You can expand what is displayed by clicking on the button on the right-hand side of the history bar and choosing the "All" radio option. This will show all recent pages in the history bar for all products / versions.
Within the history config menu you will also see a listing of your recent page visits. The results are filtered by the "Current Product / Version" and "All" radio options. Clicking on the button will clear the history bar as well as the history kept in local storage.
If "All" is selected in the history config menu the checkbox option for "Show product details in the history bar" will be enabled. When checked, the product/version for each historic page will show alongside the page name in the history bar. Hovering the cursor over the page names in the history bar will also show the product/version as a tooltip.
Both API docs and guides can be searched for using the search field at the top of the page.
On API doc pages there is also a filter input field that filters the member rows using the filter string. In addition to filtering by string you can filter the class members by access level, inheritance, and read only. This is done using the checkboxes at the top of the page.
The checkbox at the bottom of the API class navigation tree filters the class list to include or exclude private classes.
Clicking on an empty search field will show your last 10 searches for quick navigation.
Each API doc page (with the exception of Javascript primitives pages) has a menu view of metadata relating to that class. This metadata view will have one or more of the following:
Ext.button.Button class has an alternate class name of Ext.Button). Alternate class
names are commonly maintained for backward compatibility.Runnable examples (Fiddles) are expanded on a page by default. You can collapse and expand example code blocks individually using the arrow on the top-left of the code block. You can also toggle the collapse state of all examples using the toggle button on the top-right of the page. The toggle-all state will be remembered between page loads.
Class members are collapsed on a page by default. You can expand and collapse members using the arrow icon on the left of the member row or globally using the expand / collapse all toggle button top-right.
Viewing the docs on narrower screens or browsers will result in a view optimized for a smaller form factor. The primary differences between the desktop and "mobile" view are:
The class source can be viewed by clicking on the class name at the top of an API doc page. The source for class members can be viewed by clicking on the "view source" link on the right-hand side of the member row.
Sencha’s Eclipse IDE plugin is an Integrated Development Environment tool that creates a confluence between Sencha Frameworks and Eclipse software. This integration comes in the form of code completion, while seamlessly cooperating with native Eclipse behavior.
Sencha experts will love the the ease with which changes are refactored and how simple it is to trace code to the source.
Sencha beginners will benefit as the Eclipse plugin provides completion suggestions while encouraging best-practice code structure and syntax.
Eclipse 2022-12 (4.26.0) or 2023-03 (4.27.0) IDE for Enterprise Java and Web Developers
Sencha Cmd 6+ (optional - required to create and run Sencha apps)
Ext JS 4.2.+
A supported operating system
Windows 10 or higher (64-bit)
Mac OSX
Linux (64-bit only)
The Sencha Eclipse IDE plugin is compatible with Eclipse 2022-09 and later.
Note: While products derived from Eclipse Luna (4.4+), like Spring Tools Suite, MyEclipse, and Rational Application Developer should work, Sencha only tests and supports official Eclipse releases. If you do encounter compatibility issues with these other products, please report them on the Sencha Eclipse Plugin forum.
Installing from the Eclipse Marketplace will enable automatic updates when they are released.
Open Eclipse
Open the Sencha Eclipse Plugin page
Drag the Install button from the Marketplace to your Eclipse IDE
Make sure the Sencha Eclipse Plugin is selected and click 'Confirm'
Accept the terms of the license agreement as needed and click “Finish”
During the installation process, you may encounter a window regarding unsigned content. Simply click "OK" to continue the install
Restart Eclipse when prompted
When installing from a zip archive downloaded from the support portal.
Download the Eclipse IDE Plugin (from the Support Portal)
Open Eclipse
Goto Help->Install New Software
Click the "Add" button
Click the "Archive" button and point towards the Eclipse IDE Plugin zip file
Select the resulting checkbox next to the "Sencha ExtJS Plugin" item
Click "Next >" twice
Accept the terms of the license agreement as needed and click "Finish"
During the installation process, you may encounter a window regarding unsigned content. Simply click "OK" to continue the install
Restart Eclipse for the changes to take effect
At this point, you should be able start using the Sencha Eclipse plugin
If you already have the Sencha Eclipse Plugin installed from the Marketplace, updates are easy.
By default, Eclipse will check for plugin updates once a week, but you can force the IDE to check for new versions:
In Eclipse, goto Help -> Check for Updates
If the Sencha Eclipse Plugin is displayed, make sure it is selected
Click "Next >" as needed to continue through the wizard
Accept the terms of the license agreement as needed and click "Finish"
During the installation process, you may encounter a window regarding unsigned content. Simply click "OK" to continue the install
Restart Eclipse for the changes to take effect
If the Sencha Plugin is not listed, you will need to uninstall the plugin and reinstall.
Goto Help -> Installation Details
Select the Sencha Eclipse Plugin
Click Uninstall
Click Finish and Yes when asked to restart Eclipse
Follow the Marketplace installation instructions above
The Sencha Eclipse Plugin is a part of Ext JS Pro and Premium packages, and requires a valid license to use.
A fully-functional 30 day trial of the plugin is available, and will be tied to your Sencha Forum ID.
Upon starting your preferred Eclipse IDE, you will be presented with the Registration dialog:
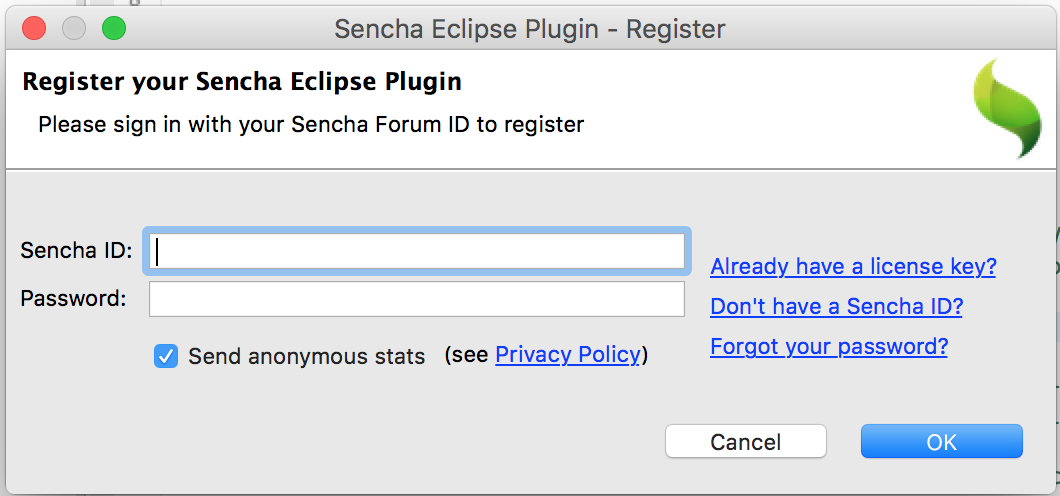
Enter your Sencha Forum ID and password.
After clicking OK:
If you already have an active license, your plugin will be registered and trial/license notifications will disappear.
If you are starting or resuming a trial, the plugin will notify you how many days are remaining in your trial with a balloon notification and status bar update at the bottom right of a project window.
If your trial has expired, the plugin will prompt you for an activation code via the Activate window.
If you purchased a license and haven't yet used your activation code, click on the "Already have a license key?" to open the Activate window.
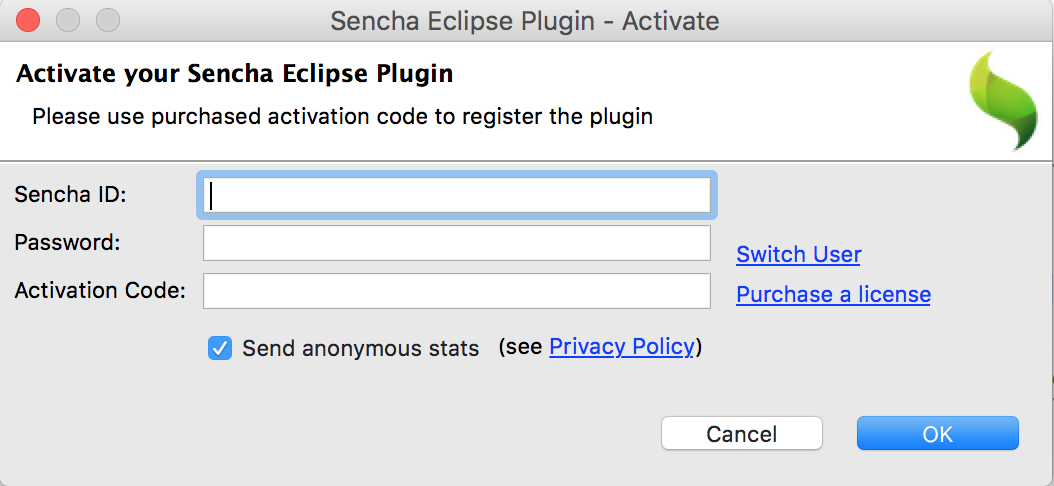
Enter your Sencha Forum ID, password, and activation code you received from your license purchase.
Once your account is associated with a license, you do not need to activate the plugin in the future.
If you do not register with a trial or valid account, or your trial has lapsed beyond 30 days, the Sencha Eclipse Plugin functionality will be disabled. To register or activate your plugin, go to:
Preferences->Sencha
You can then click "Register your copy".
The license is valid for multiple Eclipse products on your machine. If you registered one product, such as Eclipse Mars, when you open up Eclipse Luna, you will not need to register or login again. Instead, it will use your existing trial or paid license. You will see a dialog informing you who the plugin is registered to, how many days remain in the trial (if appropriate), and the option to report anonymous statistics.
Once you dismiss this dialog, you will never see it again within this IDE. Any other new Eclipse IDEs you use will display this dialog once on the first startup.
Note: If you are offline or behind a proxy and cannot connect to Sencha's Licensing servers, please contact Sencha Support or [email protected] to obtain a license file.
The Sencha Eclipse IDE Plugin is rich in functionality and simple to use. Features include:
Code Completion
Open Definition
Documentation Lookup
Run Configuration
Wizard Creation
Let’s walk through each of these.
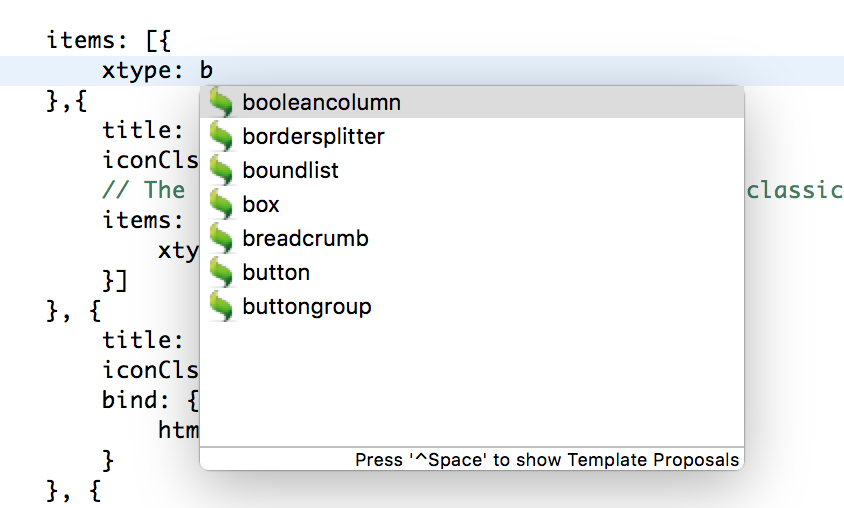
Let’s begin reviewing the benefits of Sencha Eclipse IDE Plugin with one of the most handy features; code completion. This feature allows you to receive completion suggestions for the appropriate visibility scope. This applies to almost any framework item, including:
Config, method, and property names for all Ext JS and user classes
Values for alias properties such as xtype, controller, viewModel, layout, etc…
Event names in Component.on, .mon, .un, .mun, and listeners objects
CSS class names in all config properties and methods ending in ‘cls’
this.lookupReference(…) in controllers with an alias
Controller methods in listeners: { (event): (methodName) } as well as handler config property
Model/store fields for Ext.grid.Column.dataIndex
Properties from the ViewModel in bind configs
When editing a JavaScript file inside a project that has the Sencha Nature, typing control+space will bring up the autocompletion window. The autocompletion in Eclipse will use a mix of Sencha and standard Eclipse results depending on what is being completed. Sencha results will have a higher relevance and grouped to the top of the results.
Note: A nature defines and manages the association between a given project and a particular plugin or feature.
The Sencha Eclipse plugin extends the Eclipse JavaScript editor and allows the user to open up the defining source code for various elements/properties within Ext JS and Touch classes.
This functionality will open up user-generated source code in addition to Ext JS and Touch SDK source code.
When editing a JavaScript file inside a project that has the Sencha Nature, move the cursor to where you want to open the definition, and press Shift + F3. The source will open in a new Eclipse JavaScript editor window.
Note: This keyboard shortcut can be changed via Eclipse's preferences; just search for "sencha ext js" under
General > Keys.
The Sencha Eclipse plugin also allows the user to open up Sencha API documentation relevant to the code being edited.
When editing a JavaScript file inside a project that has the Sencha Nature, move the cursor to appropriate element, and press the F1 key. The appropriate Sencha API documentation will open in a new external browser window.
If no relevant API documentation can be found, it will default to the API documentation root for the version of the SDK found in your application (such as https://docs.sencha.com/extjs/6.0/6.0.0-classic/)
Note: This keyboard shortcut can be changed via Eclipse's preferences; just search for "sencha ext js" under
General > Keys.
The Sencha Eclipse IDE plugin allows the user to create any of the following items from a standard Eclipse wizard:
Ext JS App (for existing Eclipse projects)
Ext JS App Project (will create a new Eclipse Project)
Ext JS Workspace / Ext JS Workspace Project
Ext JS Class
Ext JS Package
Ext JS View Package
You can access creation of the above items through the File > New menu option, or by right-clicking in the Project Explorer view. Some items appear based on the context, or if the Sencha Nature is currently added to a project.
You can easily open up an existing Ext JS Application or Workspace through the IDE, simply:
Select "Import" from the File menu
Next, select General->File System, unless there's a more appropriate project type that better suits your needs.
Locate and select the directory your workspace or application already resides within.
Check the resulting checkbox next to your project name
Determine an "Into folder" in which to import your project and click "Finish"
Once your project has imported, you can right-click on the containing folder and click "Add Sencha Nature". The Sencha Nature is an Eclipse Nature that enables code completion and other Sencha behaviors. Users can also right-click on a project in Project Explorer and select "Add Sencha Nature" or "Remove Sencha Nature" as needed.
Note: Adding the Sencha Nature to your project will cause it to index by default. This process may take one or two minutes depending on your machine and project.
Note: This requires an installation of Sencha Cmd.
This will create a new Eclipse project in your workspace. If you want to create a Workspace within an exiting Eclipse project, use "New Ext JS Workspace Project"
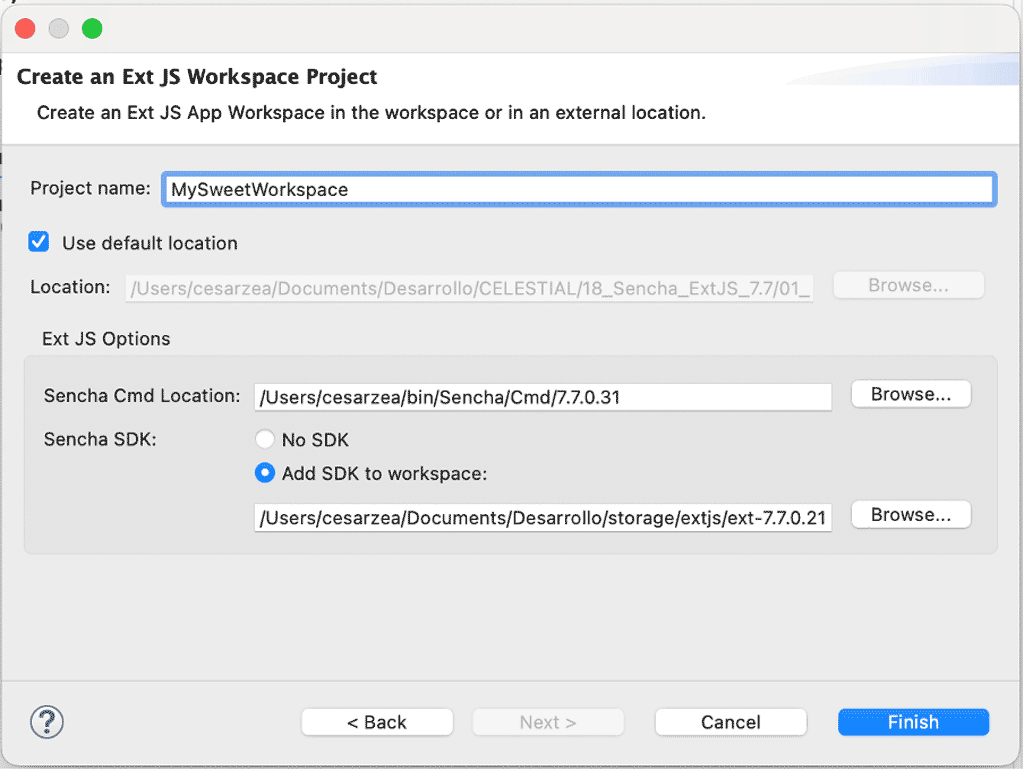
Click File -> New -> Project.
Click on Sencha to reveal Ext JS Workspace Project.
Select Ext JS Workspace Project and click Next > (or double-click your selection).
You will now see an area to provide a Project name, the location of your Cmd installation, and the location of your SDK (optional).
Once you provide valid paths for Cmd and SDK, click Finish to finalize your Workspace creation.
Your workspace will generate and index by default. This process may take one or two minutes depending on your machine.
You may now add new Ext JS App projects to the workspace by right-clicking anywhere in the project and selecting "New App" or File->New... and selecting "New Ext JS App"
Note: This requires an installation of Sencha Cmd.
This will create a new Eclipse project in your workspace. If you want to add an Ext JS application within an exiting Eclipse project, use "New Ext JS App"
Click File -> New -> Project.
Click on Sencha to reveal Ext JS App Project.
Select Ext JS App Project and click Next > (or double-click your selection).
You will now see an area to provide a Project name, the location of your Cmd installation, and the location of your SDK.
Once you provide valid paths for Cmd and SDK, you will be shown drop-downs for Toolkit selection, which includes "universal", "classic", and "modern" (Ext JS 6+ only).
You may also select a theme based on the version of the framework that you have chosen.

Click Finish to finalize your App Project creation.
Note: Once your application has generated, it will index by default. This process may take one or two minutes depending on your machine. The process can be sent to the background while you continue with your work, though performance may be degraded as indexing is a processor intensive task. Sencha autocompletion is disabled while the plugin is indexing.
Note: This requires an installation of Sencha Cmd.
This will not create a new Eclipse project in your workspace, but will just create an app in an existing Eclipse project. This can be inside an existing Ext JS Workspace, Dynamic Web Project, or any other project of your choosing.
Right click on a project or folder within Project Explorer.
Select File -> New -> Other...
Expand the Sencha category to reveal Ext JS App Project.
Select Ext JS App and click Next > (or double click your selection).
You will now see an area to provide a parent folder, app name, the location of your Cmd installation, the location of your SDK.
There are also checkboxes to control if new App Watch run configurations will be created, or if the app should be created in a subfolder for the app name.
Once you provide valid paths for Cmd and SDK, you will be shown drop-downs for Toolkit selection, which includes "universal", "classic", and "modern" (Ext JS 6+ only). You may also select a theme based on the version of the framework that you have chosen.

Click Finish to finalize your App Project creation.
Note: Once your application has generated, it will index by default. This process may take one or two minutes depending on your machine. The process can be sent to the background while you continue with your work, though performance may be degraded as indexing is a processor intensive task. Sencha autocompletion is disabled while the plugin is indexing.
The Sencha Eclipse plugin supports running Sencha Cmd's 'app watch'.
When creating a new Ext JS App Project with the wizards, the plugin will create a run configuration (or two if it is a universal app) to run Sencha App Watch.
When creating a non-project new Ext JS App, there is a checkbox option to create app watch run configurations as well.
Once an Application has been generated, you can easily launch Sencha App Watch to start development with the Cmd web server.
To launch Sencha App Watch:
Select Run -> Run Configurations... (Make sure you are in the JavaScript perspective).
Select the appropriate Run Configuration for your particular application (and toolkit if applicable) under the Sencha App Watch category.
You can now click "Run" to begin Sencha App Watch.
You will now see Sencha Cmd's output in the console view and your application will be available at http://localhost:1841
Once you have executed a Sencha App Watch configuration, you can easily run it again from the Run -> Run History menu or from the the green Run icon's dropdown in the toolbar:

You can create new or edit existing app watch run configurations:
Select Run -> Run Configurations... (Make sure you are in the JavaScript perspective)
Expand the Sencha App Watch category
Select the run configuration you wish to edit, or double-click the Sencha App Watch category to create a new run config
Enter a valid name, app directory, and Sencha Cmd path. The app and Cmd paths will be validated
If the application is an Ext 6 universal app, select the appropriate Build Name from the dropdown
If you are using Sencha Inspector, you can also check "Allow connections from Sencha Inspector" to enable app watch's Inspector integration
Note: This is strongly suggested for Eclipse Projects that have the JavaScript nature.
If you include the Ext JS SDK within a project that will attempt to build and validate JavaScript, like an Eclipse Dynamic Web Project, Eclipse will attempt to validate the SDK, which can slow down the environment.
It is best to exclude the Ext JS SDKs from Eclipse's JavaScript configuration to prevent any issues:
Disable 'build automatically' from the Project menu.
Right click on your Eclipse Project, select Properties
Expand JavaScript on the left, and select Include Path.
Select the Source tab.
Double click on the Excluded path under your WebContent listing.
Click Add... on the bottom next to the Exclusion patterns: view
Click Browse... in the new dialog
Expand your newly create app, and select the /ext/ folder within it.
Click OK, click Finish
You can now re-enable 'build automatically' if you wish.
The plugin provides code completion by indexing your JavaScript source files. You can control which files are indexed by editing (project_root)/.sencha/ide/config.json. This file is automatically created by the plugin and contains the following properties:
Here is an example of a config.json file:
{
    "include": [
        "path/to/dir/to/include" // on windows use "path\\to\\include"
    ],
    "exclude": [
        "path/to/dir/to/exclude" // on windows use "path\\to\\include"
    ],
    "apps" : [
        {
            "name": "AppRootNamespace",
            "path": "path/to/app",  // on windows use "path\\to\\app"
            "toolkit": "classic|modern", // omit this property for universal Ext JS 6+ apps
            "sdk": {
                "path": "path/to/sdk", // on windows use "path\\to\\sdk"
                "version": "6.0.1", // the version of the sdk used by your app
                "framework": "extjs" // or "touch" for Sencha Touch apps
            }
        }
    ]
}
We recommend using relative paths so that this file can be checked into source control and shared amongst team members.
Note: Prior to plugin version 6.0.3 this file was called .sencha-ide-config and was located in the root of the
project. Version 6.0.3 automatically migrated this file to .sencha/ide/config.json.
Ask questions, report problems, and give feedback using the Eclipse Plugin Forum.
The forum can also be reached from within the IDE via:
Help -> Sencha Ext JS Plugin Feedback
If an unknown error occurs, users will be presented with a dialog explaining the error and an option to report the error to Sencha.
Upgrade to support Eclipse 2022-09 and 2022-12.
Bug fixing for supporting Cmd and Ext 7.6+
Add support for ExtJS Open Tooling (ext-gen) projects.
Minor bug fixes regarding Cmd 6.5+ config files.
This release includes performance improvements and internal bug fixes related to code completion.
ECP-149 - Loosen Eclipse feature/plugin version dependencies
ECP-156 - Standardize Sencha footprint in user projects


 IDE Plugins | Terms of Use
