Introduction to the Sencha Visual Studio Plugin
Our goal for Visual Studio Plugin is to streamline the development process for developers using Sencha Ext JS and Microsoft Visual Studio IDE. Visual Studio Plugin helps developers to build Ext JS web applications faster by delivering features including code completion, code navigation, and code generation.
Installation
Requirements
Microsoft Visual Studio 2013 or 2015, Enterprise, Professional, Ultimate, or Community Edition:
Sencha Cmd 6+ (optional - required to create and run Sencha apps)
Ext JS 4.2.+ or Sencha Touch 2.1+
Installation Instructions
The simplest method of installing the Sencha Visual Studio Plugin is to install it straight through Microsoft’s Visual Studio Gallery. This can be accessed from within Visual Studio by going to (Tools > Extensions and Updates…). From here, choose ‘Online’ in the left panel and search for the phrase “Sencha” at the top right. Select the appropriate plugin and click “Download” and follow the instructions. Please note, a reboot is necessary after the installation completes to begin using the plugin.
The Visual Studio Plugin uses Microsoft’s standard VSIX file extension to install into compatible versions of Visual Studio. After downloading the VSIX file simply run it (double-click it) and follow the steps in the install wizard.
Note: You can disable or uninstall the plugin from within Visual Studio at any time (Tools > Extensions and Updates… > Sencha Visual Studio Extension).
Licensing
The Sencha Visual Studio Plugin is a part of Ext JS Pro and Premium packages, and requires a valid license to use.
A fully-functional 30 day trial of the plugin is available, and will be tied to your Sencha Forum ID.
Upon starting Visual Studio, you will be presented with the Registration dialog:
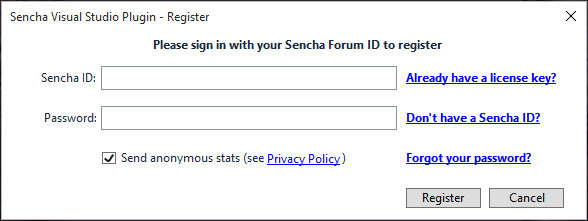
Enter your Sencha Forum ID and password.
After clicking OK:
If you already have an active license, your plugin will be registered and trial/license notifications will disappear.
If you are starting or resuming a trial, the plugin will notify you how many days are remaining in your trial with a balloon notification and status bar update at the bottom-right of a project window.
If your trial has expired, the plugin will prompt you for an activation code via the Activate window.
If you purchased a license and haven’t yet used your activation code, click on the “Already have a license key?” to open the Activate window.
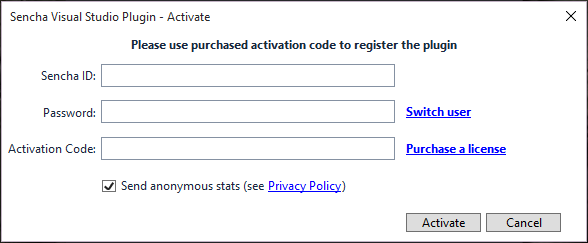
Enter your Sencha Forum ID, password, and activation code you received from your license purchase.
Once your account is associated with a license, you do not need to activate the plugin in the future.
If you do not register with a trial or valid account, or your trial has lapsed beyond 30 days, the Sencha Visual Studio Plugin functionality will be disabled. To register or activate your plugin, go to:
Tools > Options > Sencha > General
Then click the ‘Activate now’ button.
If you are offline or behind a proxy and cannot connect to Sencha’s Licensing servers, please contact Sencha Support or [email protected] to obtain a license file. This file should be placed at the following location:
%LOCALAPPDATA%\Sencha\VSPluginFeatures
The Sencha Visual Studio IDE Plugin is rich in functionality and simple to use. Features include:
IntelliSense
Toolkit Identification
Definition Lookup
Code Creation
sencha app watchintegration
Let’s walk through each of these.
IntelliSense
The Sencha Visual Studio Plugin provides IntelliSense support for Ext JS and Sencha Touch. Suggestions are provided in the following locations:
properties and methods on instances of Ext JS components
keys in config objects passed into constructors,
Ext.create,Ext.define,Ext.widget, and object literals withxtypeorxclassxtypes and other aliases
event names in listeners objects, and on, mon, un, and mun methods
Any project with the “Sencha Plugin” enabled is eligible for IntelliSense suggestions and other code navigation features. To add the “Sencha Plugin” support to any project or web site, simply right-click on the project from within the Solution Explorer and select the “Enable Sencha Plugin for Project” command. Any Ext JS project generated from within Visual Studio automatically has the “Sencha Plugin” support enabled.
Please note, Visual Studio 2015 has full IntelliSense support as described above. Visual Studio 2013 has a limitation within the JavaScript Language Service that prevents IntelliSense sessions from being created within an object literal. This means that IntelliSense within an Ext class config object will not work, for example:
Ext.create('TestClass', {
    // no IntelliSense within this object literal
})
IntelliSense outside of object literals (more specifically, within a closure scope) is still possible and supported in Visual Studio 2013.
Toolkit Identification
When using Ext JS (Ext JS 6+ only), the plugin automatically includes suggestions from the correct toolkit (classic or modern) depending on the location of current file being edited. This also applies to single toolkit applications based on the toolkit defined in the ‘app.json’ file.
Definition Lookup
With the Sencha Visual Studio Plugin installed, you can right-click (or use the standard F12 shortcut key) on any of the following and select “Go to Definition” to view an item’s definition.
class name
xtypes and other type aliases
methods and properties
config keys
events
Creating a new Sencha Project
Ext JS And ASP Web API Project Type
A basic project type containing an example of a Web API project configured to use Ext JS for the front end is available through the ‘New Project’ control (File > New Project…). Note, this project type supports Ext JS 6.0.0+ and above. For legacy support see either the Ext JS Web Site project type, or the Ext JS App Item type below.
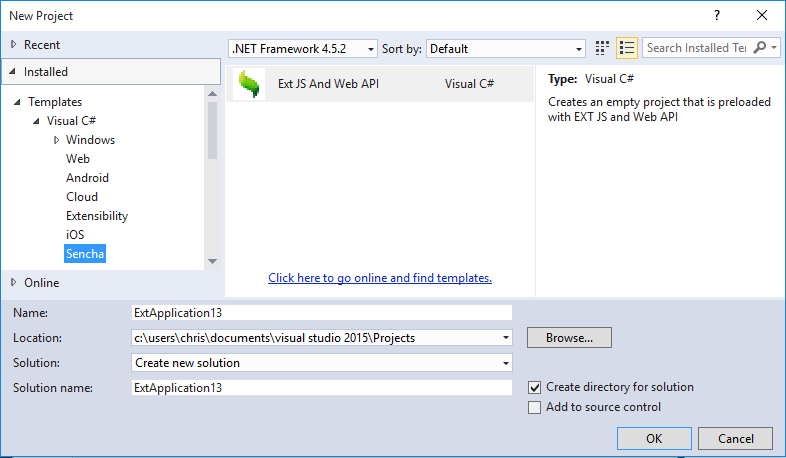
Upon selecting it, the App Generation wizard will appear as you can see below.
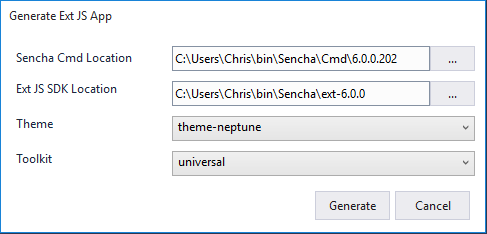
Pick valid locations for your Sencha Cmd and Sencha Ext JS SDK installations and click ‘Generate’ to continue.
Project creation can take around 2 minutes depending on your machine. During this time, the following steps are performed:
sencha generate appsencha refresh appTernJS JavaScript parsing
You can monitor the status of these processes in Visual Studio’s status bar.

Once completed, you will have an example application with the following structure:
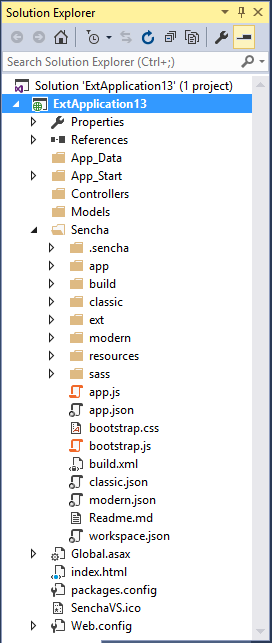
This is an ASP.NET application utilizing Web API (for Web Services, for example), with an Ext JS application baked in (Sencha directory). Click the ‘Run’ button (or press Control + F5) to launch the system web browser with the application hosted by IISExpress.
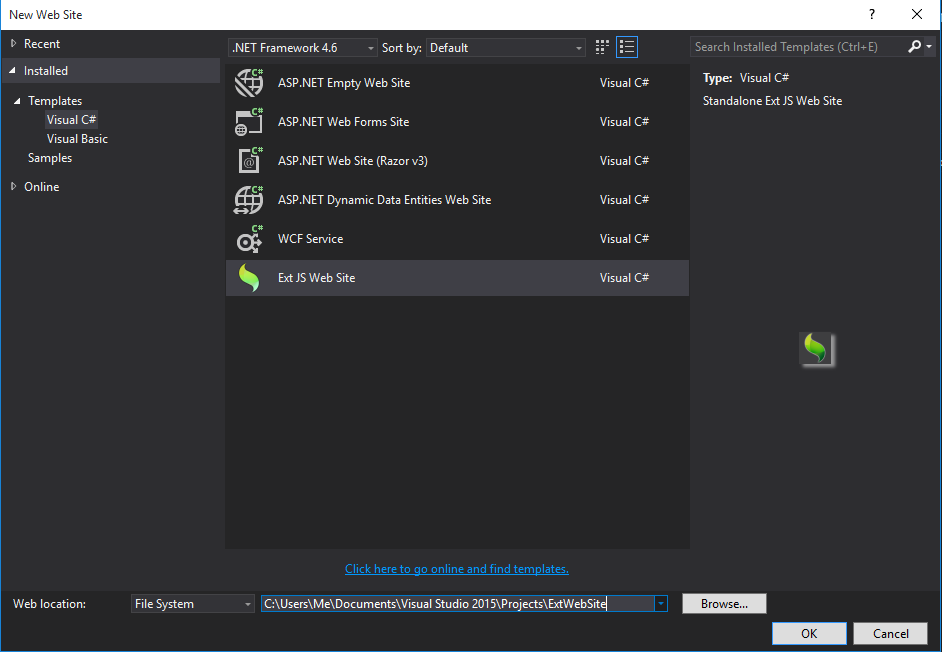
Ext JS Web Site
This creates a standalone Ext JS Web Site, which can be added to ASP.NET projects. The Ext JS framework requirements are Ext JS 4.2.4+ and Sencha Touch 2.1+. To create a new Web Site choose “File > New > New Web Site…”. Next, on the left-hand panel, select “Templates > Visual C#”, and finally select “Ext JS Web Site” from the main panel and click “OK”:
The Ext JS App Generation dialog will appear:

Enter valid Cmd (6+) and Ext JS SDK location information, pick a theme and toolkit (if Ext 6+) to create your application. Cmd will then generate your application as mentioned above.
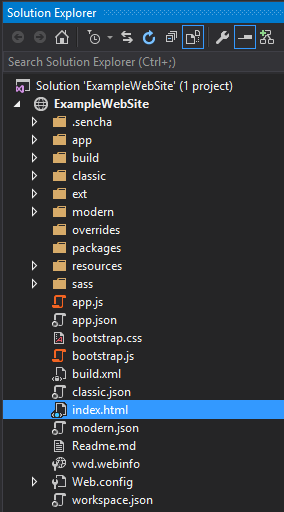
The resulting structure should now be present:
The Web Site can be deployed to IISExpress by pressing F5, or by clicking the green “Run” button on the Visual Studio toolbar. Additionally, ‘sencha app watch’ support is available by right clicking on the Web Site node and selecting the ‘Start Sencha App Watch’ command.
Add a Sencha App to an Existing Project
In addition to creating a new project, it is also possible to add one or more Ext JS applications to any C#-based Visual Studio solution. With a solution open, “right-click” on a project and choose “Add > New Item… > Sencha > App”:
The App Generation (shown above) will appear. Enter valid Cmd and Ext JS SDK location information, pick a theme and toolkit (if Ext 6+) to create your application. Cmd will then generate your application as mentioned above.
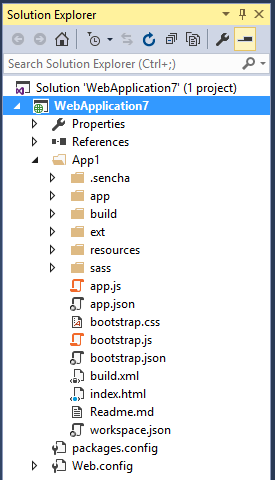
The resulting structure should now be present:
Please note, all configuration with ASP.NET or other technologies is left for the user to perform manually with this Item template.
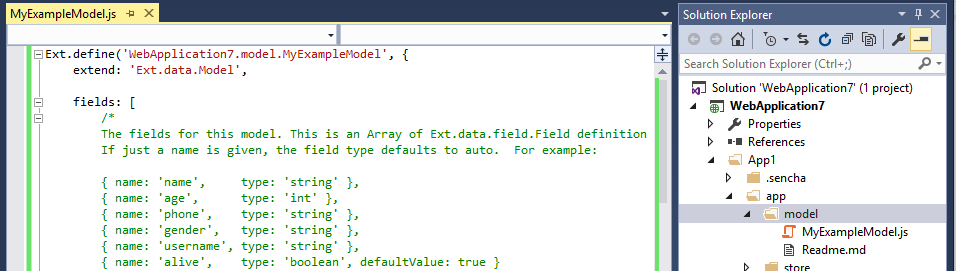
Class Creation
To add a new class (or a specific type of class: Model, Store, View, Controller, etc.) simply right-click on the location you want the new class to be created and select
"Add > New Item… > Sencha > Class (or specific type)".Enter in the name of your class and click Continue. Here is an example of the output (notice the correct name-spacing is provided by the plugin):
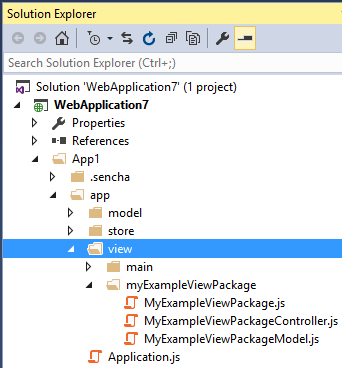
View Package Creation
View packages can also be created from the “New Item…” menu. Within a “view” folder simply choose “View Package” and provide a name, then the View Package wizard will be displayed:
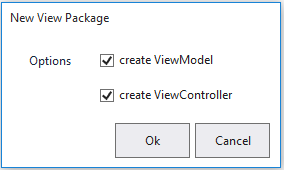
Check both, one, or none of these checkboxes dependent on your needs.
The following file structure will be created:
Sencha Cmd Integration
The Visual Studio Plugin utilizes Sencha Cmd for monitoring app development (app watch) and creating Ext JS applications (generate app). The Sencha Cmd version used by Visual Studio can be set from the Options panel found here:
Tools > Options… > Sencha > Cmd
Starting Sencha App Watch
Once an Application has been generated, you can easily start Sencha App Watch to begin development with the Cmd web server.
To start/stop Sencha Cmd’s ‘app watch’ command at any time, simply right click on the root Ext JS application folder to display the context menu and select ‘Run Sencha App Watch’.
One Cmd has started, you will see Sencha Cmd’s output in the console view and your application will be available at http://localhost:1841
Stop the process at any time by right clicking the Ext JS application root again and selecting ‘Stop Sencha App Watch’.
Note: In the case of the Ext JS with Web API project type, the ‘index.html’ file created by Sencha Cmd is relocated to the root of the ASP.NET project. Your web site will not be viewable when running sencha app watch for this project through http://localhost:1841. Instead, use the ‘Run’ (Ctrl+F5) or ‘Debug’ (F5) features built into Visual Studio.
Controlling Which Files Are Indexed
The plugin provides IntelliSense by indexing your JavaScript source files. You can control which files are indexed by editing (project_root)/.sencha/ide/config.json. This file is automatically created by the plugin and contains the following properties:
- include - An array of directories outside of project directory which should be indexed. Paths can be relative to the project root or absolute.
- exclude - An array of directories to exclude from indexing. Paths can be relative to the project root or absolute.
- apps - An array describing the location of each app in the project. Apps only need to be listed here if they were not built using Sencha Cmd. Any apps built with Cmd will be automatically detected.
Here is an example of a config.json file:
{
    "include": [
        "path\\to\\include"
    ],
    "exclude": [
        "path\\to\\exclude"
    ],
    "apps" : [
        {
            "name": "AppRootNamespace",
            "path": "path\\to\\app",
            "toolkit": "classic|modern", // omit this property for universal Ext JS 6+ apps
            "sdk": {
                "path": "path\\to\\sdk",
                "version": "6.0.1", // the version of the sdk used by your app
                "framework": "extjs" // or "touch" for Sencha Touch apps
            }
        }
    ]
}
We recommend using relative paths so that this file can be checked into source control and shared amongst team members.
This file can quickly be edited from within Visual Studio by right-clicking on the Solution tree node within the Solution Explorer window, and selecting “Edit Sencha IDE Config File” from the context menu. This option will only appear on Solutions where one or more “Sencha Enabled” projects exists.
Note: prior to plugin version 6.0.3 this file was called .sencha-ide-config and was located in the root of the project. Version 6.0.3 automatically migrated this file to .sencha/ide/config.json.
Disabling Automatic IntelliSense in JavaScript Files
By default, the plugin provides IntelliSense in JavaScript files after every keystroke. This may affect the responsiveness of the editor in certain projects and on certain machines. If you experience poor performance, please let us know in the forums or contact Sencha support. One way to increase the responsiveness of the editor is to disable automatic IntelliSense for JavaScript files so that code completion suggestions are only provided when you type ctrl-space. You can disable automatic IntelliSense by un-checking the following option:
- Tools > Options > Text Editor > JavaScript > General > Auto list members
You can also disable automatic IntelliSense within strings while leaving it enabled everywhere else by un-checking the following option:
- Tools > Options > Sencha > Enable automatic intellisense in string literals
Sencha Inspector
The Visual Studio plugin also integrates seamlessly with Sencha Inspector. If you have purchased Inspector, or are using a trial version, you can activate it by checking the following box:
Tools -> Options -> Sencha -> Cmd (checkbox)Once this box is checked and Inspector is configured, the application will be automatically connected with Inspector after running it.
Known Issues
Sencha Folder
The Sencha folder is not included in the project by default.
Workaround:
In Solution Explorer, click on: “Show All Files”
Right+Click on “Sencha” folder and choose “Include in project”
IntelliSense Plugin Collisions
The Sencha Visual Studio Plugin may have trouble providing IntelliSense suggestions when combined with any other extension that tries to augment IntelliSense with additional suggestions. One popular extension this is very apparent with is JetBrain’s ReSharper. To maintain the ability to use both extensions, please see the options offered by ReSharper here.
In very rare cases, the CSS file responsible for style and theme that gets generated by Cmd during project generation will not be “Included” in the project. This issue has only been witnessed a small handful of times within Visual Studio 2015. The fix is very simple. If when you run your application it appears without styling/theming, use the following steps to fix the resulting issue:
- In your Solution Explorer, select any item within your Ext JS Project and enable the “Show All Files” button on the toolbar:

- Expand the following directory and look for an excluded "*-all.css" file:
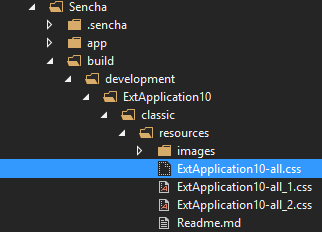
- Right click the excluded file and select the “Include in Project” command:
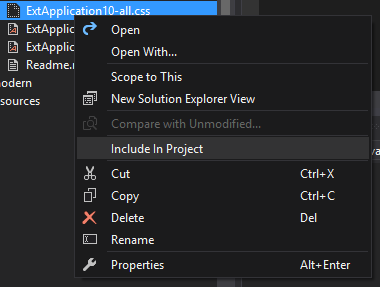
- Finally, run your application again. The style and theme should now be visible.
Support and Feedback
Ask questions, report problems, and give feedback using the Visual Studio Plugin Forum.
We truly appreciate your help and feedback to improve the Visual Studio plugin. Please report bugs, issues, or errors on the Visual Studio plugin forum. We look forward to your feedback.
Release Notes and Schedule
Visual Studio Plugin 6.0.4 - May 19, 2016
MVSP-217 - “Parsing Javascript Files” message does not clear when closing solution
MVSP-212 - Visual Studio attempts to build SDK packages when publishing a project
MVSP-139 - Instant completion fails when previous suggestion is deleted
MVSP-163 - Monitor Tern status file for indexing and display indexing status on UI
MVSP-108 - Inconsistent filtering in code suggestion list
MVSP-119 - File update should be sent on editor blur event
MVSP-208 - “StartUp Ext JS application” feature
MVSP-210 - Plugin should not allow you to add an ExtJS App to another ExtJS app
MVSP-214 - Improve error message regarding invalid ExtJS Application path
Visual Studio Plugin 6.0.3 - March 24, 2016
MVSP-179 - Integrate Sencha Cmd into Build and/or Publish processes
MVSP-183 - Standardize Sencha footprint in user projects
MVSP-188 - Allow user enable or disable automatic IntelliSense in string literal