Introduction to the Sencha Ext JS JetBrains Plugin
Sencha’s JetBrains plugin is an Integrated Development Environment tool that creates a confluence between Sencha Frameworks and JetBrains software. This integration comes in the form of code completion, inspection, and suggestion, while seamlessly cooperating with native JetBrains behavior.
Sencha experts will love the the ease with which changes are refactored and how simple it is to trace code to the source.
Sencha beginners will benefit as the JetBrains plugin provides completion suggestions while encouraging best-practice code structure and syntax.
Installation
Requirements
Any of the following JetBrains Products:
Please use version 6.0.9 for the 2016.1 releases of JetBrains IDEs
Please use version 6.0.8 for the following releases of JetBrains IDEs:
- IntelliJ 15.0.2+
- WebStorm 11.0.2+
- PhpStorm 10.0.2+
- RubyMine 8.0.2+
- PyCharm 5.0.2+
Please use version 6.0.6 for the following releases of JetBrains IDEs:
- IntelliJ 15.0.0, 15.0.1
- WebStorm 11.0.0, 10.0.1
- PhpStorm 10.0.0, 10.0.1
- RubyMine 8.0.0, 8.0.1
- PyCharm 5.0.0, 5.0.1
Please use version 6.0.5 for the following releases of JetBrains IDEs:
- IntelliJ 14
- WebStorm 10
- PhpStorm 9
- RubyMine 7
- PyCharm 4
Note: Sencha JetBrains plugin is only compatible with Ultimate versions of JetBrains IDEs. Community Editions are not currently supported.
Sencha Cmd 4+ (optional)
A Sencha Framework Development Source (un-minified)
- Ext JS 4.2+
- Touch 2.1+
Installation Instructions
Installing the Sencha JetBrains Plugin can be done completely from within the IDE.
Open the Settings dialog
- Ctrl+Alt+S for Windows
- ⌘+, for Mac
Select “Plugins” from the leftmost navigation tree
Click “Browse Repositories” on the bottom of the right panel
Type “Sencha” into the top search bar
Once you’ve isolated the Sencha plugin, right click it and select “Download and Install”.
Alternatively, you may click “Install Plugin” in the right panel.Click “Yes” when prompted to install the plugin.
Your IDE will then download and install the plugin
Restart your IDE for the changes to take effect
At this point, you should be in good shape to start using the Sencha JetBrains plugin.
Licensing
The Sencha JetBrains Plugin is a part of Ext JS Pro and Premium packages, and requires a valid license to use.
A fully-functional 30 day trial of the plugin is available, and will be tied to your Sencha Forum ID.
Upon starting your preferred JetBrains IDE, you will be presented with the Registration dialog:
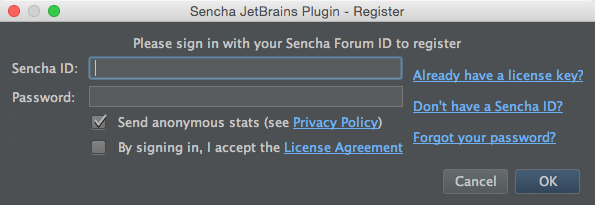
Enter your Sencha Forum ID and password. You are required to accept the License Agreement by selecting the appropriate checkbox.
After clicking OK:
If you already have an active license, your plugin will be registered and trial/license notifications will disappear.
If you are starting or resuming a trial, the plugin will notify you how many days are remaining in your trial with a balloon notification and status bar update at the bottom right of a project window.
If your trial has expired, the plugin will prompt you for an activation code via the Activate window.
If you purchased a license and haven’t yet used your activation code, click on the “Already have a license key?” to open the Activate window.

Enter your Sencha Forum ID, password, and activation code you received from your license purchase.
Once your account is associated with a license, you do not need to activate the plugin in the future.
If you do not register with a trial or valid account, or your trial has lapsed beyond 30 days, the Sencha JetBrains Plugin functionality will be disabled. To register or activate your plugin, click on the links in the balloon notifications, or on the text at the bottom right of a project window
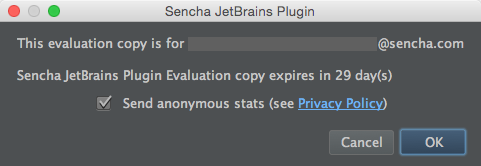
The license is valid for multiple JetBrains products on your machine. If you registered one product, such as IntelliJ, when you open up WebStorm you will not need to register or login again. Instead, it will use your existing trial or paid license. You will see a dialog informing you who the plugin is registered to, how many days remain in the trial (if appropriate), and the option to report anonymous statistics.
Once you dismiss this dialog, you will never see it again within this IDE. Any other new JetBrains IDEs you use will display this dialog once on the first startup.
To see who the plugin is currently registered to, you can see this at the bottom of the Sencha preferences screen:
Preferences->Other Settings->SenchaFeatures
The JetBrains IDE Plugin is rich in functionality and simple to use. Features include:
Code Completion
Code Inspection
Code Navigation
Code Generation
Refactoring
Template Creation
Run Configuration
Spellchecking
Let’s walk through each of these.
Code Completion
Let’s begin reviewing the benefits of Sencha JetBrains IDE Plugin with one of the most handy features; code completion. This feature allows you to receive completion suggestions for the appropriate visibility scope. This applies to almost any framework item, including:
- Config, method, and property names for all Ext JS and user classes
- Values for alias properties such as xtype, controller, viewModel, layout, etc…
- Event names in Component.on, .mon, .un, .mun, and listeners objects
- CSS class names in all config properties and methods ending in ‘cls’
- this.lookupReference(…) in controllers with an alias
- Controller methods in listeners: { (event): (methodName) } as well as handler config property
- Model/store fields for Ext.grid.Column.dataIndex
- Properties from the ViewModel in bind configs
For instance, if you were to start typing “xtype: ”, you would be presented with a list of all available xtypes. As you continue typing, the suggestion list will filter until you arrive at the xtype you seek. At that point, you can simply select the item from the dropdown via mouse click, or more simply, select it by hitting the “tab” key.
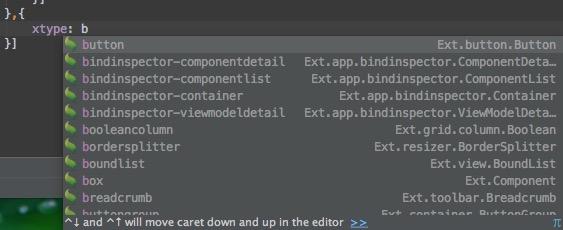
This will fill in the xtype with the selected item and appropriately wrap it with quotes as needed.
Code Inspection
The JetBrains IDE plugin provides code inspection to help developers keep their code clean, efficient, and accurate. The severity for each of the inspections listed below can be adjusted or disabled entirely via Preferences… Editor.. Inspections… JavaScript… Sencha.
Requires & Uses
It’s easy to gloss over the requires and uses arrays as your application evolves. For instance, if you require a class that your application no longer needs, you may create unnecessary overhead in your final application. That’s where the plugin comes into play.
If it detects a requires for something that is not used, it will highlight the requirement and let you know!
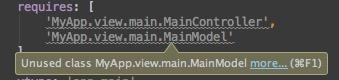
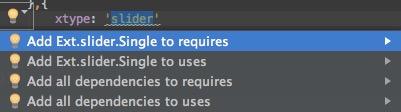
If you click within the class name, the intention action alert (a small light bulb icon) will appear. This light bulb gives you the opportunity to take some action based on the warning.
This particular action allows you remove the unused class or classes.

Note: Some users may find this feature unnecessary if they are using ext-all.js. You may disable inspections by going here:
Preferences->Editor->Inspections->JavaScript->Sencha->Detect missing or unused dependenciesNote: You can configure the plugin to automatically add and remove classes from the requires array by going here:
Preferences->Other Settings->Sencha->Manage requires arrayMissing Methods
Additionally, the IDE ensures that any methods you may reference actually exist in your controller. If not, the quick-fix automatically creates a method with the correct parameters and docs.
Unknown Classes
You will receive a similar visual warning if you attempt to reference something that the plugin can not find, or your class has not required. For instance, if you reference an xtype that has not been included in your class, you will receive the following warning:
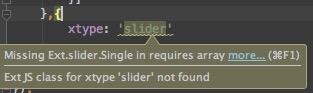
In this case, the action item allows you to inject the necessary class(es) into your requires or uses array.
You will receive similar notifications with possible resolutions for the following scenarios:
Class declaration does not match directory structure (and visa versa)
References to missing controller methods
initComponent without this.callParent()
Code Navigation
Combining JetBrains’s native functionality with the JetBrains Plugin’s knowledge of the framework provides an incredibly powerful navigation tool. You may navigate to the source member of any framework or custom class by clicking on it while holding CTRL (Command on Mac).
For instance, if you were to perform this action on myCustomFunction, you will be taken to the class in which you created that function. Additionally, clicking layout: 'border' will take you to the Ext JS source code that defines Ext.layout.container.Border.
This functionality enables users to quickly move throughout their application without the need for searching a tree or directory structure.
Code Generation
The JetBrains Plugin can also generate code snippets to simplify developer effort and reduce typing. These code generation options can be opened by right clicking on the editor window, and by selecting Generate...
Generate Columns from Model
Any Ext JS class that extends an Ext.grid.Panel can have its columns property automatically generated.
Simply choose the Generate columns from model option from the Generate menu, and the Plugin will automatically find the fields from the model and create the columns property with all the fields mapped in your current class. If the class already has a columns property, it will add only the missing fields.
The column generation is relative to where the caret is in the editor. For example, the plugin can either generate columns for the UserView class below, or for the grid xtype in items based on the editor’s caret location.
Ext.define('App.view.main.UserView', {
    requires: [
        'App.view.user.UserModel',
        'Ext.grid.Panel'
    ],

    extend: 'Ext.grid.Panel',

    viewModel: "user",
    bind: {
        store: '{users}'
    },

    items: [{
        xtype: 'grid',
        store: 'Offices'
    }]
})
Refactoring
Refactoring provides an incredible time saving feature, which comes native to JetBrains with a little extra help from the JetBrains IDE Plugin. Oftentimes in development, you will happen upon the need to rename a file. However, that can wreak havoc on file dependencies.
Let’s say you have a file called MyApp.view.main.Main, but you’ve decided it’s better suited being located in a subfolder, which changes the namespace to MyApp.view.submain.MainView.
If you were to simply move the file, the namespace would typically be wrong, and all dependencies would break. This is no longer an issue with the JetBrains IDE Plugin. Simply drag the Main file into your submain folder. You will be presented with a dialog. Ensure that “search for references” is checked and click “ok”. All references to MyApp.view.main.Main will be updated across your entire application accordingly.
This works with renaming as well. Just right-click the file and select “refactor -> rename”.
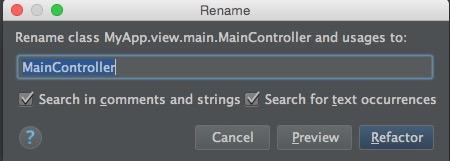
Provide your new name, ensuring that the boxes are checked, and click “Refactor”. Again, all occurrences of your file will be updated.
Templates
It can be tedious to create a bare bones structure every time you need a new class. The JetBrains IDE Plugin removes the grunt work by offering you a template creation tool. Simply right+click on a folder within your application’s structure and you will be presented with a context menu. Select the “New” menu option to see what is available:
Ext JS Workspace
- Note: This requires an installation of Sencha Cmd.
- If you are in a non-Ext JS project, you can create a workspace on a folder in the project.
- This is very similar to creating a New Ext JS Workspace Project (see Generating a New Workspace Project)
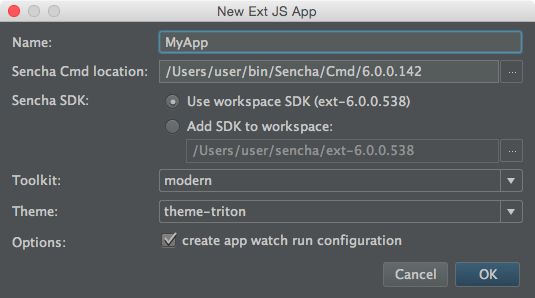
Ext JS App
- Note: This requires an installation of Sencha Cmd.
- An option to create a new Ext JS App is displayed when you right-click on any directory outside of an existing Ext app in the project tree.
- This is very similar to creating a New Ext JS App Project (see Generating a New Application Project), but instead creates an app inside an existing project.
- If this App will exist within an Ext JS Workspace, you can select an SDK already associated with the workspace (Ext JS and Touch), or specify your own.
If your workspace already has both an Ext JS and Touch SDK, you cannot specify another SDK. You also have the option of creating a Run configuration (see Run Configuration)
Ext JS Class
You can create a new Ext JS class in any folder under ‘app’ in an application, or ‘src’ in a package
From there, you can create a new Ext JS Class or App. Clicking “Ext JS Class” will present a menu containing the various class types you can generate:

The class type will be automatically selected depending on the folder, e.g. if you are creating a new class in the ‘store’ folder, then Kind will default to ‘Store’
Once you name your new Class and select a class type, simply click “OK” and an appropriately name-spaced class will be created for you.
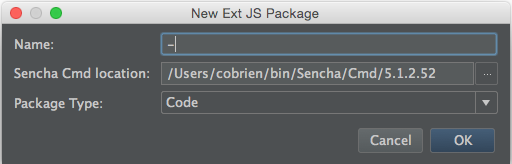
Ext JS Package
- Note: This requires an installation of Sencha Cmd.
- You can create a new Ext JS Package in the appropriate packages folder in a workspace
- Specify your Sencha Cmd location
- The plugin will default to the last Sencha Cmd location used within the IDE.
Select your type of package: Code, Locale, Theme
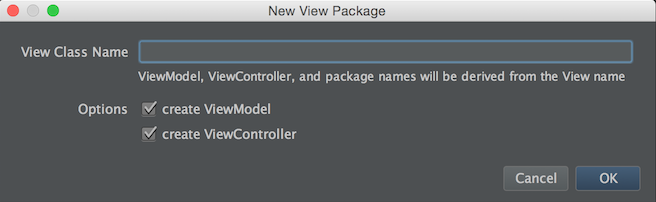
View Package
If you are in the ‘view’ folder of an application, you can use the ViewPackage generation to quickly create a package folder with View, ViewModel, and ViewController classes with the same name.
Live Templates
The Sencha JetBrains Plugin also contains the ability to utilize JetBrains’s live template system. A “live template” is a feature that allows you to type a short code and then tab complete to expand it into a commonly used code pattern. The plugin currently contains a single live template but more are on the way!
xc
Our lone template currently expands from “xc” + tab, into:
Ext.create('', {

});
You may also add your own live templates by checking out:
Preferences -> Editor -> Live TemplatesRun Configuration
Note: This requires an installation of Sencha Cmd.
It allows you to run Cmd’s “sencha app watch” feature from within the IDE. This allows you to see compilation errors as they occur and address them accordingly.
You may run “sencha app watch” by clicking the green “play” button in the top right corner of the screen.

A Run configuration is created automatically for you when creating a new Ext JS Application project. When creating an Ext JS Application inside an existing project, you have the option to create a new run configuration.
Create a new Run Configuration
- Select the run dropdown at the top right of the IDE next to the Run and Debug icons, and select Edit Configurations…
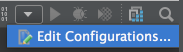 or
or - Select the “Run” menu, and select Edit Configurations…
- Press the + icon at top left
- Select “Sencha App Watch”
- Enter an appropriate name, point it to an Ext JS Application directory and a valid Cmd location
- Click OK
Spellcheck
The plugin also adds many common Ext JS keywords such as xtype, xclass, and event names to the IDE dictionary. This ensures that they are not flagged as misspellings so that spellchecking remains clean and accurate.
Support and Feedback
Ask questions, report problems, and give feedback using the JetBrains IDE Plugin Forum.
The forum can also be reached from within the IDE via:
Help -> Sencha Ext JS Plugin FeedbackOpening an Existing Ext JS Application or Workspace
You can easily open up an existing Ext JS Application or Workspace through the IDE, simply:
Select “Open” from the IDE splash screen or File menu
Locate and select the directory your workspace or application already resides in.
Note: JetBrains products will spend a minute or two indexing your project initially.
Once it’s completed, you’ll find your application indexed and ready to go.
Projects Created Without Sencha Cmd
The plugin supports projects that were not originally build with Sencha Cmd, but some additional configuration is required to get code completion working if the Ext JS or Sencha Touch SDK is not located within your project’s directory tree. To enable code completion, simply create a Library definition for Ext JS or Sencha Touch so that the plugin knows where the framework classes are located:
From the Preferences dialog, select Languages & Frameworks… JavaScript… Libraries and click the “Add” button.
Create a Library definition for Ext JS using the following settings:
- Name: (“Ext JS” or “Sencha Touch”)
- Framework type: <Custom>
- Visibility: Project
- Directories: (the root of your Ext JS or Sencha Touch SDK)
You should see the IDE do some additional indexing once these changes are applied. Once that is done the plugin will recognize the classes in your SDK and code completion should work correctly.
Projects with both Sencha Touch and Ext JS
Projects that contain both Sencha Touch and Ext JS or multiple versions of either framework require additional configuration for code completion to work correctly. You must create separate library definitions for the Sencha Touch and Ext JS sections of your app so that the plugin can determine which framework applies to which sections of your code. Follow these steps to configure libraries:
From the Preferences dialog, select Languages & Frameworks… JavaScript… Libraries and click the “Add” button.
Create a Library definition for Ext JS using the following settings:
- Name: Ext JS
- Framework type: <Custom>
- Visibility: Project
- Directories: (Ext JS SDK directory)
Create a Library definition for Sencha Touch using the following settings:
- Name: Sencha Touch
- Framework type: <Custom>
- Visibility: Project
- Directories: (Touch SDK directory)
The Library Preferences View should now look like this:
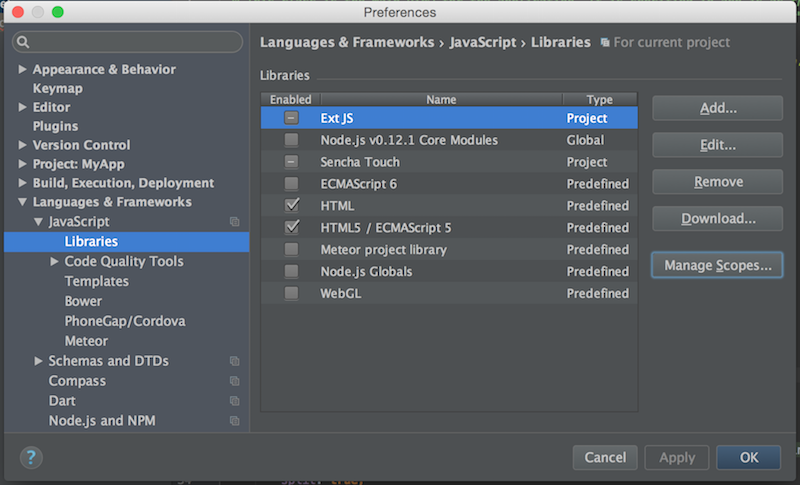
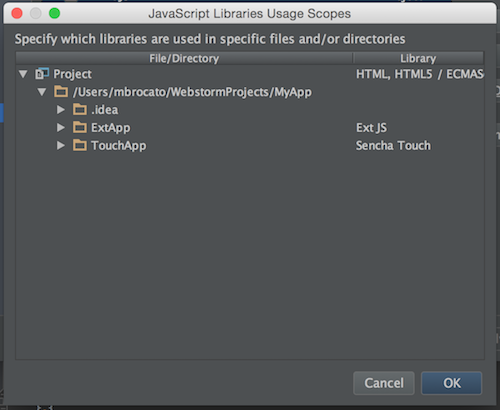
Click “Manage Scopes”
- Remove “Ext JS” and “Sencha Touch” from the root of the project.
- Add “Ext JS” to the root directory of your Ext JS app.
Add “Sencha Touch” to the root directory of your Touch app.
The library scopes dialog should look like this:
Note: the steps above are not needed for Ext JS 6 universal apps. The plugin automatically understands the Ext JS 6 app directory structure and will provide the correct code completion suggestions without additional configuration.
Generating a New Workspace Project
Note: This requires an installation of Sencha Cmd.
To create a new Ext JS Workspace project, simply:
Click “Create New Project” from the splash screen
Select “Sencha” from the left navigation (IntelliJ only)
Select “Ext JS Workspace”
Click “Next”
Give your project a name and location
Enter/choose the path of your Sencha Cmd location
- The plugin will default to the last Sencha Cmd location used within the IDE.
If you want to specify an existing SDK (Ext JS or Touch) for this workspace, you can select “Add new SDK to workspace”.
- Enter the path to an appropriate Sencha SDK. This defaults to the last used SDK folder.
- Sencha Cmd will copy this SDK into the workspace when the project is created.
- Otherwise, select “No SDK” and the workspace will be created without an SDK. This will be added when an Ext JS App is added to a workspace.
Click “Finish” - Sencha Cmd will now generate the workspace

Note: JetBrains products will spend a minute or two indexing your project initially.
Once it’s completed, you’ll find your application indexed and ready to go.
Generating a New Application Project
Note: This requires an installation of Sencha Cmd.
To create a new Ext JS Application project, simply:
Click “Create New Project” from the splash screen
Select “Sencha” from the left navigation (IntelliJ only)
Select “Ext JS Application”
Click “Next”
Give your project a name and location
Enter/choose the path of your Sencha Cmd location
- The plugin will default to the last Sencha Cmd location used within the IDE.
Select an SDK option.
- To use the default Ext JS SDK (equivalent to using ‘sencha generate app -ext’), select “Use default Sencha Cmd Ext JS SDK”.
- If you would like to use an existing SDK, select “Use other SDK”
- Enter the path to an appropriate Sencha SDK. This defaults to the last used SDK folder.
- Sencha Cmd will copy this SDK into the application when the project is created.
If an Ext 4.x - 6.x SDK is specified, you can also select the theme to use on this Application.
- This defaults to the last used theme (if available in the specified SDK/toolkit).
- The available themes are generated from the specified Ext JS SDK and toolkit (if an Ext JS 6 application)
Click “Finish” - Sencha Cmd will now generate the application and associated run configuration (see Run Configuration)
Note: JetBrains products will spend a minute or two indexing your project initially.
Once it’s completed, you’ll find your application indexed and ready to go.
Release Notes and Schedule
JetBrains Plugin 6.0.9 - March 17, 2016
IDEAPLUGIN-341 - Plugin throws exceptions when using the latest WebStorm EAP
IDEAPLUGIN-340 - selModel type=spreadsheet requires Ext.grid.selection.SpreadsheetModel
IDEAPLUGIN-339 - Auto method generation is not complete when using a handler
IDEAPLUGIN-335 - Classes missing from code completion in IntelliJ 15.0.3
IDEAPLUGIN-334 - Classes missing from code completion in IntelliJ 16 EAP
JetBrains Plugin 6.0.8 - Jan 21, 2016
- IDEAPLUGIN-330 - Endless loop when indexing after installing 6.0.7 in Intellij 15.0.2
JetBrains Plugin 6.0.7 - Jan 8, 2016
- IDEAPLUGIN-309 - Error reporting hangs IDEA when there are network issues
JetBrains Plugin 6.0.6 - Nov 12, 2015
- IDEAPLUGIN-306 - Exception when generating references
JetBrains Plugin 6.0.4 - Oct 15, 2015
- IDEAPLUGIN-297 - References to non-unique alternateClassNames are resolved incorrectly