Intro to App Architecture
Many classes have shortcut names used when creating (instantiating) a class with a
configuration object. The shortcut name is referred to as an alias (or xtype if the
class extends Ext.Component). The alias/xtype is listed next to the class name of
applicable classes for quick reference.
Framework classes or their members may be specified as private or protected. Else,
the class / member is public. Public, protected, and private are access
descriptors used to convey how and when the class or class member should be used.
Public classes and class members are available for use by any other class or application code and may be relied upon as a stable and persistent within major product versions. Public classes and members may safely be extended via a subclass.
Protected class members are stable public members intended to be used by the
owning class or its subclasses. Protected members may safely be extended via a subclass.
Private classes and class members are used internally by the framework and are not intended to be used by application developers. Private classes and members may change or be omitted from the framework at any time without notice and should not be relied upon in application logic.
static label next to the
method name. *See Static below.Below is an example class member that we can disect to show the syntax of a class member (the lookupComponent method as viewed from the Ext.button.Button class in this case).
Let's look at each part of the member row:
lookupComponent in this example)( item ) in this example)Ext.Component in this case). This may be omitted for methods that do not
return anything other than undefined or may display as multiple possible values
separated by a forward slash / signifying that what is returned may depend on the
results of the method call (i.e. a method may return a Component if a get method calls is
successful or false if unsuccessful which would be displayed as
Ext.Component/Boolean).PROTECTED in
this example - see the Flags section below)Ext.container.Container in this example). The source
class will be displayed as a blue link if the member originates from the current class
and gray if it is inherited from an ancestor or mixed-in class.view source in the example)item : Object in the example).undefined a "Returns" section
will note the type of class or object returned and a description (Ext.Component in the
example)Available since 3.4.0 - not pictured in
the example) just after the member descriptionDefaults to: false)The API documentation uses a number of flags to further commnicate the class member's function and intent. The label may be represented by a text label, an abbreviation, or an icon.
classInstance.method1().method2().etc();false is returned from
an event handler- Indicates a framework class
- A singleton framework class. *See the singleton flag for more information
- A component-type framework class (any class within the Ext JS framework that extends Ext.Component)
- Indicates that the class, member, or guide is new in the currently viewed version
- Indicates a class member of type config
- Indicates a class member of type property
- Indicates a class member of type
method
- Indicates a class member of type event
- Indicates a class member of type
theme variable
- Indicates a class member of type
theme mixin
- Indicates that the class, member, or guide is new in the currently viewed version
Just below the class name on an API doc page is a row of buttons corresponding to the types of members owned by the current class. Each button shows a count of members by type (this count is updated as filters are applied). Clicking the button will navigate you to that member section. Hovering over the member-type button will reveal a popup menu of all members of that type for quick navigation.
Getting and setter methods that correlate to a class config option will show up in the methods section as well as in the configs section of both the API doc and the member-type menus just beneath the config they work with. The getter and setter method documentation will be found in the config row for easy reference.
Your page history is kept in localstorage and displayed (using the available real estate) just below the top title bar. By default, the only search results shown are the pages matching the product / version you're currently viewing. You can expand what is displayed by clicking on the button on the right-hand side of the history bar and choosing the "All" radio option. This will show all recent pages in the history bar for all products / versions.
Within the history config menu you will also see a listing of your recent page visits. The results are filtered by the "Current Product / Version" and "All" radio options. Clicking on the button will clear the history bar as well as the history kept in local storage.
If "All" is selected in the history config menu the checkbox option for "Show product details in the history bar" will be enabled. When checked, the product/version for each historic page will show alongside the page name in the history bar. Hovering the cursor over the page names in the history bar will also show the product/version as a tooltip.
Both API docs and guides can be searched for using the search field at the top of the page.
On API doc pages there is also a filter input field that filters the member rows using the filter string. In addition to filtering by string you can filter the class members by access level, inheritance, and read only. This is done using the checkboxes at the top of the page.
The checkbox at the bottom of the API class navigation tree filters the class list to include or exclude private classes.
Clicking on an empty search field will show your last 10 searches for quick navigation.
Each API doc page (with the exception of Javascript primitives pages) has a menu view of metadata relating to that class. This metadata view will have one or more of the following:
Ext.button.Button class has an alternate class name of Ext.Button). Alternate class
names are commonly maintained for backward compatibility.Runnable examples (Fiddles) are expanded on a page by default. You can collapse and expand example code blocks individually using the arrow on the top-left of the code block. You can also toggle the collapse state of all examples using the toggle button on the top-right of the page. The toggle-all state will be remembered between page loads.
Class members are collapsed on a page by default. You can expand and collapse members using the arrow icon on the left of the member row or globally using the expand / collapse all toggle button top-right.
Viewing the docs on narrower screens or browsers will result in a view optimized for a smaller form factor. The primary differences between the desktop and "mobile" view are:
The class source can be viewed by clicking on the class name at the top of an API doc page. The source for class members can be viewed by clicking on the "view source" link on the right-hand side of the member row.
Ext JS provides support for both MVC and MVVM application architectures. Both of these architectural approaches share certain concepts and focus on dividing application code along logical lines. Each approach has its strengths based on how it chooses to divide up the pieces of an application.
The goal of this guide is to provide you with foundational knowledge regarding the components that make up these architectures.
In an MVC architecture, most classes are either Models, Views or Controllers. The user interacts with Views, which display data held in Models. Those interactions are monitored by a Controller, which then responds to the interactions by updating the View and Model, as necessary.
The View and the Model are generally unaware of each other because the Controller has the sole responsibility of directing updates. Generally speaking, Controllers will contain most of the application logic within an MVC application. Views ideally have little (if any) business logic. Models are primarily an interface to data and contain business logic to manage changes to said data.
The goal of MVC is to clearly define the responsibilities for each class in the application. Because every class has clearly defined responsibilities, they implicitly become decoupled from the larger environment. This makes the app easier to test and maintain, and its code more reusable.
The key difference between MVC and MVVM is that MVVM features an abstraction of a View called the ViewModel. The ViewModel coordinates the changes between a Model’s data and the View's presentation of that data using a technique called “data binding”.
The result is that the Model and framework perform as much work as possible, minimizing or eliminating application logic that directly manipulates the View.
Ext JS 5 introduces support for the MVVM architecture as well as improvements on the (C) in MVC. While we encourage you to investigate and take advantage of these improvements, it is important to note that we have made every effort to ensure existing Ext JS 4 MVC applications continue to function unmodified.
To understand how these choices fit into your application, we should start by further defining what the various abbreviations represent.
(M) Model - This is the data for your application. A set of classes (called “Models”) defines the fields for their data (e.g. a User model with user-name and password fields). Models know how to persist themselves through the data package and can be linked to other models via associations.
Models are normally used in conjunction with Stores to provide data for grids and other components. Models are also an ideal location for any data logic that you may need, such as validation, conversion, etc.
(V) View - A View is any type of component that is visually represented. For instance, grids, trees and panels are all considered Views.
(C) Controller - Controllers are used as a place to maintain the view's logic that makes your app work. This could entail rendering views, routing, instantiating Models, and any other sort of app logic.
(VM) ViewModel - The ViewModel is a class that manages data specific to the View.
It allows interested components to bind to it and be updated whenever this data changes.
These application architectures provide structure and consistency to your framework code. Following the conventions we suggest will provide a number of important benefits:
Every application works in the same manner, so you only have to learn it once.
It's easy to share code between applications.
You can use Sencha Cmd to create optimized production versions of your applications.
Before we start walking through the pieces, let's build a sample application with Sencha Cmd. First, download and unzip the Ext JS SDK. Next, issue the following commands from your command line:
sencha -sdk local/path/to/ExtJS generate app MyApp MyApp
cd app
sencha app watch
Note: If you are not familiar with what's happening above, please check out our Getting Started guide.
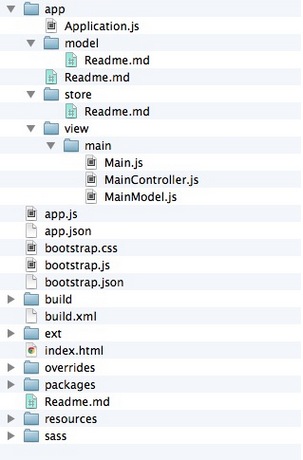
Before we start talking about the pieces that make up the MVC, MVVM, MVC+VM patterns, let's take a look at the structure of a Cmd generated application.
Ext JS applications follow a unified directory structure that is the same for every app.
In our recommended layout, all Store, Model, ViewModel, and ViewController classes are
placed in the app folder (with Models placed in the model folder, Stores in
store, and ViewModels/Controllers in view). Best practice will be to logically
group ViewControllers and
ViewModels together in sub-folders within the app/view/
folder using a similar naming structure that you'll use for the views themselves (see
the "app/view/main/" and "classic/src/view/main/" folders below).
The first line of each Class is an address of sorts. This "address" is called a namespace. The formula for namespace is:
<AppName>.<foldername>.<ClassAndFileName>
In your sample app, "MyApp" is the AppName, "view" is the folder name, "main" is the
sub-folder name and "Main" is the Class and Filename. Based on that information, the
framework looks for a file called Main.js in the following location:
// Classic
classic/src/view/main/Main.js

// Modern
modern/src/view/main/Main.js

// Core
// "MyApp.view.main.MainController" shared between toolkits would be located at:
app/view/main/MainController.js
If that file is not found, Ext JS will throw an error until you remedy the situation.

Let’s start evaluating the application by looking at index.html.
<!DOCTYPE HTML>
<html manifest="">
<head>
    <meta http-equiv="X-UA-Compatible" content="IE=edge">
    <meta charset="UTF-8">

    <title>MyApp</title>


    <script type="text/javascript">
        var Ext = Ext || {}; // Ext namespace won't be defined yet...

        // This function is called by the Microloader after it has performed basic
        // device detection. The results are provided in the "tags" object. You can
        // use these tags here or even add custom tags. These can be used by platform
        // filters in your manifest or by platformConfig expressions in your app.
        //
        Ext.beforeLoad = function (tags) {
            var s = location.search,  // the query string (ex "?foo=1&bar")
                profile;

            // For testing look for "?classic" or "?modern" in the URL to override
            // device detection default.
            //
            if (s.match(/\bclassic\b/)) {
                profile = 'classic';
            }
            else if (s.match(/\bmodern\b/)) {
                profile = 'modern';
            }
            else {
                profile = tags.desktop ? 'classic' : 'modern';
                //profile = tags.phone ? 'modern' : 'classic';
            }

            Ext.manifest = profile; // this name must match a build profile name

            // This function is called once the manifest is available but before
            // any data is pulled from it.
            //
            //return function (manifest) {
                // peek at / modify the manifest object
            //};
        };
    </script>


    <!-- The line below must be kept intact for Sencha Cmd to build your application -->
    <script id="microloader" type="text/javascript" src="bootstrap.js"></script>

</head>
<body></body>
</html>
Ext JS uses the Microloader to load application resources described in the app.json
file. This replaces the need to add them to index.html. With app.json all of the
application meta-data exists in a single location.
Sencha Cmd can then compile your
application in a simple and efficient manner.
app.json is heavily commented and provides an excellent resource for gleaning
information about the configuration it accepts.
For more information on the beforeLoad section and platform-specific builds refer to
the Developing for Multiple Environments and Screens guide.
When we generated our application earlier, we created a class (in Application.js) AND
launched an instance of it (in app.js). You can see the content of app.js below:
/*
 * This file is generated and updated by Sencha Cmd. You can edit this file as
 * needed for your application, but these edits will have to be merged by
 * Sencha Cmd when upgrading.
 */
Ext.application({
    name: 'MyApp',

    extend: 'MyApp.Application',

    requires: [
        'MyApp.view.main.Main'
    ],

    // The name of the initial view to create. With the classic toolkit this class
    // will gain a "viewport" plugin if it does not extend Ext.Viewport. With the
    // modern toolkit, the main view will be added to the Viewport.
    //
    mainView: 'MyApp.view.main.Main'

    //-------------------------------------------------------------------------
    // Most customizations should be made to MyApp.Application. If you need to
    // customize this file, doing so below this section reduces the likelihood
    // of merge conflicts when upgrading to new versions of Sencha Cmd.
    //-------------------------------------------------------------------------
});
By designating a container class for mainView,
you can use any class as your Viewport. In the above example, we have determined
MyApp.view.main.Main (an TabPanel class) to be our Viewport.
The mainView config instructs the application to create the designated view and attach the Viewport Plugin. This connects the view to the document body.
Every Ext JS application starts with an instance of the
Application Class. This class is intended to be launch-able
by app.js as well as instantiable for testing.
The following Application.js content is automatically created when you generate your
application with Sencha Cmd.
Ext.define('MyApp.Application', {
    extend: 'Ext.app.Application',

    name: 'MyApp',

    stores: [
        // TODO: add global / shared stores here
    ],

    launch: function () {
        // TODO - Launch the application
    },

    onAppUpdate: function () {
        Ext.Msg.confirm('Application Update', 'This application has an update, reload?',
            function (choice) {
                if (choice === 'yes') {
                    window.location.reload();
                }
            }
        );
    }
});
The Application Class contains global settings for your
application, such as the app's namespace, shared stores, etc. The onAppUpdate method
is called when the application is out of date (browser cached version versus the
latest version on the server). The user is prompted to reload the application in order
to operate with the current build.
A View is nothing more than a Component, which is a subclass of Ext.Component.
A view contains all of your application's visual aspects.
If you open the starter app's classic/src/view/main/Main.js file, you should see the
following code.
Ext.define('MyApp.view.main.Main', {
    extend: 'Ext.tab.Panel',
    xtype: 'app-main',

    requires: [
        'Ext.plugin.Viewport',
        'Ext.window.MessageBox',

        'MyApp.view.main.MainController',
        'MyApp.view.main.MainModel',
        'MyApp.view.main.List'
    ],

    controller: 'main',
    viewModel: 'main',

    ui: 'navigation',

    tabBarHeaderPosition: 1,
    titleRotation: 0,
    tabRotation: 0,

    header: {
        layout: {
            align: 'stretchmax'
        },
        title: {
            bind: {
                text: '{name}'
            },
            flex: 0
        },
        iconCls: 'fa-th-list'
    },

    tabBar: {
        flex: 1,
        layout: {
            align: 'stretch',
            overflowHandler: 'none'
        }
    },

    responsiveConfig: {
        tall: {
            headerPosition: 'top'
        },
        wide: {
            headerPosition: 'left'
        }
    },

    defaults: {
        bodyPadding: 20,
        tabConfig: {
            plugins: 'responsive',
            responsiveConfig: {
                wide: {
                    iconAlign: 'left',
                    textAlign: 'left'
                },
                tall: {
                    iconAlign: 'top',
                    textAlign: 'center',
                    width: 120
                }
            }
        }
    },

    items: [{
        title: 'Home',
        iconCls: 'fa-home',
        // The following grid shares a store with the classic version's grid as well!
        items: [{
            xtype: 'mainlist'
        }]
    }, {
        title: 'Users',
        iconCls: 'fa-user',
        bind: {
            html: '{loremIpsum}'
        }
    }, {
        title: 'Groups',
        iconCls: 'fa-users',
        bind: {
            html: '{loremIpsum}'
        }
    }, {
        title: 'Settings',
        iconCls: 'fa-cog',
        bind: {
            html: '{loremIpsum}'
        }
    }]
});
Please note that the view does not include any application logic. All of your view's logical bits should be included in the ViewController, which we'll talk about in the next section.
Two interesting pieces of this view are the controller and viewModel configs.
The next view of interest is the "List" view at classic/src/main/view/List.
/**
 * This view is an example list of people.
 */
Ext.define('MyApp.view.main.List', {
    extend: 'Ext.grid.Panel',
    xtype: 'mainlist',

    requires: [
        'MyApp.store.Personnel'
    ],

    title: 'Personnel',

    store: {
        type: 'personnel'
    },

    columns: [
        { text: 'Name',  dataIndex: 'name' },
        { text: 'Email', dataIndex: 'email', flex: 1 },
        { text: 'Phone', dataIndex: 'phone', flex: 1 }
    ],

    listeners: {
        select: 'onItemSelected'
    }
});
The controller config allows you to designate a
ViewController for the view. When a
ViewController is specified on a view in this manner, it
then becomes a container for your event handlers and references. This gives the
ViewController a one-to-one relationship with the
components and events fired from the view. We'll talk more about controllers in the
next section.
The viewModel config allows you to designate a ViewModel for
the view. The ViewModel is a data provider for this component and its child views. The
data contained in the ViewModel is typically used by adding bind configs to the
components that want to present or edit this data.
In the "Main" view, you can see that the header title of the main tabpanel is bound to
the ViewModel. This means that the title will be populated by data's "name" value,
which is managed in the ViewModel. If the ViewModel's data changes, the title's value
will be automatically updated. We'll discuss ViewModels later in this document.
Next, let's take a look at Controllers. The starter
app's generated ViewController MainController.js looks like this:
Ext.define('MyApp.view.main.MainController', {
    extend: 'Ext.app.ViewController',

    alias: 'controller.main',

    onItemSelected: function (sender, record) {
        Ext.Msg.confirm('Confirm', 'Are you sure?', 'onConfirm', this);
    },

    onConfirm: function (choice) {
        if (choice === 'yes') {
            //
        }
    }
});
If you look back at your list view, List.js, you'll notice a function designation for the
grid's select event. That handler is mapped to a function called
onItemSelected in the parent view, Main.js, controller. As you can see, this
controller is ready to deal with that event with no special setup.
This makes it incredibly easy to add logic for your application. All you need to do is
define the onItemSelected function since your controller has a one-to-one relationship
with its view.
Upon selecting a grid row, a Message box will be created. This message box contains
its own function call with onConfirm, which is scoped to this same controller.
ViewControllers are designed to:
Make the connection to views using “listeners” and “reference” configs obvious.
Leverage the life cycle of views to automatically manage their associated ViewController. From instantiation to destruction, Ext.app.ViewController is tied to the component that referenced it. A second instance of the same view class would get its own ViewController instance. When these views are destroyed, their associated ViewController instance will be destroyed as well.
Provide encapsulation to make nesting views intuitive.
Next, let's take a look at the ViewModel. If you open your
app/view/main/MainModel.js file, you should see the following code:
Ext.define('MyApp.view.main.MainModel', {
    extend: 'Ext.app.ViewModel',

    alias: 'viewmodel.main',

    data: {
        name: 'MyApp',

        loremIpsum: 'Lorem ipsum dolor sit amet, consectetur adipisicing elit, sed do eiusmod tempor incididunt ut labore et dolore magna aliqua. Ut enim ad minim veniam, quis nostrud exercitation ullamco laboris nisi ut aliquip ex ea commodo consequat. Duis aute irure dolor in reprehenderit in voluptate velit esse cillum dolore eu fugiat nulla pariatur. Excepteur sint occaecat cupidatat non proident, sunt in culpa qui officia deserunt mollit anim id est laborum.'
    }

    //TODO - add data, formulas and/or methods to support your view
});
A ViewModel is a class that manages a data object. This class then allows views interested in this data to bind to it and be notified of changes. The ViewModel, like ViewController, is owned by the view that references it. Because ViewModels are associated with a view, they are also able to link to a parent ViewModel owned by ancestor components in the component hierarchy. This allows child views to simply "inherit" the data of their parent ViewModel.
We created a linkage from our view to the ViewModel with the ViewModel config in "Main.js". This linkage allows binding of configs with setters to automatically set data from the viewModel onto the view in a declarative fashion. The data is in-line in the "MainModel.js" example. That said, your data could be anything and come from anywhere. Data may be provided by any sort of proxy (AJAX, REST, etc).
Models and Stores make up the information gateway of your application. Most of your data is sent, retrieved, organized, and "modeled" by these two classes.
A Ext.data.Model represents any type of persist-able data in your application. Each model has fields and functions that allow your application to "model" data. Models are most commonly used in conjunction with stores. Stores can then be consumed by data-bound components like grids, trees, and charts.
Our sample application does not currently contain a model so let's add the following code:
Ext.define('MyApp.model.User', {
    extend: 'Ext.data.Model',
    fields: [
        {name: 'name',  type: 'string'},
        {name: 'age',   type: 'int'}
    ]
});
As mentioned in the namespace section above, you would want to create User.js, which will
live under "app/model/".
Ext.data.Model describes records that contain values or properties called
“fields”. The Model class can declare these fields
using the fields config. In this case, the name is declared to be a
string and age is an
integer. There are other
field types available in the API docs.
While there are good reasons to declare fields and their types, doing so is not required. If you do not include the fields config, data will be automatically read and inserted into the data object. You will want to define your fields if your data needs:
Validation
Default values
Convert functions
Let's set up a store and see these two work together.
A Store is a client side cache of records (instances of a Model class). Stores provide functions for sorting, filtering and querying the records contained within.
This sample application does not contain a store, but not to worry. Simply define your store and assign the Model.
Ext.define('MyApp.store.Users', {
    extend: 'Ext.data.Store',
    alias: 'store.users',
    model: 'MyApp.model.User',
    data : [
     {firstName: 'Seth', age: '34'},
     {firstName: 'Scott', age: '72'},
     {firstName: 'Gary', age: '19'},
     {firstName: 'Capybara', age: '208'}
    ]
});
Add the above content to Users.js, which should be placed in app/store/.
You can add the store to Application.js's store config if you'd like a global instance
of your store. The stores config in Application.js would look like this:
stores: [
    'Users'
],
In this example, the store directly contains the data. Most real world situations would require that you gather data by using a proxy on your model or store. Proxies allow for data transfer between your data providers and applications.
You can read more about models, stores, and data providers in our Data Guide.
We've created a robust and useful application called the Ticket App. This application manages Login/Logout sessions, incorporates data binding, and displays "best practice" when utilizing an MVC+VM architecture. This example has been heavily commented so that everything is as clear as possible.
We recommend you spend some time exploring the Ticket App to learn more about ideal MVC+VM Application Architecture.


 Ext JS | Terms of Use
