Cmd 6 Upgrade Guide
Many classes have shortcut names used when creating (instantiating) a class with a
configuration object. The shortcut name is referred to as an alias (or xtype if the
class extends Ext.Component). The alias/xtype is listed next to the class name of
applicable classes for quick reference.
Framework classes or their members may be specified as private or protected. Else,
the class / member is public. Public, protected, and private are access
descriptors used to convey how and when the class or class member should be used.
Public classes and class members are available for use by any other class or application code and may be relied upon as a stable and persistent within major product versions. Public classes and members may safely be extended via a subclass.
Protected class members are stable public members intended to be used by the
owning class or its subclasses. Protected members may safely be extended via a subclass.
Private classes and class members are used internally by the framework and are not intended to be used by application developers. Private classes and members may change or be omitted from the framework at any time without notice and should not be relied upon in application logic.
static label next to the
method name. *See Static below.Below is an example class member that we can disect to show the syntax of a class member (the lookupComponent method as viewed from the Ext.button.Button class in this case).
Let's look at each part of the member row:
lookupComponent in this example)( item ) in this example)Ext.Component in this case). This may be omitted for methods that do not
return anything other than undefined or may display as multiple possible values
separated by a forward slash / signifying that what is returned may depend on the
results of the method call (i.e. a method may return a Component if a get method calls is
successful or false if unsuccessful which would be displayed as
Ext.Component/Boolean).PROTECTED in
this example - see the Flags section below)Ext.container.Container in this example). The source
class will be displayed as a blue link if the member originates from the current class
and gray if it is inherited from an ancestor or mixed-in class.view source in the example)item : Object in the example).undefined a "Returns" section
will note the type of class or object returned and a description (Ext.Component in the
example)Available since 3.4.0 - not pictured in
the example) just after the member descriptionDefaults to: false)The API documentation uses a number of flags to further commnicate the class member's function and intent. The label may be represented by a text label, an abbreviation, or an icon.
classInstance.method1().method2().etc();false is returned from
an event handler- Indicates a framework class
- A singleton framework class. *See the singleton flag for more information
- A component-type framework class (any class within the Ext JS framework that extends Ext.Component)
- Indicates that the class, member, or guide is new in the currently viewed version
- Indicates a class member of type config
- Indicates a class member of type property
- Indicates a class member of type
method
- Indicates a class member of type event
- Indicates a class member of type
theme variable
- Indicates a class member of type
theme mixin
- Indicates that the class, member, or guide is new in the currently viewed version
Just below the class name on an API doc page is a row of buttons corresponding to the types of members owned by the current class. Each button shows a count of members by type (this count is updated as filters are applied). Clicking the button will navigate you to that member section. Hovering over the member-type button will reveal a popup menu of all members of that type for quick navigation.
Getting and setter methods that correlate to a class config option will show up in the methods section as well as in the configs section of both the API doc and the member-type menus just beneath the config they work with. The getter and setter method documentation will be found in the config row for easy reference.
Your page history is kept in localstorage and displayed (using the available real estate) just below the top title bar. By default, the only search results shown are the pages matching the product / version you're currently viewing. You can expand what is displayed by clicking on the button on the right-hand side of the history bar and choosing the "All" radio option. This will show all recent pages in the history bar for all products / versions.
Within the history config menu you will also see a listing of your recent page visits. The results are filtered by the "Current Product / Version" and "All" radio options. Clicking on the button will clear the history bar as well as the history kept in local storage.
If "All" is selected in the history config menu the checkbox option for "Show product details in the history bar" will be enabled. When checked, the product/version for each historic page will show alongside the page name in the history bar. Hovering the cursor over the page names in the history bar will also show the product/version as a tooltip.
Both API docs and guides can be searched for using the search field at the top of the page.
On API doc pages there is also a filter input field that filters the member rows using the filter string. In addition to filtering by string you can filter the class members by access level, inheritance, and read only. This is done using the checkboxes at the top of the page.
The checkbox at the bottom of the API class navigation tree filters the class list to include or exclude private classes.
Clicking on an empty search field will show your last 10 searches for quick navigation.
Each API doc page (with the exception of Javascript primitives pages) has a menu view of metadata relating to that class. This metadata view will have one or more of the following:
Ext.button.Button class has an alternate class name of Ext.Button). Alternate class
names are commonly maintained for backward compatibility.Runnable examples (Fiddles) are expanded on a page by default. You can collapse and expand example code blocks individually using the arrow on the top-left of the code block. You can also toggle the collapse state of all examples using the toggle button on the top-right of the page. The toggle-all state will be remembered between page loads.
Class members are collapsed on a page by default. You can expand and collapse members using the arrow icon on the left of the member row or globally using the expand / collapse all toggle button top-right.
Viewing the docs on narrower screens or browsers will result in a view optimized for a smaller form factor. The primary differences between the desktop and "mobile" view are:
The class source can be viewed by clicking on the class name at the top of an API doc page. The source for class members can be viewed by clicking on the "view source" link on the right-hand side of the member row.

This guide is meant to assist developers using Sencha Cmd in migrating from Ext JS 5.x or Sencha Touch 2.4.x to Ext JS 6.0.x. Even though there are some important changes in this release, we have tried to make the upgrade process as painless as possible. Before diving in, it is worth mentioning that this guide makes a few assumptions.
We recognize that not all of our customers have the luxury of running the latest versions of framework and Sencha Cmd. Time restrictions, deadlines, and support licenses often dictate what versions are used in the enterprise. If your application is based on an older release of Sencha frameworks, you consult the Upgrade Guides specifically relating to these releases as a starting point for further information. For example, the Sencha Cmd 5 Upgrade Guide.
With Sencha Cmd 6, we have introduced new installers that allow non-admin/root users to install the application. We have also included the Java Runtime Environment (JRE) required by Sencha Cmd so you won't have to download and install this separately. If you have a previous release of Sencha Cmd there are some issues you might encounter in your upgrade.
A side-effect of the PATH change for Windows users with older versions of Sencha Cmd is that you will not see the new version of "sencha" at the front of your PATH. This is expected behavior. To manage your PATH, use the Control Panel:
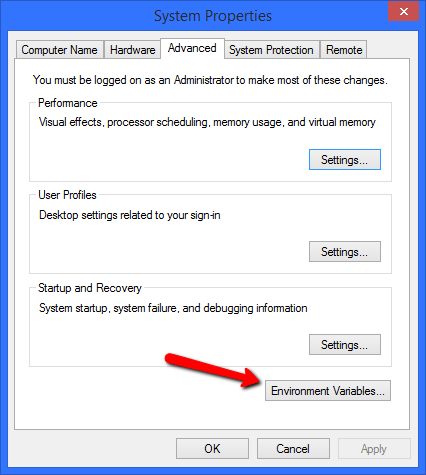
To change the PATH for the User or System, find the entry in this dialog:
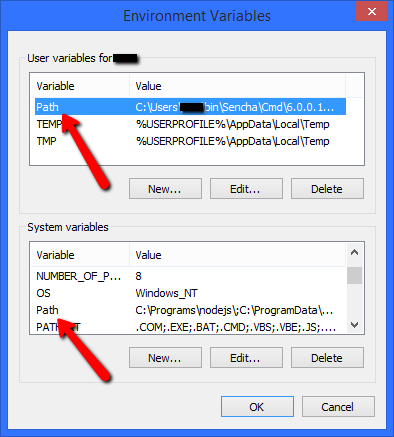
The System PATH string will appear before the User PATH string in the final value of the PATH environment variable. Previous versions of Sencha Cmd installed in the System PATH and so these will "hide" the new version.
On non-Windows platforms, the installer now adds only one location to the PATH by
modifying ~/.bash_profile:
export PATH=~/bin/Sencha/Cmd:$PATHIn previous installers, you might find multiple entries such as these:
export PATH=~/bin/Sencha/Cmd/5.1.1.39:$PATH

export PATH=~/bin/Sencha/Cmd/5.1.2.52:$PATH

export PATH=~/bin/Sencha/Cmd/5.1.3.61:$PATH
The new installer now maintains the symbolic link "~/bin/Sencha/Cmd/sencha" that points to the most recently installed version.
The first step in the migration process is to make sure you have no changes pending in your source control system. Starting the upgrade while you have other changes in progress is not recommended. This will allow you to much more easily review the changes made by Sencha Cmd so that you are sure any customizations you have made are still in place.
During an upgrade, Sencha Cmd may need to apply changes to some files that you may also have edited. As with any such scenario there is the possibility that you have edited the same lines that Sencha Cmd needs to update creating a merge conflict.
The good news is that, like version control, there are tools that can help resolve these merge conflicts. Sencha Cmd can utilize any visual merge tool that you can run from a command line (which is pretty much all of them). This step is optional, but highly recommended as it will make dealing with upgrade much simpler.
Here is a list of some popular choices (some free, some commercial):
We will configure Sencha Cmd to use your preferred merge tool in the next step.
Next, you'll need to grab the latest version of Sencha Cmd 6. You can download Sencha Cmd 6 from the Sencha web site.
Install Sencha Cmd and restart your terminal. If you have an older version of Sencha Cmd you will probably need to correct your PATH (see above).
Note: If you have a previous version of Cmd installed, this will not replace it, but it will take precedence when running the Cmd software. See above for details.
If you have chosen to get a merge tool, we need to configure Sencha Cmd to use that merge tool. To do so you need to add two properties to the config file:
cmd.merge.tool
cmd.merge.tool.args
We can set these in the "sencha.cfg" file located in the Sencha Cmd installation folder.
Alternatively, these two properties can be set in a version-independent way so your
preferences apply to all versions of Sencha Cmd. For details see the end of the
"sencha.cfg" file.
We are ready to start the upgrade. Just run this command from your application's root folder to get things going:
sencha app upgrade path/to/ext6You should see a very minimal amount of green text letting you know that your application has been successfully upgraded.
If you are upgrading from Ext JS 4.x, you should consult the Microloader and Build Properties sections of Sencha Cmd 5 Upgrade Guide. Likewise, if you are using Cordova or PhoneGap, you should check those sections as well.
Once the application is upgraded, and you've resolved any merge conflicts that might have been reported, now might be a good time to look at the differences in source control. If all looks good, it would be good to commit changes and get back to a clean slate.
The next step is to run a quick build from the app root folder:
sencha app build --clean developmentBe aware that the --clean switch will delete all files from the build output folder. This
will ensure there are no left-overs from previous builds but to be safe, we wanted to make
sure all changes are committed before we proceed.
You might have further work to do to make the application buildable, especially if you are coming from Sencha Touch. If so, the above will display build errors. Once all build errors are corrected, the build command will succeed.
Once all build errors are resolved, it is time to commit changes. The Cmd phase of the upgrade is complete. There may be more changes required due to a framework upgrade, but it is best to start those with a buildable application.
To use the new Live Update features made possible by Sencha Fashion (our new theme
compiler), the application must be hosted by app watch.
Using watch, you can now view the application on your own web server's localhost or at
http://localhost:1841, which is the server we spin up for you
automatically. The web server is now a default piece of app watch. Prior to Sencha Cmd 5
you had to separately run sencha web start to use the Sencha Cmd web server. You can
adjust the web server configuration using these properties (their default values are
shown):
build.web.port=1841
build.web.root=${workspace.dir}When generating an Ext JS 6 application with Sencha Cmd the following command will generate a universal application (one using both the classic and modern toolkits):
sencha -sdk path/to/ext6 generate app YourAppName ./AppFolderTo generate classic toolkit-only application for Ext JS 6, add --classic:
sencha -sdk path/to/ext6 generate app --classic YourAppName ./AppFolderSimilarly for a modern toolkit-only application:
sencha -sdk path/to/ext6 generate app --modern YourAppName ./AppFolderGenerated applications for Ext JS 6 have a more complete app.json file. Certain pieces
of the standard app.json file may need to be incorporated into existing applications'
app.json files.
This object contains properties to control style compilation. The following fragment is what
will be provided in a newly generated application. If your app.json does not have a
"sass" object you can probably just paste the following in directly.
/**
 * Sass configuration properties.
 */
"sass": {
    /**
     * The root namespace to use when mapping *.scss files to classes in the
     * sass/src and sass/var directories. For example, "App.view.Foo" would
     * map to "sass/src/view/Foo.scss". If we changed this to "App.view" then
     * it would map to "sass/src/Foo.scss". To style classes outside the app's
     * root namespace, change this to "". Doing so would change the mapping of
     * "App.view.Foo" to "sass/src/App/view/Foo.scss".
     */
    "namespace": "App",

    /**
     * Comma-separated list of files or folders containing extra Sass. These
     * files are automatically included in the Sass compilation. By default this
     * is just "etc/all.scss" to allow import directives to control the order
     * other files are included.
     *
     * All "etc" files are included at the top of the Sass compilation in their
     * dependency order:
     *
     *      +-------+---------+
     *      |       | base    |
     *      | theme +---------+
     *      |       | derived |
     *      +-------+---------+
     *      | packages        |  (in package dependency order)
     *      +-----------------+
     *      | application     |
     *      +-----------------+
     */
    "etc": [
        "sass/etc/all.scss",
        "${toolkit.name}/sass/etc/all.scss"
    ],

    /**
     * Comma-separated list of folders containing Sass variable definitions
     * files. These file can also define Sass mixins for use by components.
     *
     * All "var" files are included after "etc" files in the Sass compilation in
     * dependency order:
     *
     *      +-------+---------+
     *      |       | base    |
     *      | theme +---------+
     *      |       | derived |
     *      +-------+---------+
     *      | packages        |  (in package dependency order)
     *      +-----------------+
     *      | application     |
     *      +-----------------+
     *
     * The "sass/var/all.scss" file is always included at the start of the var
     * block before any files associated with JavaScript classes.
     */
    "var": [
        "sass/var/all.scss",
        "sass/var",
        "${toolkit.name}/sass/var"
    ],

    /**
     * Comma-separated list of folders containing Sass rule files.
     *
     * All "src" files are included after "var" files in the Sass compilation in
     * dependency order (the same order as "etc"):
     *
     *      +-------+---------+
     *      |       | base    |
     *      | theme +---------+
     *      |       | derived |
     *      +-------+---------+
     *      | packages        |  (in package dependency order)
     *      +-----------------+
     *      | application     |
     *      +-----------------+
     */
    "src": [
        "sass/src",
        "${toolkit.name}/sass/src"
    ],

    /**
     * File used to save sass variables edited via Sencha Inspector. This file
     * content will override all other variables.
     */
    // "save": "sass/save.scss"
},
The above properties will replace "app.sass.*" properties that may have been added to the
".sencha/app/sencha.cfg" file.
Even though Fashion is not in fact an implementation of Sass, we have retained the term "sass" in this context because it has historically been the name for these path settings.
Previously, applications had either of these (from Ext JS 5 or the Sencha Con EA release):
{
    "path": "bootstrap.css",
    "bootstrap": true
},

{
    "path": "${build.out.css.path}"
    "bundle": true
}
The value should instead be:
{
    "path": "${build.out.css.path}"
    "bundle": true,
    "exclude": ["fashion"]
}
The exclude property we've added ensures that the CSS file is skipped if we enable Fashion
since it will build the CSS from the .scss sources.
With Sencha Cmd 6, there is now a workspace.json file added to the workspace root folder.
While this file will be generated when needed, it would benefit from some attention during
an upgrade.
The file looks something like this by default:
{
    /**
     * An array of the paths to all the applications present in
     * this workspace
     */
    "apps": [
        "app1"
    ],

    /**
     * This is the folder for build outputs in the workspace.
     */
    "build": {
        "dir": "${workspace.dir}/build"
    },

    /**
     * These configs determine where packages are generated and
     * extracted to (when downloaded).
     */
    "packages": {
        /**
         * This folder contains all local packages.
         * If a comma-separated string is used as value the first
         * path will be used as the path to generate new packages.
         */
        "dir": "${workspace.dir}/packages/local,${workspace.dir}/packages",

        /**
         * This folder contains all extracted (remote) packages.
         */
        "extract": "${workspace.dir}/packages/remote"
    }
}
The "apps" array contains the relative path to Sencha Cmd applications in the workspace. This list is maintained by sencha generate app but removing or relocating apps will require manual maintenance of this array. Previously generated apps would also need to be added manually. This array is not currently required by Sencha Cmd but will be important for future tooling to effectively see the list of applications in the workspace.
"Sencha Space" has been renamed to "Sencha Web Application Manager". If you were integrating
Sencha Space with Sencha Cmd, you'll need to change the "space" object app.json to be "manager".


 Cmd | Terms of Use