Advanced Sencha Cmd
Many classes have shortcut names used when creating (instantiating) a class with a
configuration object. The shortcut name is referred to as an alias (or xtype if the
class extends Ext.Component). The alias/xtype is listed next to the class name of
applicable classes for quick reference.
Framework classes or their members may be specified as private or protected. Else,
the class / member is public. Public, protected, and private are access
descriptors used to convey how and when the class or class member should be used.
Public classes and class members are available for use by any other class or application code and may be relied upon as a stable and persistent within major product versions. Public classes and members may safely be extended via a subclass.
Protected class members are stable public members intended to be used by the
owning class or its subclasses. Protected members may safely be extended via a subclass.
Private classes and class members are used internally by the framework and are not intended to be used by application developers. Private classes and members may change or be omitted from the framework at any time without notice and should not be relied upon in application logic.
static label next to the
method name. *See Static below.Below is an example class member that we can disect to show the syntax of a class member (the lookupComponent method as viewed from the Ext.button.Button class in this case).
Let's look at each part of the member row:
lookupComponent in this example)( item ) in this example)Ext.Component in this case). This may be omitted for methods that do not
return anything other than undefined or may display as multiple possible values
separated by a forward slash / signifying that what is returned may depend on the
results of the method call (i.e. a method may return a Component if a get method calls is
successful or false if unsuccessful which would be displayed as
Ext.Component/Boolean).PROTECTED in
this example - see the Flags section below)Ext.container.Container in this example). The source
class will be displayed as a blue link if the member originates from the current class
and gray if it is inherited from an ancestor or mixed-in class.view source in the example)item : Object in the example).undefined a "Returns" section
will note the type of class or object returned and a description (Ext.Component in the
example)Available since 3.4.0 - not pictured in
the example) just after the member descriptionDefaults to: false)The API documentation uses a number of flags to further commnicate the class member's function and intent. The label may be represented by a text label, an abbreviation, or an icon.
classInstance.method1().method2().etc();false is returned from
an event handler- Indicates a framework class
- A singleton framework class. *See the singleton flag for more information
- A component-type framework class (any class within the Ext JS framework that extends Ext.Component)
- Indicates that the class, member, or guide is new in the currently viewed version
- Indicates a class member of type config
- Indicates a class member of type property
- Indicates a class member of type
method
- Indicates a class member of type event
- Indicates a class member of type
theme variable
- Indicates a class member of type
theme mixin
- Indicates that the class, member, or guide is new in the currently viewed version
Just below the class name on an API doc page is a row of buttons corresponding to the types of members owned by the current class. Each button shows a count of members by type (this count is updated as filters are applied). Clicking the button will navigate you to that member section. Hovering over the member-type button will reveal a popup menu of all members of that type for quick navigation.
Getting and setter methods that correlate to a class config option will show up in the methods section as well as in the configs section of both the API doc and the member-type menus just beneath the config they work with. The getter and setter method documentation will be found in the config row for easy reference.
Your page history is kept in localstorage and displayed (using the available real estate) just below the top title bar. By default, the only search results shown are the pages matching the product / version you're currently viewing. You can expand what is displayed by clicking on the button on the right-hand side of the history bar and choosing the "All" radio option. This will show all recent pages in the history bar for all products / versions.
Within the history config menu you will also see a listing of your recent page visits. The results are filtered by the "Current Product / Version" and "All" radio options. Clicking on the button will clear the history bar as well as the history kept in local storage.
If "All" is selected in the history config menu the checkbox option for "Show product details in the history bar" will be enabled. When checked, the product/version for each historic page will show alongside the page name in the history bar. Hovering the cursor over the page names in the history bar will also show the product/version as a tooltip.
Both API docs and guides can be searched for using the search field at the top of the page.
On API doc pages there is also a filter input field that filters the member rows using the filter string. In addition to filtering by string you can filter the class members by access level, inheritance, and read only. This is done using the checkboxes at the top of the page.
The checkbox at the bottom of the API class navigation tree filters the class list to include or exclude private classes.
Clicking on an empty search field will show your last 10 searches for quick navigation.
Each API doc page (with the exception of Javascript primitives pages) has a menu view of metadata relating to that class. This metadata view will have one or more of the following:
Ext.button.Button class has an alternate class name of Ext.Button). Alternate class
names are commonly maintained for backward compatibility.Runnable examples (Fiddles) are expanded on a page by default. You can collapse and expand example code blocks individually using the arrow on the top-left of the code block. You can also toggle the collapse state of all examples using the toggle button on the top-right of the page. The toggle-all state will be remembered between page loads.
Class members are collapsed on a page by default. You can expand and collapse members using the arrow icon on the left of the member row or globally using the expand / collapse all toggle button top-right.
Viewing the docs on narrower screens or browsers will result in a view optimized for a smaller form factor. The primary differences between the desktop and "mobile" view are:
The class source can be viewed by clicking on the class name at the top of an API doc page. The source for class members can be viewed by clicking on the "view source" link on the right-hand side of the member row.
This guide covers capabilities of Sencha Cmd available to advanced users.
The following guides are recommended reading before proceeding further:
The Installer lets you select a destination path, but changing this can have side effects (see the section "Multiple Installed Versions"). Ideally, all versions of Sencha Cmd are installed in a single base folder with sub-folders named by the version number. On Windows, the default install folder for a single-user installation looks like this:
C:\Users\myself\bin\Sencha\Cmd\n.n.n.n\
If you change this path, preserve the version number folder as well as installing any other versions of Sencha Cmd in that same parent folder.
At the command prompt, all calls to sencha go to the most recently installed version
of Sencha Cmd. Sometimes this version may not be compatible with the current
application. For example, if an application required Sencha Cmd 5.1.3.61 specifically
for some reason, you can adjust the PATH for a console/terminal as shown below.
On Windows, this looks like this (n is the current version):
set PATH=C:\Users\Me\bin\Sencha\Cmd\5.1.3.61;%PATH%
sencha ....
On OS X and Linux, this looks like this:
set PATH=~/bin/Sencha/Cmd/5.1.3.61:$PATH
sencha ....
With the above adjustments, sencha will route to the desired version for the current
console or terminal.
Any parameter that can be passed to Sencha Cmd on the command line can be set as a configuration option in one of the configuration files discussed below. If you know the command line option, it is a simple matter to add that option to a configuration file.
For example, to specify the ignore parameter for sencha compile in the configuration,
add this line:
sencha.compile#ignore=attic
This particular setting is not necessarily a recommended practice, but it just serves to
illustrate the syntax. The parts of the command that goes before the # are the Sencha
Cmd commands separated by dots. Following the # is the option name.
To set global options (like debug logging), do this:
sencha#debug=true
Configuration becomes more important over time as Sencha Cmd (especially the compiler) evolves.
To see the current configuration properties, run this command:
sencha diag show
Similar to Apache Ant (on which many aspects of Sencha Cmd are based), configuration is applied in a "first-write-wins" model. This is essential to allow property values to be overridden by the command line.
The process of loading configuration begins by searching from the current directory and proceeds up the file system until the Workspace is found. Along the way, Sencha Cmd looks for the presence of an application or Sencha Framework SDK. At the end of the loading process, Sencha Cmd loads any of the following files it detects in this order:
${app.dir}/app.json - Application configuration when in an application folder
that is the most specific loads first.${app.dir}/.sencha/app/sencha.cfg - Application configuration when in an application
folder that is the most specific loads first.${package.dir}/package.json - Package configuration when in a package folder that
is the most specific loads next.${package.dir}/.sencha/package/sencha.cfg - Package configuration when in a package
folder that is the most specific loads next.${workspace.dir}/workspace.json - Workspace configuration applies next when you
are in a workspace (or an app or package in the workspace).${workspace.dir}/.sencha/workspace/sencha.cfg - Workspace configuration applies
next when you are in a workspace (or an app or package in the workspace).${framework.dir}/cmd/sencha.cfg - Based on the applicable framework for the app or
package at the current directory, those properties load next.${home.dir}/.sencha/cmd/sencha.cfg - Your personal configuration loads next. This
typically only sets high-level properties.${cmd.dir}/../sencha.cfg - Local machine Sencha Cmd configuration loads next.
This typically only sets high-level properties. This loads from the parent folder of the
running Sencha Cmd, which is the folder that holds the various installed versions of
Sencha Cmd.${cmd.dir}/sencha.cfg - Lastly, the Sencha Cmd, version specific configuration
loads.The most important configuration properties are those passed on the command line. These will override properties coming from any of the above files. For example:
sencha config -prop foo=42 then ...
This sets "foo" to 42 prior to the loading the config files, and in Sencha Cmd v3.1 and later, this setting "wins".
In most cases you can tell where a property comes from by its prefix:
app. -- See "app.json" and ".sencha/app/sencha.cfg".package. -- See "package.json" and ".sencha/package/sencha.cfg".workspace. -- See "workspace.json" and ".sencha/workspace/sencha.cfg".framework. -- See "cmd/sencha.cfg" in the Ext JS or Sencha Touch SDK.cmd. -- See "sencha.cfg" in the Sencha Cmd install folder.It is not required that these properties be set in these files, but it is the default and
following this convention will help you manage these settings. That said, there are times
when a Workspace setting may need to be overridden by an application. To do this, the
workspace.foo property must be set in ".sencha/app/sencha.cfg" because that is the
application-level configuration file. When deviating from the convention, leaving behind
a comment would be advised.
Starting in Sencha Cmd 5, JSON files are now always respected as higher priority than their
corresponding "sencha.cfg" file. Previously this was only true for applications based on
Sencha Touch.
The content of files like "app.json", "package.json" and "workspace.json" are flattened
into properties with the filename prefix applied ("app", "package" or "workspace").
For example, if you placed the following JSON object in "workspace.json":
{
    "foo": {
        "bar": 42
    }
}
This would set the workspace.foo.bar property to the value "42".
This mechanism is what allows the app.id property to be imported from "app.json" for
use in the build process.
Java System Properties may need to be set for Sencha Cmd, such as HTTP Proxy Server settings.
The "sencha.cfg" file in your Cmd install folder has default settings for proxies that
enable detection of your system-defined proxy. For further information, consult the comments
found in "${cmd.dir}/sencha.cfg".
NOTE: If you need to change any of these settings, use the
"${cmd.dir}/../sencha.cfg" file so that these settings are preserved across Cmd
upgrades.
These properties effect Sencha Cmd's ability to access the Web to perform
sencha upgrade or to download packages. These options are in Cmd v3.1.1 and later.
These tricks help if you make frequent use of Sencha Cmd.
All commands, categories and options in Sencha Cmd can be specified by their full name or by the shortest prefix that is unique.
To illustrate, since generate is the only top-level category in Sencha Cmd that currently
starts with the letter "g", and likewise, app is the only command in that category that
starts with an "a", the following commands are equivalent:
sencha generate app MyApp ../MyApp
sencha gen ap MyApp ../MyApp
Important While this can be convenient at the console or terminal, it is not a good practice to use extremely short/terse prefixes in scripts. The use of terse commands in scripts makes it hard to understand or maintain the script, and can break if new commands make the short form ambiguous.
The Sencha Cmd command line processor executes all commands given to it until they have
all been dispatched. This means you can avoid the cost of relaunching the Sencha Cmd
process to execute multiple commands. To take advantage of this, insert and or then
between commands.
The and and then commands are based on the execution model of Sencha Cmd and its
hierarchical structure of commands and categories. The and command is used to execute
another command in the same category as the previous command. This is the most common use
case.
For example, to generate a controller and two models, use this:
cd /path/to/MyApp
sencha generate controller Central and model User id:int and model Ticket id,name,email
In the above, the two uses of and caused two generate model commands to be executed.
The then command is similar to and, except that the next command will be part of the
root category (that is, the sencha command).
For example, the following generates a new model, then builds the application:
cd /path/to/MyApp
sencha generate model User id:int,name then app build
When command chaining starts to make command lines too long to be readable, perhaps in a complex build script, you can put command line arguments in a file and tell Sencha Cmd to read arguments from that file.
For example:
cd /path/to/MyApp
sencha @file.sencha
In the above, the "file.sencha" file is read and each line is taken to be a command line
argument, unless that line begins with "#", in which case it is skipped. All lines from
the specified file are inserted into the command line arguments as if they had been typed
there instead of "@file.sencha". This means that "file.sencha" can contain response
file
insertions as well (for example, "@file2.sencha").
For performance reasons, some categories maintain state across multiply executed commands.
The best example of this is the new compile category of commands. Instead of reading all
the sources for each command, the compile category maintains a cache of all the files in
the class path. This context is then available to all of the commands in the category.
The following command rebuilds the ext-all-dev.js and ext-all.js files while reading
the framework sources only once:
cd /path/to/MyApp
sencha compile -c sdk/src --debug=true concat -o sdk/ext-all-dev.js \
    and --debug=false concat -c -o sdk/ext-all.js
If you don't want to use this caching, perhaps because the set of files is not the same
for the next set of outputs, use the then command, like this:
cd /path/to/MyApp
sencha compile -c sdk/src --debug=true concat -o sdk/ext-all-dev.js \
     then compile -c app/foo --debug=true concat -o app/foo/foo-all.js
At present, only the compile category maintains state across commands.
While the same Sencha Cmd install is used by both Ext JS and Sencha Touch, there are many times when commands perform slightly different operations depending on the framework. Further, some commands may only be available for one framework.
To accommodate this, the functionality of Sencha Cmd is partitioned across two layers: the command line (properly called "Sencha Cmd") and the lower-level interface for use in Ant. Commands that have these special concerns are routed from the command line into a plugin.
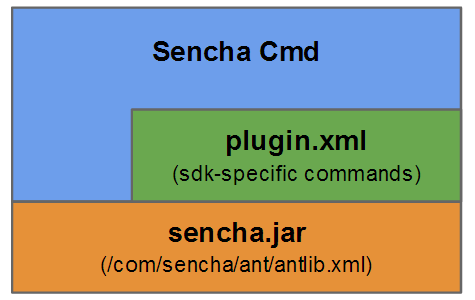
A Sencha Cmd plugin is just an Ant script contained in a file called "plugin.xml" though
for any given command, executed in an application or workspace, there are potentially
several active plugins.
The process begins by looking for the most specific plugin available as follows:
${app.dir}/.sencha/app/plugin.xml${workspace.dir}/.sencha/workspace/plugin.xml${cmd.dir}/plugins/${framework.name}/${framework.plugin.version}/plugin.xml${cmd.dir}/plugin.xml (also known as the "default plugin")The first of these to be found is based on the current directory. Sencha Cmd
then loads only that plugin and invokes specific targets based on the command it was given.
These plugins, however, contain the Ant invocation required to load the plugin at the next
level up. For example, if the application plugin is found, it contains an import of the
workspace plugin. That plugin contains an import of the framework plugin and, lastly,
that contains an import of the default plugin.
Technically, the lowest two levels (the framework and default plugins) are the only plugins that contain actual code. The application and workspace plugins are empty by default but are present to allow for user extension of these built-in commands. The purpose for this is to allow you to add logic to enforce project or application standards for code generation requests made to Sencha Cmd.
If you want to check to see if new model definitions follow project guidelines, for example,
the first field is always id:string, add this to the application or workspace
"plugins.xml":
<target name="-before-generate-model">
    <if>
        <not><matches string="${args.fields}" pattern="^id\:string,.*"/></not>
        <then>
            <fail>Models must have "id:string" as first field.</fail>
        </then>
    </if>
</target>
Similarly you can also provide a hook to update other systems when a new model has been added.
<target name="-after-generate-model">
    ... post new/updated Model ${args.name} and ${args.fields} ...
</target>
The actual target names differ by which plugin you extend. For
specifics, consult the comments in the respective "plugin.xml" file.
Note. The default "plugin.xml" file imports Ant Contrib
which provides many useful tasks.
While the primary use of Sencha Cmd is at the command line (hence its name), Sencha Cmd is also usable directly from Ant. For details about the many commands provided at this level, see the Ant Integration guide.


 Cmd | Terms of Use
