Sencha Compiler Reference
Many classes have shortcut names used when creating (instantiating) a class with a
configuration object. The shortcut name is referred to as an alias (or xtype if the
class extends Ext.Component). The alias/xtype is listed next to the class name of
applicable classes for quick reference.
Framework classes or their members may be specified as private or protected. Else,
the class / member is public. Public, protected, and private are access
descriptors used to convey how and when the class or class member should be used.
Public classes and class members are available for use by any other class or application code and may be relied upon as a stable and persistent within major product versions. Public classes and members may safely be extended via a subclass.
Protected class members are stable public members intended to be used by the
owning class or its subclasses. Protected members may safely be extended via a subclass.
Private classes and class members are used internally by the framework and are not intended to be used by application developers. Private classes and members may change or be omitted from the framework at any time without notice and should not be relied upon in application logic.
static label next to the
method name. *See Static below.Below is an example class member that we can disect to show the syntax of a class member (the lookupComponent method as viewed from the Ext.button.Button class in this case).
Let's look at each part of the member row:
lookupComponent in this example)( item ) in this example)Ext.Component in this case). This may be omitted for methods that do not
return anything other than undefined or may display as multiple possible values
separated by a forward slash / signifying that what is returned may depend on the
results of the method call (i.e. a method may return a Component if a get method calls is
successful or false if unsuccessful which would be displayed as
Ext.Component/Boolean).PROTECTED in
this example - see the Flags section below)Ext.container.Container in this example). The source
class will be displayed as a blue link if the member originates from the current class
and gray if it is inherited from an ancestor or mixed-in class.view source in the example)item : Object in the example).undefined a "Returns" section
will note the type of class or object returned and a description (Ext.Component in the
example)Available since 3.4.0 - not pictured in
the example) just after the member descriptionDefaults to: false)The API documentation uses a number of flags to further commnicate the class member's function and intent. The label may be represented by a text label, an abbreviation, or an icon.
classInstance.method1().method2().etc();false is returned from
an event handler- Indicates a framework class
- A singleton framework class. *See the singleton flag for more information
- A component-type framework class (any class within the Ext JS framework that extends Ext.Component)
- Indicates that the class, member, or guide is new in the currently viewed version
- Indicates a class member of type config
- Indicates a class member of type property
- Indicates a class member of type
method
- Indicates a class member of type event
- Indicates a class member of type
theme variable
- Indicates a class member of type
theme mixin
- Indicates that the class, member, or guide is new in the currently viewed version
Just below the class name on an API doc page is a row of buttons corresponding to the types of members owned by the current class. Each button shows a count of members by type (this count is updated as filters are applied). Clicking the button will navigate you to that member section. Hovering over the member-type button will reveal a popup menu of all members of that type for quick navigation.
Getting and setter methods that correlate to a class config option will show up in the methods section as well as in the configs section of both the API doc and the member-type menus just beneath the config they work with. The getter and setter method documentation will be found in the config row for easy reference.
Your page history is kept in localstorage and displayed (using the available real estate) just below the top title bar. By default, the only search results shown are the pages matching the product / version you're currently viewing. You can expand what is displayed by clicking on the button on the right-hand side of the history bar and choosing the "All" radio option. This will show all recent pages in the history bar for all products / versions.
Within the history config menu you will also see a listing of your recent page visits. The results are filtered by the "Current Product / Version" and "All" radio options. Clicking on the button will clear the history bar as well as the history kept in local storage.
If "All" is selected in the history config menu the checkbox option for "Show product details in the history bar" will be enabled. When checked, the product/version for each historic page will show alongside the page name in the history bar. Hovering the cursor over the page names in the history bar will also show the product/version as a tooltip.
Both API docs and guides can be searched for using the search field at the top of the page.
On API doc pages there is also a filter input field that filters the member rows using the filter string. In addition to filtering by string you can filter the class members by access level, inheritance, and read only. This is done using the checkboxes at the top of the page.
The checkbox at the bottom of the API class navigation tree filters the class list to include or exclude private classes.
Clicking on an empty search field will show your last 10 searches for quick navigation.
Each API doc page (with the exception of Javascript primitives pages) has a menu view of metadata relating to that class. This metadata view will have one or more of the following:
Ext.button.Button class has an alternate class name of Ext.Button). Alternate class
names are commonly maintained for backward compatibility.Runnable examples (Fiddles) are expanded on a page by default. You can collapse and expand example code blocks individually using the arrow on the top-left of the code block. You can also toggle the collapse state of all examples using the toggle button on the top-right of the page. The toggle-all state will be remembered between page loads.
Class members are collapsed on a page by default. You can expand and collapse members using the arrow icon on the left of the member row or globally using the expand / collapse all toggle button top-right.
Viewing the docs on narrower screens or browsers will result in a view optimized for a smaller form factor. The primary differences between the desktop and "mobile" view are:
The class source can be viewed by clicking on the class name at the top of an API doc page. The source for class members can be viewed by clicking on the "view source" link on the right-hand side of the member row.
One of the major components in Sencha Cmd is its compiler, which provides a JavaScript-to-JavaScript, framework-aware optimizer. The optimizer "understands" your high-level Ext JS and Sencha Touch code and produces the smallest, most efficient code possible to support these high-level abstractions.
The following guides are recommended reading before proceeding further:
Under the covers, the compiler manages a set of source files and analyzes these files to
determine their dependencies. The set of all files is determined by the classpath:
sencha compile -classpath=common,app ...
In this example, the compiler recursively loads "*.js" from the specified list of
folders.
This set of all files defines the basis for all operations to follow (that is, it defines
its "universe").
The default classpath used by the compiler comes from these configuration properties:
${framework.classpath},${workspace.classpath},${app.classpath}
When running high-level commands like sencha app build, Sencha Cmd will know the SDK in
use and load the appropriate configuration as well as include the "src" folder of that
framework in the classpath. When using the compiler outside of these contexts you will
probably need to use the -sdk switch:
sencha -sdk /path/to/sdk compile -classpath=common,app ...
The compiler's output commands (for example, concat and metadata) operate on the set
of files called the "current set". The current set starts out equal to the universe of all
files, but this can be manipulated using the many commands provided to perform set
operations.
Note With the compiler, you often see rather long command lines using the and
command
chaining mechanism. Also, in practical use cases, for long command lines, you should
consider using Ant or a "response file". See
Advanced Sencha Cmd.
In this guide, all command lines are complete (and potentially long) to keep the examples as clear as possible.
Ultimately the compiler needs to reach the "src" folder of the desired SDK, but simply
adding this to the -classpath will not produce the optimal result. Instead, as shown in
the example above, the -sdk switch should be used to inform the compiler which Sencha
framework is in use. This will enable the compiler to understand framework-specific things
like config properties that imply class dependencies (such as the model config on an
Ext.data.Store).
concatA compiler ultimately is all about writing useful output given some number of inputs. The
concat command concatenates the source for the current set of files in the
appropriate dependency order.
The one required parameter is -out, which indicates the name of the output file.
Other options affect the generated file. You can pick one of the
following options for compression:
-compress - Compresses the generated file using the default compressor. Currently
this
is the same as -yui.-closure - Compresses the generated file using the Google Closure
Compiler.-yui - Compresses the source file using the YUI
Compressor.-strip - Strips comments from the output file, but preserves whitespace. This
option converts "ext-all-debug-w-comments.js" into "ext-all-debug.js".The following command produces three flavors of output from a single read of the source.
sencha -sdk sdk compile \
    exclude -namespace Ext.chart and \
    concat ext-all-nocharts-debug-w-comments.js and \
    -debug=true \
    concat -strip ext-all-nocharts-debug.js and \
    -debug=false \
    concat -yui ext-all-nocharts.js
The compiler can also generate metadata in many useful ways, for example, the names of all source files, the set of files in dependency order, etc. To see what is available, see the Generating Metadata guide.
When you need to produce multiple output files, it can be very helpful to save the current set for later use:
sencha -sdk sdk compile \
    exclude -namespace Ext.chart and \
    save nocharts and \
    ...
    restore nocharts and \
    ...
The save command takes a snapshot of the current set and stores it under the given name
(nocharts in this example).
The simplest use of a saved set is with the restore command, which does the reverse and
restores the current set to its state at the time of the save.
Many of the commands provided by the compiler are classified as set operations, which are operations that work on and produce sets. In the case of the compiler, this means sets of files or classes. Let's first take a look at set terminology.
There are three classic set operations:
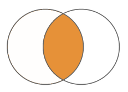
Intersection - The intersection of two sets is a set containing only what was in both
sets.
Union - The union of two sets is a set containing whatever was in either of the sets.
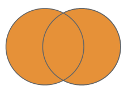
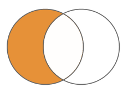
Difference - The difference of two sets is the set of all things in the first set that are not in the second set.
include and excludeThese two set operations are probably the most common (and flexible) set operations. Both support these basic switches:
-namespace - Matches files that define types in the specified namespace.-class - Matches a specific defined type.-file - Matches filenames and/or folder names using Ant-style glob patterns (a ""
matches only filename characters, where "*" matches folders).-tag - Matches any files with the specified tag(s) (see below).-set - The files that are present in any of the specified named sets.In all of these cases, the next command line argument is a list of match criteria
separated by commas. Also, a single exclude or include can have as many switch/value
pairs as needed.
So, let's start with a simple example and build an
"ext-all-no-charts-debug-w-comments.js".
sencha -sdk sdk compile \
    exclude -namespace Ext.chart and \
    ...
What is happening here is that we started with only the Ext JS sources (in "sdk/src")
and
they were all part of the "current set". We then performed a set difference by excluding
all files in the Ext.chart namespace. The current set was then equivalent to
"ext-all.js"
but without use of the Chart package.
include and exclude with -notBoth include and exclude support a rich set of matching criteria. This is rounded out
by the -not switch, which negates the matching criteria that follows it. This means that
the files included or excluded are all those that do not match the criteria.
For example:
sencha -sdk sdk compile -classpath=js \
    ... \
    exclude -not -namespace Ext and \
    ...
The exclude command excludes from the current set any classes that are not in
the Ext namespace.
all SetIn some cases, it is very handy to restore the current set to all files or to the empty
set. To do this, simply use include or exclude with the -all switch. To build
on the previous example:
sencha -sdk sdk compile -classpath=js \
    ... \
    include -all and \
    ... \
    exclude -all and \
    ...
After the include -all, the current set is all files. After exclude -all it is the
empty set.
As shown already, the include command is a form of set union: it performs a union of
the current set with the set of matching files. Sometimes it is desirable to not include
the current set in the union and only include those file matching the desired criteria.
This is
what the union command does.
The union command has all of the options of include. Consider this union command:
sencha -sdk sdk compile -classpath=js ... and \
    union -namespace Ext.grid,Ext.chart and \
    ...
It is exactly equivalent to this pair of exclude and include commands:
sencha -sdk sdk compile -classpath=js ... and \
    exclude -all and \
    include -namespace Ext.grid,Ext.chart and \
    ...
One of the most important set operations is the union of all files explicitly specified
and all of the files they require. This is the core of a build process, since this is
how you select only the set of files you need. So, if you have a small set of top-level
files to start the process, say the class MyApp.App, you can use:
sencha -sdk sdk compile -classpath=app \
    union -r -class MyApp.App and \
    ...
The union command starts with no current set, includes only the class MyApp.App and
then proceeds to include all the things it needs recursively. The resulting current set
is all files needed by the application.
The intersect command is a bit less flexible in the criteria it supports: it only
accepts named sets (using -set).
sencha -sdk sdk compile -classpath=common,page1/src,page2/src \
    ... \
    intersect -set page1,page2 and \
    ... \
This command intersects the two page sets and produces their intersection as the current set.
When dealing with more than two sets, intersect has an option called -min that sets
the threshold for membership in the current set.
For example,
sencha compile ... \
    intersect -min=2 -set page1,page2,page3 and \
    ...
This use of intersect produces in the current set all files that are found in two of
the three sets specified.
In many situations, it is helpful to embed metadata in files that only the compiler will pick up. To do this, the compiler recognizes special line comments as directives. These directives are single-line comments starting with a @-prefix word. For example:
// @define Foo.bar.Thing
The list of directives is:
// @charset// @tag// @define// @requireThere is no standard way to specify the character encoding of a particular JS file. The Sencha Cmd compiler, therefore, understands the following directive:
// @charset ISO-9959-1
This must be the first line of the JS file. The value to the right of charset can be any
valid Java
charset
name. The default is "UTF-8".
The charset directive is used to describe the encoding of an input file to the compiler.
This does not affect the encoding of the output file. The content of the input file is
converted to Unicode internally.
In an ideal world, a namespace would be sufficient to define a set of interest. Sometimes, however, a set can be quite arbitrary and even cross namespace boundaries. Rather than move this issue to the command-line level, the compiler can track arbitrary tags in files.
Consider the example:
// @tag foo,bar
This assigns the tags foo and bar to the file. These tags can be used in the
include,
exclude and union commands with their -tag option.
In some cases, JavaScript files define classes or objects and require classes or objects
that are not expressed in terms of Ext.define and requires or Ext.require. Using
Ext.define you can still say that a class requires such things and the dynamic loader
will not complain so long as those things exist (if they do not exist, the loader will
try to load them, which will most likely fail).
To support arbitrary JavaScript approaches to defining and requiring types, the compiler also provides these directives:
// @define Foo.bar.Thing
// @require Bar.foo.Stuff
These directives set up the same basic metadata in the compiler that tracks what file
defines a type and what types that a file requires. In most ways, then, these directives
accomplish the same thing as an Ext.define with a requires property.
You can use either of these directives in a file without using the other.
The compiler supports conditional compilation directives, such as:
foo: function () {
    //<debug>
    if (sometest) {
        Ext.log.warn("Something is wrong...");
    }
    //</debug>

    this.bar();
}
This may be the most useful of the conditional directives, which you can use for code that you want to run in a development environment but not in production.
Important When you use conditional compilation, remember that unless you always run compiled code, the directives are just comments and the conditional code will be "live" during development.
When compiling, by default, none of the preprocessor statements are examined. So in this
case, the result is development mode. If we switch on -debug we get a very similar
result, but with the preprocessor active. In fact, the only difference is that the
preprocessor directives are removed.
For example, this command:
sencha compile -classpath=... \
    -debug \
    ...
Generates code like this:
foo: function () {
    if (sometest) {
        Ext.log.warn("Something is wrong...");
    }

    this.bar();
}
However, this command:
sencha compile -classpath=... \
    -debug=false \
    ...
Generates code like this:
foo: function () {
    this.bar();
}
You can see that the if test and the log statement are both removed.
The most general directive is if. The if directive tests one or more configured
options against the attributes of the directive and removes the code in the block
if any are false.
For example:
//<if debug>
//</if>
This is equivalent to the <debug> directive.
The buildOptions property on app.json can be used to specify additional compiler options. For
example, consider the following block(s):
{
    // ...
    "buildOptions": {
        "foo": true,
        "bar": false
    },
    // Can also be specified for a given build environment
    "production": {
        "buildOptions": {
            "foo": false
        }
    },
    // or even per build profile
    "builds": {
        "abc": {
            "buildOptions": {
                "foo": true
            }
         },
         "xyz": {
             "buildOptions": {
                 "bar": true
             }
         }
     }
 }
The above would allow usage of the if directive like this:
//<if foo>
console.log("foo is enabled!");
//</if>

//<if bar>
console.log("bar is enabled!");
//</if>


 Cmd | Terms of Use
