The Class System
Many classes have shortcut names used when creating (instantiating) a class with a
configuration object. The shortcut name is referred to as an alias (or xtype if the
class extends Ext.Component). The alias/xtype is listed next to the class name of
applicable classes for quick reference.
Framework classes or their members may be specified as private or protected. Else,
the class / member is public. Public, protected, and private are access
descriptors used to convey how and when the class or class member should be used.
Public classes and class members are available for use by any other class or application code and may be relied upon as a stable and persistent within major product versions. Public classes and members may safely be extended via a subclass.
Protected class members are stable public members intended to be used by the
owning class or its subclasses. Protected members may safely be extended via a subclass.
Private classes and class members are used internally by the framework and are not intended to be used by application developers. Private classes and members may change or be omitted from the framework at any time without notice and should not be relied upon in application logic.
static label next to the
method name. *See Static below.Below is an example class member that we can disect to show the syntax of a class member (the lookupComponent method as viewed from the Ext.button.Button class in this case).
Let's look at each part of the member row:
lookupComponent in this example)( item ) in this example)Ext.Component in this case). This may be omitted for methods that do not
return anything other than undefined or may display as multiple possible values
separated by a forward slash / signifying that what is returned may depend on the
results of the method call (i.e. a method may return a Component if a get method calls is
successful or false if unsuccessful which would be displayed as
Ext.Component/Boolean).PROTECTED in
this example - see the Flags section below)Ext.container.Container in this example). The source
class will be displayed as a blue link if the member originates from the current class
and gray if it is inherited from an ancestor or mixed-in class.view source in the example)item : Object in the example).undefined a "Returns" section
will note the type of class or object returned and a description (Ext.Component in the
example)Available since 3.4.0 - not pictured in
the example) just after the member descriptionDefaults to: false)The API documentation uses a number of flags to further commnicate the class member's function and intent. The label may be represented by a text label, an abbreviation, or an icon.
classInstance.method1().method2().etc();false is returned from
an event handler- Indicates a framework class
- A singleton framework class. *See the singleton flag for more information
- A component-type framework class (any class within the Ext JS framework that extends Ext.Component)
- Indicates that the class, member, or guide is new in the currently viewed version
- Indicates a class member of type config
- Indicates a class member of type property
- Indicates a class member of type
method
- Indicates a class member of type event
- Indicates a class member of type
theme variable
- Indicates a class member of type
theme mixin
- Indicates that the class, member, or guide is new in the currently viewed version
Just below the class name on an API doc page is a row of buttons corresponding to the types of members owned by the current class. Each button shows a count of members by type (this count is updated as filters are applied). Clicking the button will navigate you to that member section. Hovering over the member-type button will reveal a popup menu of all members of that type for quick navigation.
Getting and setter methods that correlate to a class config option will show up in the methods section as well as in the configs section of both the API doc and the member-type menus just beneath the config they work with. The getter and setter method documentation will be found in the config row for easy reference.
Your page history is kept in localstorage and displayed (using the available real estate) just below the top title bar. By default, the only search results shown are the pages matching the product / version you're currently viewing. You can expand what is displayed by clicking on the button on the right-hand side of the history bar and choosing the "All" radio option. This will show all recent pages in the history bar for all products / versions.
Within the history config menu you will also see a listing of your recent page visits. The results are filtered by the "Current Product / Version" and "All" radio options. Clicking on the button will clear the history bar as well as the history kept in local storage.
If "All" is selected in the history config menu the checkbox option for "Show product details in the history bar" will be enabled. When checked, the product/version for each historic page will show alongside the page name in the history bar. Hovering the cursor over the page names in the history bar will also show the product/version as a tooltip.
Both API docs and guides can be searched for using the search field at the top of the page.
On API doc pages there is also a filter input field that filters the member rows using the filter string. In addition to filtering by string you can filter the class members by access level, inheritance, and read only. This is done using the checkboxes at the top of the page.
The checkbox at the bottom of the API class navigation tree filters the class list to include or exclude private classes.
Clicking on an empty search field will show your last 10 searches for quick navigation.
Each API doc page (with the exception of Javascript primitives pages) has a menu view of metadata relating to that class. This metadata view will have one or more of the following:
Ext.button.Button class has an alternate class name of Ext.Button). Alternate class
names are commonly maintained for backward compatibility.Runnable examples (Fiddles) are expanded on a page by default. You can collapse and expand example code blocks individually using the arrow on the top-left of the code block. You can also toggle the collapse state of all examples using the toggle button on the top-right of the page. The toggle-all state will be remembered between page loads.
Class members are collapsed on a page by default. You can expand and collapse members using the arrow icon on the left of the member row or globally using the expand / collapse all toggle button top-right.
Viewing the docs on narrower screens or browsers will result in a view optimized for a smaller form factor. The primary differences between the desktop and "mobile" view are:
The class source can be viewed by clicking on the class name at the top of an API doc page. The source for class members can be viewed by clicking on the "view source" link on the right-hand side of the member row.
Sencha Touch uses the state-of-the-art class system developed for Ext JS 4. This class system makes it easy to create new classes in JavaScript, providing inheritance, dependency loading, mixins, powerful configuration options, and lots more.
At its simplest, a class is just an object with some functions and properties attached to it. For instance, here is a class for an animal, recording its name and a function that makes it speak:
Ext.define('Animal', {
    config: {
        name: null
    },

    constructor: function(config) {
        this.initConfig(config);
    },

    speak: function() {
        alert('grunt');
    }
});
This defines a class called Animal, where each animal can have a name and speak. To create
a new instance of animal, we just use Ext.create:
var bob = Ext.create('Animal', {
    name: 'Bob'
});

bob.speak(); //alerts 'grunt'
We created an Animal called Bob and commanded it to speak. Now that we have created a class
and instantiated it, we can start improving what we have. At the moment we do not know
Bob's species, so let us clear that up with a Human subclass:
Ext.define('Human', {
    extend: 'Animal',

    speak: function() {
        alert(this.getName());
    }
});
Now we have got a new class that inherits from Animal, therefore gaining all of its functions and configurations. We actually overrode the speak function because most humans are smart enough to say their name instead of grunt. Now, let us make Bob a human:
var bob = Ext.create('Human', {
    name: 'Bob'
});

bob.speak(); //alerts 'Bob'
In the previous example we used a magical function when adding the Human subclass. You will notice that we did not actually define a getName function for our Animal class, so where did it come from? Part of the class system is the ability to give classes configuration options, which each automatically give you the following functionality:
getName().setName().applyName().updateName().The getter and setter functions are generated for free and represent the recommended way to store data in a class. Every component in Sencha Touch uses the class system and the generated functions always follow the same pattern, so if you know a config, you already know how to get and set its value.
This approach also makes your code cleaner. For example, if you wanted to always ask the
user if he or she really wants to change Bob's name, you can just define an applyName
function that will be called automatically:
Ext.define('Human', {
    extend: 'Animal',

    applyName: function(newName, oldName) {
        return confirm('Are you sure you want to change name to ' + newName + '?')? newName : oldName;
    }
});
The previous code sample uses the browser's built in confirm function, which opens a dialog asking the user the question and offering "Yes" and "No" as answers. The applier functions allow you to cancel the name change if the confirm call returned false. As it happens, the confirm function returns either the new or old name, depending on whether the user clicks Yes or No.
If we create a new Bob instance and try to change his name, but then click No when prompted, his name will not change after all:
var bob = Ext.create('Human', {
    name: 'Bob'
});

bob.setName('Fred'); //opens a confirm box, but we click No

bob.speak(); //still alerts 'Bob'
The apply function is also a good place where to transform your value. Remember that whatever this returns, this will be the new value for this configuration. A good example of this would be to prepend a title to the name, as shown in the following code sample:
Ext.define('Human', {
    extend: 'Animal',

    applyName: function(newName, oldName) {
        return 'Mr. ' + newName;
    }
});
Another config method is update. The update method (updateName() in this case) is only
called when the value of the config changes. For example, given the following code,
the updateName() will not be called:
var bob = Ext.create('Human', {
    name: 'Bob'
});

bob.setName('Bob'); // The name is the same, so update is not called
Consequently, when we use the update method, the config is changing. This function should
be the place where you update your component, or do whatever you need to do when the
value of your config changes. The following example shows an alert:
Ext.define('Human', {
    extend: 'Animal',

    updateName: function(newName, oldName) {
        alert('Name changed. New name is: ' + newName);
    }
});
Remember that the update and apply methods get called on component instantiation too, such that in the following example we would get two alerts:
// creating this will cause the name config to update, therefor causing the alert
var bob = Ext.create('Human', {
    name: 'Bob'
});

// changing it will cause the alert to show again
bob.setName('Ed');
We have basically already learned the following important behavior of classes:
Ext.define, including your own classesextend syntaxExt.create, for example Ext.create('SomeClass', {some: 'configuration'})config syntax to get automatic getters and setters and have a much cleaner codebaseAt this point you can already go about creating classes in your app, but the class system takes care of a few more things that will be helpful to learn.
Most of the time, classes depend on other classes. The Human class described previously
depends on the Animal class because it extends it - we depend on Animal being present to
be able to define Human. Sometimes you make use of other classes inside a class, so you
need to guarantee that those classes are on the page. This is accomplished using the
requires syntax, as shown in the following code sample:
Ext.define('Human', {
    extend: 'Animal',

    requires: 'Ext.MessageBox',

    speak: function() {
        Ext.Msg.alert(this.getName(), "Speaks...");
    }
});
When you create a class this way, Sencha Touch verifies if Ext.MessageBox is already
loaded and if not, it immediately loads the required class file with AJAX.
Ext.MessageBox itself may also have classes it depends on, which are then also loaded
automatically in the background. Once all the required classes are loaded, the Human
class is defined and you can start using Ext.create to instantiate people. This works
well in development mode, as it means you do not have to manage the loading of all your
scripts yourself, but not as well in production, because loading files one by one over
an internet connection is rather slow.
In production, we want to load a single JavaScript file, ideally containing only the classes that our application actually uses. This is done in Sencha Touch using the JSBuilder tool, which analyzes your app and creates a single file build that contains all of your classes and only the framework classes your app actually uses. See the Building guide for details on how to use the JSBuilder.
Each approach has its pros and cons, but can we have the good parts of both without the drawbacks, too? The answer is yes, and we have implemented the solution in Sencha Touch.
Using consistent naming conventions throughout your code base for classes, namespaces, and filenames helps keep your code organized, structured, and readable.
Class names may only contain alphanumeric characters. Numbers are permitted but are discouraged in most cases, unless they belong to a technical term. Do not use underscores, hyphens, or any other non-alphanumeric character. For example:
MyCompany.useful_util.Debug_Toolbar is discouragedMyCompany.util.Base64 is acceptableWhere appropriate, class names should be grouped into packages and should be properly namespaced using the object property dot notation ( . ). At the minimum, there should be one unique top level namespace followed by the class name. For example:
MyCompany.data.CoolProxy
MyCompany.Application
The top level namespaces and the actual class names should be in CamelCase, everything else should be all lower-cased. For example:
MyCompany.form.action.AutoLoad
Classes that are not distributed by Sencha should never use Ext as the top-level namespace.
Acronyms should also follow the CamelCase convention, as illustrated by the following naming examples:
Ext.data.JsonProxy instead of Ext.data.JSONProxyMyCompany.util.HtmlParser instead of MyCompary.parser.HTMLParserMyCompany.server.Http instead of MyCompany.server.HTTPThe names of the classes map directly to the file paths in which they are stored. As a r esult, there must only be one class per file. For example:
Ext.mixin.Observable is stored in path/to/src/Ext/mixin/Observable.jsExt.form.action.Submit is stored in path/to/src/Ext/form/action/Submit.jsMyCompany.chart.axis.Numeric is stored in path/to/src/MyCompany/chart/axis/Numeric.jswhere path/to/src is the directory of your application's classes. All classes should
stay under this common root and should be properly namespaced for the best development,
maintenance, and deployment experience.
Similarly to class names, method and variable names may only contain alphanumeric characters. Numbers are permitted but are discouraged in most cases, unless they belong to a technical term. Do not use underscores, hyphens, or any other non-alphanumeric character.
Method and variable names should always use CamelCase. This also applies to acronyms.
Here are a few examples:
Acceptable method names:
encodeUsingMd5()
getHtml() instead of getHTML()
getJsonResponse() instead of getJSONResponse()
parseXmlContent() instead of parseXMLContent()
Acceptable variable names:
var isGoodName
var base64Encoder
var xmlReader
var httpServer
Class property names follow the same convention as method and variable names, except the case when they are static constants. Static class properties that are constants should be all upper-cased, for example:
Ext.MessageBox.YES = "Yes"Ext.MessageBox.NO = "No"MyCompany.alien.Math.PI = "4.13"If you have developed apps with Sencha Touch 1.x, you are certainly familiar with theExt.extend function that creates a class:
var MyPanel = Ext.extend(Object, {
    // ...
});
This approach is easy to follow when creating a new class that inherits from another. Other than direct inheritance, however, there was not a fluent API for other aspects of class creation, such as configuration, statics, and mixins. We will be reviewing these items in detail shortly.
Let us take a look at the following example:
My.cool.Panel = Ext.extend(Ext.Panel, {
    // ...
});
In this example we want to namespace our new class and make it extend from Ext.Panel. There
are two concerns we need to address:
My.cool needs to be an existing object before we can assign Panel as its property.Ext.Panel needs to exist or to be loaded on the page before it can be referenced.The first concern is usually solved by using Ext.namespace (aliased by Ext.ns). This
method recursively traverses the object/property tree and creates them if they do not
exist yet. The drawback is that you need to remember adding this function call above
Ext.extend all the time, as shown in the following example:
Ext.ns('My.cool');
My.cool.Panel = Ext.extend(Ext.Panel, {
    // ...
});
The second issue, however, is not easy to address because Ext.Panel might depend on many
other classes that it directly or indirectly inherits from, and in turn, these dependencies
might depend on other classes to exist. For that reason, applications written before
Sencha Touch usually include the whole library in the form of ext-all.js, even though
they might only need a small portion of the framework.
Sencha Touch eliminates all these drawbacks with a single method you need to remember for
class creation: Ext.define. Its basic syntax is as follows:
Ext.define(className, members, onClassCreated);
Let us look at each part of method call:
className is the class namemembers is an object that represents a collection of class members in key-value pairsonClassCreated is an optional function callback to be invoked when all dependencies of
this class are ready, and when the class itself is fully created. Due to the
new asynchronous nature of class creation, this callback can be useful in many
situations. These will be discussed further in Section IV.Example
Ext.define('My.sample.Person', {
    name: 'Unknown',

    constructor: function(name) {
        if (name) {
            this.name = name;
        }
    },

    eat: function(foodType) {
        alert(this.name + " is eating: " + foodType);
    }
});

var aaron = Ext.create('My.sample.Person', 'Aaron');
aaron.eat("Salad"); // alert("Aaron is eating: Salad");
Note that we created a new instance of My.sample.Person using the Ext.create() method.
We could have used the new keyword (new My.sample.Person()). However it is recommended
that you always use Ext.create, since it allows you to take advantage of dynamic
loading. For more info on dynamic loading see the Getting Started guide.
In Sencha Touch, we introduce a dedicated config property that is processed by the
powerful Ext.Class preprocessors before the class is created. The config features
include the following:
apply method is also generated for every config property. The auto-generated
setter method calls the apply method internally before setting the value. Override
the apply method for a config property if you need to run custom logic before setting
the value. If apply method does not return a value, then the setter will not set the
value. For an example see the following applyTitle code sample:Ext.define('My.own.Window', {
/** @readonly */
isWindow: true,
config: {
title: 'Title Here',
bottomBar: {
enabled: true,
height: 50,
resizable: false
}
},
constructor: function(config) {
this.initConfig(config);
},
applyTitle: function(title) {
if (!Ext.isString(title) || title.length === 0) {
console.log('Error: Title must be a valid non-empty string');
}
else {
return title;
}
},
applyBottomBar: function(bottomBar) {
if (bottomBar && bottomBar.enabled) {
if (!this.bottomBar) {
return Ext.create('My.own.WindowBottomBar', bottomBar);
}
else {
this.bottomBar.setConfig(bottomBar);
}
}
}
});
The following code illustrates the use of the previously defined My.own.Window class:
var myWindow = Ext.create('My.own.Window', {
    title: 'Hello World',
    bottomBar: {
        height: 60
    }
});

console.log(myWindow.getTitle()); // logs "Hello World"

myWindow.setTitle('Something New');
console.log(myWindow.getTitle()); // logs "Something New"

myWindow.setTitle(null); // logs "Error: Title must be a valid non-empty string"

myWindow.setBottomBar({ height: 100 }); // Bottom bar's height is changed to 100
Static members can be defined using the statics config, as shown in the following example:
Ext.define('Computer', {
    statics: {
        instanceCount: 0,
        factory: function(brand) {
            // 'this' in static methods refer to the class itself
            return new this({brand: brand});
        }
    },

    config: {
        brand: null
    },

    constructor: function(config) {
        this.initConfig(config);

        // the 'self' property of an instance refers to its class
        this.self.instanceCount ++;
    }
});

var dellComputer = Computer.factory('Dell');
var appleComputer = Computer.factory('Mac');

alert(appleComputer.getBrand());
// using the auto-generated getter to get the value of a config property. Alerts "Mac"

alert(Computer.instanceCount);
// Alerts "2"
Sencha Touch includes some useful features that help you with debugging and error handling.
You can use the Ext.getDisplayName() call to get the display name of any method. This
is especially useful for throwing errors that have the class name and the method name in
their description, as shown in the following code sample:
throw new Error('['+ Ext.getDisplayName(arguments.callee) +'] Some message here');
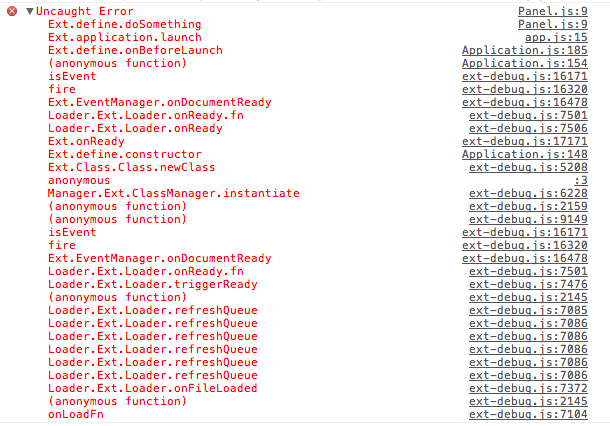
When an error is thrown in any method of any class defined using Ext.define(), you
should see the method and class names in the call stack if you are using a WebKit based
browser (Chrome or Safari). For example, here is what it would look like in Chrome:
Classes are only a part of the Sencha Touch ecosystem. To understand more about the framework and how it works, we recommend reading the following guides:


 Sencha Touch | Terms of Use
