Sencha Visual Studio Code Plugin
Many classes have shortcut names used when creating (instantiating) a class with a
configuration object. The shortcut name is referred to as an alias (or xtype if the
class extends Ext.Component). The alias/xtype is listed next to the class name of
applicable classes for quick reference.
Framework classes or their members may be specified as private or protected. Else,
the class / member is public. Public, protected, and private are access
descriptors used to convey how and when the class or class member should be used.
Public classes and class members are available for use by any other class or application code and may be relied upon as a stable and persistent within major product versions. Public classes and members may safely be extended via a subclass.
Protected class members are stable public members intended to be used by the
owning class or its subclasses. Protected members may safely be extended via a subclass.
Private classes and class members are used internally by the framework and are not intended to be used by application developers. Private classes and members may change or be omitted from the framework at any time without notice and should not be relied upon in application logic.
static label next to the
method name. *See Static below.Below is an example class member that we can disect to show the syntax of a class member (the lookupComponent method as viewed from the Ext.button.Button class in this case).
Let's look at each part of the member row:
lookupComponent in this example)( item ) in this example)Ext.Component in this case). This may be omitted for methods that do not
return anything other than undefined or may display as multiple possible values
separated by a forward slash / signifying that what is returned may depend on the
results of the method call (i.e. a method may return a Component if a get method calls is
successful or false if unsuccessful which would be displayed as
Ext.Component/Boolean).PROTECTED in
this example - see the Flags section below)Ext.container.Container in this example). The source
class will be displayed as a blue link if the member originates from the current class
and gray if it is inherited from an ancestor or mixed-in class.view source in the example)item : Object in the example).undefined a "Returns" section
will note the type of class or object returned and a description (Ext.Component in the
example)Available since 3.4.0 - not pictured in
the example) just after the member descriptionDefaults to: false)The API documentation uses a number of flags to further commnicate the class member's function and intent. The label may be represented by a text label, an abbreviation, or an icon.
classInstance.method1().method2().etc();false is returned from
an event handler- Indicates a framework class
- A singleton framework class. *See the singleton flag for more information
- A component-type framework class (any class within the Ext JS framework that extends Ext.Component)
- Indicates that the class, member, or guide is new in the currently viewed version
- Indicates a class member of type config
- Indicates a class member of type property
- Indicates a class member of type
method
- Indicates a class member of type event
- Indicates a class member of type
theme variable
- Indicates a class member of type
theme mixin
- Indicates that the class, member, or guide is new in the currently viewed version
Just below the class name on an API doc page is a row of buttons corresponding to the types of members owned by the current class. Each button shows a count of members by type (this count is updated as filters are applied). Clicking the button will navigate you to that member section. Hovering over the member-type button will reveal a popup menu of all members of that type for quick navigation.
Getting and setter methods that correlate to a class config option will show up in the methods section as well as in the configs section of both the API doc and the member-type menus just beneath the config they work with. The getter and setter method documentation will be found in the config row for easy reference.
Your page history is kept in localstorage and displayed (using the available real estate) just below the top title bar. By default, the only search results shown are the pages matching the product / version you're currently viewing. You can expand what is displayed by clicking on the button on the right-hand side of the history bar and choosing the "All" radio option. This will show all recent pages in the history bar for all products / versions.
Within the history config menu you will also see a listing of your recent page visits. The results are filtered by the "Current Product / Version" and "All" radio options. Clicking on the button will clear the history bar as well as the history kept in local storage.
If "All" is selected in the history config menu the checkbox option for "Show product details in the history bar" will be enabled. When checked, the product/version for each historic page will show alongside the page name in the history bar. Hovering the cursor over the page names in the history bar will also show the product/version as a tooltip.
Both API docs and guides can be searched for using the search field at the top of the page.
On API doc pages there is also a filter input field that filters the member rows using the filter string. In addition to filtering by string you can filter the class members by access level, inheritance, and read only. This is done using the checkboxes at the top of the page.
The checkbox at the bottom of the API class navigation tree filters the class list to include or exclude private classes.
Clicking on an empty search field will show your last 10 searches for quick navigation.
Each API doc page (with the exception of Javascript primitives pages) has a menu view of metadata relating to that class. This metadata view will have one or more of the following:
Ext.button.Button class has an alternate class name of Ext.Button). Alternate class
names are commonly maintained for backward compatibility.Runnable examples (Fiddles) are expanded on a page by default. You can collapse and expand example code blocks individually using the arrow on the top-left of the code block. You can also toggle the collapse state of all examples using the toggle button on the top-right of the page. The toggle-all state will be remembered between page loads.
Class members are collapsed on a page by default. You can expand and collapse members using the arrow icon on the left of the member row or globally using the expand / collapse all toggle button top-right.
Viewing the docs on narrower screens or browsers will result in a view optimized for a smaller form factor. The primary differences between the desktop and "mobile" view are:
The class source can be viewed by clicking on the class name at the top of an API doc page. The source for class members can be viewed by clicking on the "view source" link on the right-hand side of the member row.
Sencha's Visual Studio (VS) Code plugin is a extension available for Microsoft's Visual Studio Code editor. Visual Studio Code is a free, open source (MIT), source code editor for Windows, OS X, and Linux. The project is available for collaboration on GitHub.
Sencha's VS Code plugin extends VS Code to provide Ext JS IntelliSense, code inspection, documentation lookup, as well as helpful integration with Sencha Cmd.
Ext JS 4.2.+
http://www.sencha.com/products/extjs
Sencha Cmd 6+ (optional)
Sencha Cmd is only required if you want to take advantage of the ability to create and run Sencha applications.
https://www.sencha.com/products/sencha-cmd/
Visual Studio Code Editor
Sencha's Visual Studio Code plugin is compatible with Visual Studio Code 1.x. If you encounter compatibility issues, please report them on the Sencha Visual Studio Code Forum .
https://code.visualstudio.com/
Begin by downloading the Sencha VS Code plugin vscode-extjs-1.x.x.vsix from the Support portal.
Select the "Extensions" tab on the left from within Visual Studio Code.
From the "..." menu, select "Install from VSIX” and select your downloaded vscode-extjs-1.x.x.vsix file.
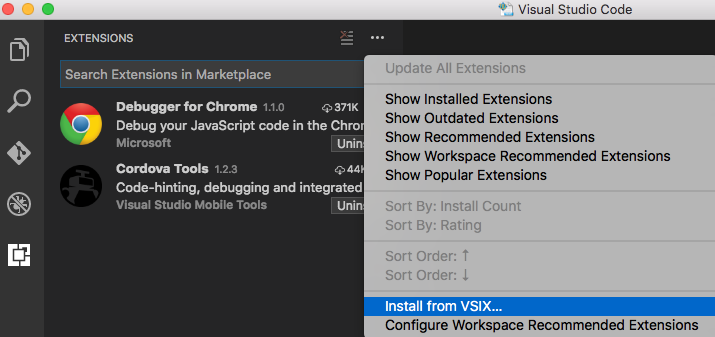
Note: You can also install the extension from the command line by using following command:
code --install-extension vscode-extjs-1.x.x.vsix
Download from Visual Studio Code Marketplace
You can browse and install Sencha Visual Studio Code Plugin from within VS Code Editor. Bring up the Extension view by clicking on the Extensions icon in the View Bar on the side of VS Code.
Search "Sencha" and click "install” for "Sencha Visual Studio Code Plugin”.
Once installed, VS Code will suggest a restart. Go ahead and restart, and when the application reopens, you will see the following licensing toolbar:

If you don't have a license and you'd like try the Sencha extension, select "Start Trial".
You will be prompted for your email address. Enter your email and hit "return" or "enter".
You should receive a message saying that your trial license has been activated. You now have full usage of the Sencha VS Code extension for 30 days for evaluation purposes.
If your email address is not associated with a Sencha forum account, you will receive an email from [email protected] with an email validation code.
The plugin will then prompt you to enter that code to begin your trial.
If you have a license or you're ready to activate the Sencha extension, click on the footer where it says "Activate Sencha Ext JS Extension". You can then click on "Activate License".
You will be prompted for an email address. You should receive an activation code via email. Simply paste your activation code into the prompt and you will get a message saying that the extension has successfully been activated!
If you need an offline activation code, simply click "Offline Activation". You will then be prompted as to whether you need an offline trial or offline activation.
You can then create a request for offline activation by following the wizard tool.
The extension will display an email message that you can send to [email protected] to request your license.
You will be sent an email with a "license.json" file attached. You can access the license file at any time using the "Reveal Ext JS Extension License Location" command.
The Sencha Visual Studio Code Plugin is simple to use. Features include:
IntelliSense - Code Completion
Code Navigation
Documentation lookup
Code generation
Integration with Sencha Cmd
Debugging Ext JS apps
Edit Ext JS IntelliSense Configuration
Let's walk through each of these.
Let's begin reviewing the benefits of Sencha Visual Studio Code Plugin with one of the most handy features; code completion. This feature allows you to receive completion suggestions for the appropriate visibility scope. When editing an Ext JS JavaScript file, just typing will bring up the IntelliSense window. You can also bring up the the IntelliSense in VS Code with control+space combination. The IntelliSense will use a mix of Sencha and standard VS Code results depending on what is being completed.
This applies to almost any framework item, including:
Config, method, and property names for all Ext JS and user classes
Values for alias properties such as xtype, controller, viewModel, layout, etc…
Event names in Component.on, .mon, .un, .mun, and listeners objects
CSS class names in all config properties and methods ending in cls
this.lookupReference(..) and this.lookup(...) in controllers with an alias
Controller methods in listeners: { (event): (methodName) } as well as handler config property
Model/store fields for Ext.grid.Column.dataIndex
Properties from the ViewModel in bind configs

IntelliSense is only enabled by default if the project contains a .sencha directory anywhere
within it. Cmd automatically creates a .sencha directory when creating an app,
workspace, or package.
However, users with apps not created with Cmd will need to explicitly enable IntelliSense on the project using the “Enable Ext JS IntelliSense for this Project” command from within the command pallette (Shift + Command + P).
The Sencha VS Code plugin has intimate knowledge of the Ext JS framework. This allows the plugin to provide a powerful navigation tool. You can quickly move throughout the application without the need for searching a tree or directory structure.
You can navigate using class name, xtypes, and other type aliases. You can also navigate by methods, properties, config
keys, events, etc. You may navigate to the source member of the Ext JS framework or custom class by clicking on it
while holding CTRL (Command on Mac). You can also move the cursor to where you want to open the definition, and press
F12 key or fn + F12 keys. The source will open in a new JavaScript editor tab.

You also have ability to just peek at definitions with Option+F12 in your current JavaScript tab.

The Sencha Visual Studio Code plugin also allows users to open Sencha API documentation relevant to the code being edited. It supports documentation lookups for Ext JS class names, xtypes, and other type aliases. You can also lookup methods, properties, config keys, events, etc.
When editing a JavaScript file inside a project, move the cursor to appropriate element, and press the F1 key. The appropriate Sencha API documentation will open in a new external browser window.
If no relevant API documentation can be found, it will default to the API documentation root for the version of the SDK found in your application (such as https://docs.sencha.com/extjs/6.2.0).
Note: Code creation requires an installation of Sencha Cmd.
Right+Click in VS Code's explorer and select "New Ext JS App".

Now, walk through the steps in the wizard to create an Ext JS app.


Bring up the command menu in VS Code (Cmd+Shift+P), start typing "New" and select "New Ext JS App" and then walk through the steps in the wizard to create an Ext JS app.

The Sencha VS Code plugin helps you create new classes, views, view models, view controllers, models, controllers, and stores.
Type extjs_ in any .js file to bring up the list of Ext JS snippets in the IntelliSense menu.
You can easily modify or add snippets with VS Code. Just open your Command Pallette and
select "Edit Ext JS Snippets". This will bring up an user snippets file that you can modify.
This will also open the Default Ext JS Snippets file for comparison. To adjust a snippet,
just copy it from the defaults and into your User Snippets. For instance, your user snippets
may look like this:
{
    "Ext JS Class": {
        "prefix": "extjs_class",
        "body": [
            "Ext.define('{classname}', {\n",
            " \n",
            "});"
        ],
        "description": "Nitro Burning Funny Cars"
    },
}
As long as the initial key ("Ext JS Class" in this case) matches one in the Ext JS Snippets file, the user entry will override the default.
You can also use 4 variables within your customizations.
{classname} - the fully qualified class name including namespace.
{xtype} / {alias} - lower case form of the class name.
{aliasPrefix} - lower case form of the root namespace.
Note: Using Cmd's Build and Watch functionality requires an installation of Sencha Cmd.
Sencha VS Code plugin watches app source code for changes and then rebuilds outputs when it detects changes. The Sencha Cmd-based web server is started and then hosts the app. This allows you to see compilation errors as they happen.
Right+Click on any Ext JS application files and bring up the VS Code context menu and select "Run sencha app watch"
You will now see Sencha Cmd's output in the console view and your application will be available at: http://localhost:port
Apart from Sencha's VS Code extension, there are many other VS Code extensions that will help you speed up your Ext JS development. To debug apps running in Chrome browser, you should search and install Microsoft's "JavaScript Debugger" extension.
To launch and debug your Ext JS application effectively, begin by confirming that application is running on the browser. Once the application is running, proceed to open the Run and Debug from Activity bar within Visual Studio Code. Click on to customize Run and Debug Create a launch.json file to automatically generate the essential configuration for debugging.
Within the generated launch.json file, locate the Chrome configuration and ensure to update the URL field with the actual URL of your running Ext JS application. This step is crucial for establishing a connection between the debugger and the Chrome browser.
"configurations": [{
    "type": "chrome",
    "request": "launch",
    "name": "Launch Chrome against localhost",
    "url": "http://localhost:8080",
    "webRoot": "${workspaceFolder}"
}]
After configuring the launch settings, strategically place breakpoints in your code where you intend to pause execution for closer inspection during debugging. This allows you to focus on specific sections of your Ext JS code.
With everything set up, initiate the debugging process by either pressing F5 or utilizing the Run and Debugging sidebar in Visual Studio Code. This comprehensive approach ensures a smooth and efficient debugging experience for your Ext JS application development.
If your app was created using Sencha Cmd, or adheres to the Sencha Cmd app structure, the plugin will automatically index the Ext JS framework and all of the source code within your application. To include additional directories or exclude directories within your project, right+click on the project tree and select "Edit Ext JS IntelliSense Configuration".
This opens .sencha/ide/config.json in a new editor tab.
Note: Paths on windows should use "\" (escaped backlash) as the directory delimiter instead of "/” on Mac OS and Linux. The plugin will automatically re-index project source code when you save changes to the configuration file.
/*
 * By default the Sencha Ext JS plugin indexes all JavaScript files in your project.  Use this file to
 * index additional directories outside of your project, exclude directories within the project from indexing, and
 * configure apps that were not created using Sencha Cmd.
 *
 * Both relative and explicit paths are supported.  Relative paths are relative to the project's root directory.
 *
 * For example, if your project looks like...
 *
 *  (project root)
 *    .sencha
 *      ide
 *        config.json  <= this file
 *    assets
 *      build
 *        all.js
 *
 * ...you can exclude the build directory from indexing using:
 *
 *  "exclude": [
 *    "assets/build"
 *  ]
 */
{
    // List directories outside of the project root which should be included when indexing.  Paths may be relative
    // to the project root or absolute.
    /*
    "include": [
        "path/to/dir/to/index"
    ],
    */

    // List directories inside the project root which should be excluded from indexing.  Paths may be relative
    // to the project root or absolute.
    /*
    "exclude": [
        "path/to/dir/to/exclude"
    ],
    */

    // List apps within the project root or included directories that were not built with Sencha Cmd.
    // This is only required for apps that were not built with Sencha Cmd.  This lets the plugin know the correct root
    // namespace, sdk version, and toolkit (only applies to Ext 6 apps) for apps that do not follow the standard Sencha
    // structure.
    /*
    "apps": [
        {
            "name": "AppRootNamespace",
            "path": "path/to/app",
            "toolkit": "classic | modern",
            "sdk": {
                 "path": "path/to/sdk",
                 "version": "sdk version",
                 "framework": "extjs | touch"
            }
        }
    ]
    */
}
Some linux distributions, including Ubuntu, limit the number of open file handles. If that limit is exceeded, the Ext JS plugin will not be able to provide IntelliSense. The plugin should detect this and display the following instructions describing how the limit can be increased.
Visual Studio Code has reached the maximum number of open file handles allowed by your operating system. The limit can be increased to its maximum by editing /etc/sysctl.conf and adding this line to the end of the file:
fs.inotify.max_user_watches=524288
The new value can then be loaded in by running:
sudo sysctl -p
Once this is done, please restart Visual Studio Code.
All of the above can be done in a single command:
echo fs.inotify.max_user_watches=524288 | sudo tee -a /etc/sysctl.conf && sudo sysctl -p
For more information see:
https://code.visualstudio.com/docs/setup/linux#_error-enospc
Added "Ext JS: Reindex Project for IntelliSense" command
Reduced build size by 60%
VSCP-71 - Offline Licenses cannot be requested in some situations
VSCP-65 - Cannot generate projects outside of a workspace
VSCP-64 - Ext JS SDK is not automatically indexed in some cases
VSCP-63 - Inconsistent build number in license files
VSCP-62 - Cannot request offline licenses unless folder is opened.
VSCP-60 - Sencha app watch does not show line number when it fails
VSCP-47 - Running "sencha app watch" from the command palette fails silently if no file is open.
VSCP-35 - Plugin doesn't work if the project is located on a network drive
Ask questions, report problems, and give feedback using the Visual Studio Code Plugins Forum
From beginner to expert, the Visual Studio Code plugin provides an immersive experience for Sencha Developers. It provides best practice notation while streamlining code navigation, class creation, and self-documentation.


 IDE Plugins | Terms of Use
