Introduction to Sencha Cmd
Many classes have shortcut names used when creating (instantiating) a class with a
configuration object. The shortcut name is referred to as an alias (or xtype if the
class extends Ext.Component). The alias/xtype is listed next to the class name of
applicable classes for quick reference.
Framework classes or their members may be specified as private or protected. Else,
the class / member is public. Public, protected, and private are access
descriptors used to convey how and when the class or class member should be used.
Public classes and class members are available for use by any other class or application code and may be relied upon as a stable and persistent within major product versions. Public classes and members may safely be extended via a subclass.
Protected class members are stable public members intended to be used by the
owning class or its subclasses. Protected members may safely be extended via a subclass.
Private classes and class members are used internally by the framework and are not intended to be used by application developers. Private classes and members may change or be omitted from the framework at any time without notice and should not be relied upon in application logic.
static label next to the
method name. *See Static below.Below is an example class member that we can disect to show the syntax of a class member (the lookupComponent method as viewed from the Ext.button.Button class in this case).
Let's look at each part of the member row:
lookupComponent in this example)( item ) in this example)Ext.Component in this case). This may be omitted for methods that do not
return anything other than undefined or may display as multiple possible values
separated by a forward slash / signifying that what is returned may depend on the
results of the method call (i.e. a method may return a Component if a get method calls is
successful or false if unsuccessful which would be displayed as
Ext.Component/Boolean).PROTECTED in
this example - see the Flags section below)Ext.container.Container in this example). The source
class will be displayed as a blue link if the member originates from the current class
and gray if it is inherited from an ancestor or mixed-in class.view source in the example)item : Object in the example).undefined a "Returns" section
will note the type of class or object returned and a description (Ext.Component in the
example)Available since 3.4.0 - not pictured in
the example) just after the member descriptionDefaults to: false)The API documentation uses a number of flags to further commnicate the class member's function and intent. The label may be represented by a text label, an abbreviation, or an icon.
classInstance.method1().method2().etc();false is returned from
an event handler- Indicates a framework class
- A singleton framework class. *See the singleton flag for more information
- A component-type framework class (any class within the Ext JS framework that extends Ext.Component)
- Indicates that the class, member, or guide is new in the currently viewed version
- Indicates a class member of type config
- Indicates a class member of type property
- Indicates a class member of type
method
- Indicates a class member of type event
- Indicates a class member of type
theme variable
- Indicates a class member of type
theme mixin
- Indicates that the class, member, or guide is new in the currently viewed version
Just below the class name on an API doc page is a row of buttons corresponding to the types of members owned by the current class. Each button shows a count of members by type (this count is updated as filters are applied). Clicking the button will navigate you to that member section. Hovering over the member-type button will reveal a popup menu of all members of that type for quick navigation.
Getting and setter methods that correlate to a class config option will show up in the methods section as well as in the configs section of both the API doc and the member-type menus just beneath the config they work with. The getter and setter method documentation will be found in the config row for easy reference.
Your page history is kept in localstorage and displayed (using the available real estate) just below the top title bar. By default, the only search results shown are the pages matching the product / version you're currently viewing. You can expand what is displayed by clicking on the button on the right-hand side of the history bar and choosing the "All" radio option. This will show all recent pages in the history bar for all products / versions.
Within the history config menu you will also see a listing of your recent page visits. The results are filtered by the "Current Product / Version" and "All" radio options. Clicking on the button will clear the history bar as well as the history kept in local storage.
If "All" is selected in the history config menu the checkbox option for "Show product details in the history bar" will be enabled. When checked, the product/version for each historic page will show alongside the page name in the history bar. Hovering the cursor over the page names in the history bar will also show the product/version as a tooltip.
Both API docs and guides can be searched for using the search field at the top of the page.
On API doc pages there is also a filter input field that filters the member rows using the filter string. In addition to filtering by string you can filter the class members by access level, inheritance, and read only. This is done using the checkboxes at the top of the page.
The checkbox at the bottom of the API class navigation tree filters the class list to include or exclude private classes.
Clicking on an empty search field will show your last 10 searches for quick navigation.
Each API doc page (with the exception of Javascript primitives pages) has a menu view of metadata relating to that class. This metadata view will have one or more of the following:
Ext.button.Button class has an alternate class name of Ext.Button). Alternate class
names are commonly maintained for backward compatibility.Runnable examples (Fiddles) are expanded on a page by default. You can collapse and expand example code blocks individually using the arrow on the top-left of the code block. You can also toggle the collapse state of all examples using the toggle button on the top-right of the page. The toggle-all state will be remembered between page loads.
Class members are collapsed on a page by default. You can expand and collapse members using the arrow icon on the left of the member row or globally using the expand / collapse all toggle button top-right.
Viewing the docs on narrower screens or browsers will result in a view optimized for a smaller form factor. The primary differences between the desktop and "mobile" view are:
The class source can be viewed by clicking on the class name at the top of an API doc page. The source for class members can be viewed by clicking on the "view source" link on the right-hand side of the member row.
Sencha Cmd is a cross-platform command line tool that provides many automated tasks around the full life-cycle of your applications from generating a new project to deploying an application to production.
Sencha Cmd provides a collection of powerful, time-saving features that work together and in conjunction with the Sencha Ext JS and Sencha Touch frameworks. Sencha Cmd provides the following capabilities:
Sencha Cmd supports Sencha Ext JS version 4.1.1a or higher and Sencha Touch version 2.1 or higher. Many of the features of Sencha Cmd require framework support that is only available at these or later version levels. Some low-level commands can be used for older versions of Sencha frameworks or JavaScript in general.
If you are using an older version of Ext JS, you may use Sencha Cmd's build command to
build via your JSB file. In other words, Sencha Cmd can replace JSBuilder to produce a
compressed build of the files described in a JSB file. Sencha Cmd will not update your JSB
file as was done by the deprecated SDK Tools v2.
Sencha Touch 2.0 and Sencha Ext JS 4.0 require the deprecated SDK Tools v2, which cannot be used with later Touch or Ext JS versions.
The Sencha Cmd 6 installer includes all required software for building Ext JS 6 applications, so simply download Sencha Cmd:
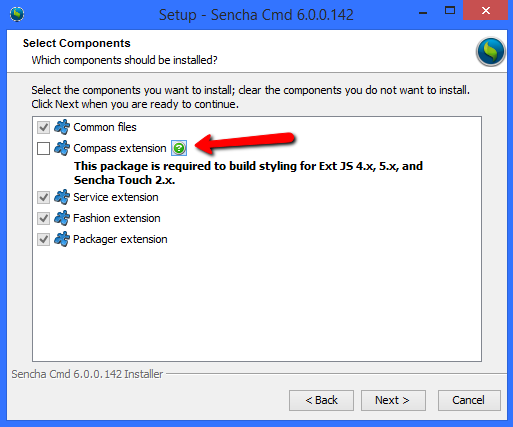
If you are using older versions of Ext JS or Sencha Touch, you will need to check the "Compass extension" option in the installer:
You will also need to install Ruby to compile themes and applications that use Sass. Ruby differs by OS:
".exe" file version of the software and install it.If you will be using Cordova or PhoneGap, you may have other requirements for these tools. See Integrating With Cordova or PhoneGap.
The installer will add an entry to your PATH environmental variable.
To verify that Sencha Cmd is working properly, open a command line, change directory to
your application, and type the sencha command.
You should see output that starts something like this:
Sencha Cmd v6.0.0.202
...
The exact version number displayed should match the version you just installed.
Some users may wish to install Sencha Cmd without the installer's GUI. If you need a CLI-only installation process, simply run the following command from your command line tool:
SenchaCmd-6.x.y.z-osx.app/Contents/MacOS/JavaApplicationStub -q
SenchaCmd-6.x.y.z-linux(-i386|-amd64).sh -q
SenchaCmd-6.x.y.z-windows-(32|64)bit.exe -q
This will install Sencha Cmd sans GUI installer.
If you need to change the installation path, you may specify it using the "dir" flag. For instance:
sudo SenchaCmd-6.x.y.z-linux(-i386|-amd64).sh -q -dir "/opt"
Note: Your choice of installation path may necessitate permission changes.
The sencha upgrade feature lets you upgrade Sencha Cmd.
Check for new updates to Sencha Cmd:
sencha upgrade --check
Without the --check option, the sencha upgrade command downloads and installs the
latest version if you don't already have it:
sencha upgrade
After the installer is done, start a new console or terminal to pick up the changes to your PATH environment variable.
Because multiple versions of Sencha Cmd can be installed side-by-side, you can safely try
new releases and simply uninstall them (or adjust the PATH or symlink) to go back to your
previous version. Upgrading your applications using sencha app upgrade however, is more
of a source control item you may need "roll back" if you downgrade to an older Sencha Cmd.
Some users may wish to upgrade Sencha Cmd without the installer's GUI. If you need a CLI-only upgrade process, simply run the following command from your command line tool:
sencha upgrade --unattended
This will upgrade Sencha Cmd sans GUI installer.
If you want to check for beta releases, use:
sencha upgrade --check --beta
To install the latest beta version:
sencha upgrade --beta
Note It is possible that the most current release is in either the "beta" or stable
channel. That is to say, sencha upgrade --beta may install a beta that pre-dates the
current release that would be installed by sencha upgrade.
Sencha Cmd features are arranged in categories (or modules) and commands:
sencha [category] [command] [options...] [arguments...]
Help is available using the help command.
sencha help [module] [action]
For example, try this:
sencha help
Displays the current version and the available top-level commands. For example:
Sencha Cmd v6.0.0.202
...

Options
  * --beta, -be - Enable beta package repositories
  * --cwd, -cw - Sets the directory from which commands should execute
  * --debug, -d - Sets log level to higher verbosity
  * --info, -i - Sets log level to default
  * --nologo, -n - Suppress the initial Sencha Cmd version display
  * --plain, -pl - enables plain logging output (no highlighting)
  * --quiet, -q - Sets log level to warnings and errors only
  * --sdk-path, -sd - The location of the SDK to use for non-app commands
  * --strict, -st - Treats warnings as errors, exiting with error if any warnings are present
  * --time, -ti - Display the execution time after executing all commands

Categories
  * app - Perform various application build processes
  * compile - Compile sources to produce concatenated output and metadata
  * cordova - Quick init Support for Cordova
  * diag - Perform diagnostic operations on Sencha Cmd
  * fs - Utility commands to work with files
  * generate - Generates models, controllers, etc. or an entire application
  * manager - Commands for interacting with Sencha Web Application Manager.
  * manifest - Extract class metadata
  * package - Manages local and remote packages
  * phonegap - Quick init support for PhoneGap
  * repository - Manage local repository and remote repository connections
  * template - Commands for working with templates
  * theme - Commands for low-level operations on themes
  * web - Manages a simple HTTP file server

Commands
  * ant - Invoke Ant with helpful properties back to Sencha Cmd
  * audit - Search from the current folder for Ext JS frameworks and report their license
  * build - Builds a project from a legacy JSB3 file.
  * config - Load a properties file or sets a configuration property
  * help - Displays help for commands
  * js - Executes arbitrary JavaScript file(s)
  * upgrade - Upgrades Sencha Cmd
  * which - Displays the path to the current version of Sencha Cmd
Note: The exact content will depend on the version you have installed.
The level of debug output was significantly decreased in Sencha Cmd 5. You can re-enable
verbose output by including the -info flag in your command. For instance:
sencha -info app watch
This command will provide more information about the background processes occurring during initialization and upon file system updates.
The -info flag can be used with any Sencha command that produces output.
In many cases, Sencha Cmd requires that you set a specific current directory. Or it may just need to know details about the relevant Sencha SDK. The SDK (or "framework") can be determined automatically by Sencha Cmd when it is run from a generated application folder or, for some few commands, from an extracted SDK folder.
Important For the following commands, Sencha Cmd needs to be run from the root folder of a generated application. The commands fail if not run from the application's root folder.
* `sencha generate ...` (for commands other than `app`, `package` and `workspace`)
* `sencha app ...`
This is also true of Packages. When running commands like sencha package build, the
current directory must be the desired package folder.
The many guides for Sencha Cmd are organized to help build on your understanding and it is recommended that you follow this sequence. Jumping ahead can result in confusion as the advanced guides often assume understanding of the content of the earlier guides.
At the start of each guide are links to any prerequisites for that guide. Further, most guides end with a set of links for further reading.
There are many other details related to using Sencha Cmd that can be helpful. The help
command is a great reference, but if you want to walk through all the highlights, consult
Advanced Sencha Cmd.
Here are some tips for solving common problems encountered when using Sencha Cmd.
If you receive a "java heap space" error after executing a Cmd command, you may need to increase Java's allocated memory usage.
Add the following to ~/.bash_profile:
export _JAVA_OPTIONS="-Xms1024m -Xmx2048m"
You can either add the variable as an environmental variable, or you can
add the following to startup.bat:
set _JAVA_OPTIONS="-Xms1024m -Xmx2048m"
If running sencha results in the error message sencha: command not found on OSX/Linux
or 'sencha' is not recognized as an internal or external command, operable program or
batch file on Windows, follow these steps:
C:\Users\Me\bin\Sencha\Cmd\{version}~/bin/Sencha/Cmd/{version}~/bin/Sencha/Cmd/{version}echo %PATH% on Windows or echo $PATH on Mac or Linux.
The Sencha Cmd directory should be displayed in part of the output. If this is not
the case, add it to your PATH manually.If you see an error related to not recognizing or finding "ruby" this is likely because
Ruby is not installed or is not in your PATH. See the previous System Setup
section.
You should not see this message using Ext JS 6 because Fashion is used instead of Compass and Fashion does not require Ruby.
A common mistake is to perform a command that requires the current directory to be either an extracted SDK directory or an application directory, but such a directory has not been set. If this requirement is not met, Sencha Cmd displays an error and exits.
Note A valid application directory is one that was generated by Sencha Cmd.
The sencha app build command works by reading your index.html and app.json files and
scanning for required classes. If your application does not properly declare the classes it
requires, the build usually completes but will not contain all the classes needed by your
application.
To ensure that you have all required classes specified, always develop with the debugger console enabled ("Developer Tools" in IE/Chrome, FireBug in FireFox and Web Inspector in Safari) and resolve all warnings and error messages as they appear.
Whenever you see a warning like this:
[Ext.Loader] Synchronously loading 'Ext.foo.Bar'; consider adding 'Ext.foo.Bar'
explicitly as a require of the corresponding class
You should add 'Ext.foo.Bar' inside the requires array property of the class from
which the dependency originates. If it is a application-wide dependency, add it to the
requires array property inside Ext.application(...) statement in app.js.


 Cmd | Terms of Use
