Ant Integration
Many classes have shortcut names used when creating (instantiating) a class with a
configuration object. The shortcut name is referred to as an alias (or xtype if the
class extends Ext.Component). The alias/xtype is listed next to the class name of
applicable classes for quick reference.
Framework classes or their members may be specified as private or protected. Else,
the class / member is public. Public, protected, and private are access
descriptors used to convey how and when the class or class member should be used.
Public classes and class members are available for use by any other class or application code and may be relied upon as a stable and persistent within major product versions. Public classes and members may safely be extended via a subclass.
Protected class members are stable public members intended to be used by the
owning class or its subclasses. Protected members may safely be extended via a subclass.
Private classes and class members are used internally by the framework and are not intended to be used by application developers. Private classes and members may change or be omitted from the framework at any time without notice and should not be relied upon in application logic.
static label next to the
method name. *See Static below.Below is an example class member that we can disect to show the syntax of a class member (the lookupComponent method as viewed from the Ext.button.Button class in this case).
Let's look at each part of the member row:
lookupComponent in this example)( item ) in this example)Ext.Component in this case). This may be omitted for methods that do not
return anything other than undefined or may display as multiple possible values
separated by a forward slash / signifying that what is returned may depend on the
results of the method call (i.e. a method may return a Component if a get method calls is
successful or false if unsuccessful which would be displayed as
Ext.Component/Boolean).PROTECTED in
this example - see the Flags section below)Ext.container.Container in this example). The source
class will be displayed as a blue link if the member originates from the current class
and gray if it is inherited from an ancestor or mixed-in class.view source in the example)item : Object in the example).undefined a "Returns" section
will note the type of class or object returned and a description (Ext.Component in the
example)Available since 3.4.0 - not pictured in
the example) just after the member descriptionDefaults to: false)The API documentation uses a number of flags to further commnicate the class member's function and intent. The label may be represented by a text label, an abbreviation, or an icon.
classInstance.method1().method2().etc();false is returned from
an event handler- Indicates a framework class
- A singleton framework class. *See the singleton flag for more information
- A component-type framework class (any class within the Ext JS framework that extends Ext.Component)
- Indicates that the class, member, or guide is new in the currently viewed version
- Indicates a class member of type config
- Indicates a class member of type property
- Indicates a class member of type
method
- Indicates a class member of type event
- Indicates a class member of type
theme variable
- Indicates a class member of type
theme mixin
- Indicates that the class, member, or guide is new in the currently viewed version
Just below the class name on an API doc page is a row of buttons corresponding to the types of members owned by the current class. Each button shows a count of members by type (this count is updated as filters are applied). Clicking the button will navigate you to that member section. Hovering over the member-type button will reveal a popup menu of all members of that type for quick navigation.
Getting and setter methods that correlate to a class config option will show up in the methods section as well as in the configs section of both the API doc and the member-type menus just beneath the config they work with. The getter and setter method documentation will be found in the config row for easy reference.
Your page history is kept in localstorage and displayed (using the available real estate) just below the top title bar. By default, the only search results shown are the pages matching the product / version you're currently viewing. You can expand what is displayed by clicking on the button on the right-hand side of the history bar and choosing the "All" radio option. This will show all recent pages in the history bar for all products / versions.
Within the history config menu you will also see a listing of your recent page visits. The results are filtered by the "Current Product / Version" and "All" radio options. Clicking on the button will clear the history bar as well as the history kept in local storage.
If "All" is selected in the history config menu the checkbox option for "Show product details in the history bar" will be enabled. When checked, the product/version for each historic page will show alongside the page name in the history bar. Hovering the cursor over the page names in the history bar will also show the product/version as a tooltip.
Both API docs and guides can be searched for using the search field at the top of the page.
On API doc pages there is also a filter input field that filters the member rows using the filter string. In addition to filtering by string you can filter the class members by access level, inheritance, and read only. This is done using the checkboxes at the top of the page.
The checkbox at the bottom of the API class navigation tree filters the class list to include or exclude private classes.
Clicking on an empty search field will show your last 10 searches for quick navigation.
Each API doc page (with the exception of Javascript primitives pages) has a menu view of metadata relating to that class. This metadata view will have one or more of the following:
Ext.button.Button class has an alternate class name of Ext.Button). Alternate class
names are commonly maintained for backward compatibility.Runnable examples (Fiddles) are expanded on a page by default. You can collapse and expand example code blocks individually using the arrow on the top-left of the code block. You can also toggle the collapse state of all examples using the toggle button on the top-right of the page. The toggle-all state will be remembered between page loads.
Class members are collapsed on a page by default. You can expand and collapse members using the arrow icon on the left of the member row or globally using the expand / collapse all toggle button top-right.
Viewing the docs on narrower screens or browsers will result in a view optimized for a smaller form factor. The primary differences between the desktop and "mobile" view are:
The class source can be viewed by clicking on the class name at the top of an API doc page. The source for class members can be viewed by clicking on the "view source" link on the right-hand side of the member row.
Sencha Cmd is a cross-platform command line tool. Under the covers Sencha Cmd uses Apache Ant to provide much of its functionality. This guide describes the most important pieces of this interface in to Sencha Cmd.
The following guides are recommended reading before proceeding further:
Apache Ant has long been a pillar of the Java development community, but at its core, Ant is an XML-based, cross-platform scripting platform. It is a "platform" rather than a "language" because Ant can easily incorporate libraries of code in JAR form, or you can use one of the many supported scripting languages as part of your Ant script.
Ant can, of course, call other programs (like Sencha Cmd), passing arguments and processing exit codes, but what Ant is particularly good at is manipulating files. This is because Ant was designed for use in build scripts.
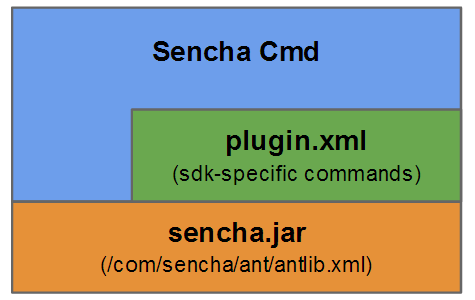
As touched on in the Advanced Sencha Cmd guide, Sencha Cmd
is delivered as a JAR file and it exposes its core functionality as an Ant Library (or
antlib). The command line level of Sencha Cmd, as well as SDK-specific processing
are implemented on top of this layer. So anything you can do in one, you can do in the
other.
If you are using Ant, it is better to interface to Sencha Cmd at this level rather than make repeated calls through the command line interface.
<taskdef resource="com/sencha/ant/antlib.xml"
         classpath="${cmd.dir}/sencha.jar"
         loaderref="senchaloader"/>
When an Ant script executes using sencha ant ..., the cmd.dir property defines
on entry. Otherwise, the Ant script or the executing party must determine cmd.dir in an
appropriate way for the local machine.
This task loads the configuration properties from "sencha.cfg" files based on the
current
directory. This is typically done by Ant scripts that require Sencha Cmd and are specific
to builds of Sencha applications.
<x-sencha-init/>
This will also load any Ant tasks defined by any available Sencha Cmd "extensions" such as
x-compass-compile.
This command is equivalent to the command line interface. The arguments are placed in the body text of this tag, one argument per line. Spaces are trimmed at both ends, so indent level is not significant. A good use of indentation is to clarify the command structure, like this:
<x-sencha-command>
    compile
        --classpath=app,sdk/src
        page
            --in=app/index.html
            --out=build/index.html
</x-sencha-command>
Because each line is an argument, spaces are not special and should not be escaped or quoted.
Ant properties are expanded, so the following (fairly conventional style) also works:
<x-sencha-command>
    compile
        --classpath=${app.dir},${sdk.dir}/src
        page
            --in=${app.dir}/index.html
            --out=${build.dir}/index.html
</x-sencha-command>
Finally, comments are supported so you can document the command or disable parts temporarily without deleting them. Also, blank lines are skipped:
<x-sencha-command>
    compile
        # Include the app folder and the sdk/src folder
        --classpath=${app.dir},${sdk.dir}/src

        # Turn off debugging (comment next line to leave debug enabled):
        # --debug=false

        page
            # The application main page:
            --in=${app.dir}/index.html

            # The compiled page goes in build folder along with "all-classes.js":
            --out=${build.dir}/index.html
</x-sencha-command>
This task extends the classpath of the current ClassLoader. This is sometimes necessary
to include "sencha.jar" in the classpath but can be useful in other cases where an Ant
script is launched and the classpath must be extended dynamically.
<x-extend-classpath>
    <jar path="${cmd.dir}/sencha.jar/>
</x-extend-classpath>
As many JAR's as needed can be listed.
This task generates output from templates in two basic modes: file and dir. That is,
the template generator can be given a single source file or a source folder.
The name of the source file determines if it should be processed as a "template":
.tpl = Ext.XTemplateFor example, "foo.js.tpl" would be used to generate "foo.js" using the XTemplate
engine.
In cases where a file may need to be changed from its original generated content (i.e.,
regenerate the target), the ".merge" suffix is very helpful. The primary use case for
this is an application's "app.js" file.
When processing a ".merge" file, x-generate performs the following steps:
"app.js") to the side (for example, as
"app.js.$old")."app.js")."app.js.$base"). That
is,
the version generated the last time.It is often the case (as with "app.js") that a ".merge" file is also a ".tpl". In
the case of "app.js", for example, the source file is "app.js.tpl.merge".
To enable this mode, x-generate must be given a store attribute which points at the
data store (a JSON file).
When generating code, files fall into two basic categories: machine maintained and user maintained. It is preferable, however, to provide a starter or skeleton file at initial generation even for files that will be ultimately user maintained.
This is called a "sacred" file and is identified by the source file extension of
".default".
That is, the source file is just a default and will not replace an existing file.
For example, one might want to generate a starter "readme.txt" file but preserve
whatever
the user might have changed during a later regeneration. To do so, the source file would
be named readme.txt.default.
There are times when a sacred file is also a template. This is done by adding both
extensions, for example, "readme.txt.tpl.default". This "readme.txt" file is a sacred
file that is initially generated from a template.
Template generation requires data, or parameters. The simplest form of parameter uses the
param attribute:
<x-generate ...>
    <param name="bar" value="42" />
</x-generate>
Parameters can also be loaded from a file, like so:
<x-generate ...>
    <load file="data.properties"/>
</x-generate>
The following file types are understood automatically:
".cfg" or ".properties" = A standard Java Properties file.".json" = A JSON data file.If the file does not have one of these extensions, but is a properties file or JSON, you
can specify the type attribute as json or properties, like so:
<x-generate ...>
    <load file="data.props" type="properties" />
    <load file="data" type="json" />
</x-generate>
Note. Parameters are applied in the order specified. Duplicate names are replaced if they are encountered.
The simplest form of x-generate is using the file attribute to transform a single
template file to a specified output file:
<x-generate file="foo.js.tpl" tofile="build/foo.js">
    <param name="bar" value="42" />
</x-generate>
The source filename determines how the process proceeds (and which template engine to use and if it is sacred), but that is all.
In many cases, you can leave off the target filename and just specify the folder, like this:
<x-generate file="foo.js.tpl" todir="build">
    <param name="bar" value="42" />
</x-generate>
This generates "foo.js" (using XTemplate) in the "build" folder.
Beyond avoiding redundancy, this form also allows the source filename to be a template, for example:
<x-generate file="{name}.js.tpl" todir="build">
    <param name="name" value="foobar" />
    <param name="bar" value="42" />
</x-generate>
The source file exists with the specified name (that is, "{name}.js.tpl"), but this name
is transformed using the XTemplate engine and the provided parameters to determine the
target filename.
In the above case, "foobar.js" is generated in the build directory.
The final form of x-generate operates on a source folder, and generates content in the
target folder, for example:
<x-generate dir="templates/foo" todir="build/foo">
    <param name="bar" value="42" />
    <load file="data.json"/>
</x-generate>
In this form, the generator recursively reads files and sub-folders in "templates/foo"
and
applies the appropriate template engine. It also preserves sacred files. All file and
folder
names are processed as XTemplate templates.
Compresses JavaScript source according to the following options (attributes):
srcfile: The source file to compress.outfile: The output file to generate (defaults to srcfile).charset: The charset of the input/output files.header: Optional text to include in a comment block at the start of the file.linebreak: The column number at which to break lines (default is -1, to not break
lines).obfuscate: False to not obfuscate local symbols (default is true).disableoptimizations: True to disable all built-in optimizations.preservesemi: True to preserve all semicolons.verbose: True to enable extra diagnostic messages.Compresses CSS source according to the following options (attributes):
srcfile: The source file to compress.outfile: The output file to generate (defaults to srcfile).charset: The charset of the input/output files.header: Optional text to include in a comment block at the start of the file.linebreak: The column number at which to break lines.verbose: True to enable extra diagnostic messages.This task removes comments (line and/or block) from a JS file. The following options are supported:
srcfile: The source file to stripoutfile: The output file to generate (defaults to srcfile).header: Optional text to include in a comment block at the start of the file.blockcomments: True (the default) to strip block comments ("/ ... /").linecomments: True (the default) to strip line comments ("//").keepfirstcomment: True (the default) to keep the first comment in the JS file.This is typically a copyright.
whitespace: True to also strip whitespace.Stores an environment variable value in the specified property. The name of the environment variable is first matched for exact case, but if no exact case match is found, it will pick a match ignoring case if one exists.
<x-get-env name="PATH" property="env.path"/>
This should be preferred over the "properties" task to read environment variables because that reflects the exact case of the variables as Ant properties which are case sensitive but environment variables (like "Path") are case insensitive at least on Windows.
This task escapes a string and stores the escaped string in a specified property.
<x-escape string="${some.text}" property="some.text.js" type="json"/>
<x-escape string="${some.text}" property="some.text.xml" type="xml"/>


 Cmd | Terms of Use
