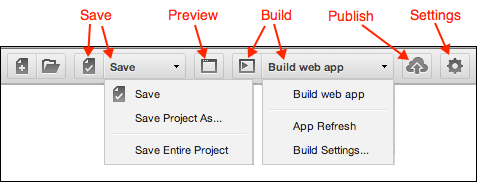
Save, Preview, and Build
Many classes have shortcut names used when creating (instantiating) a class with a
configuration object. The shortcut name is referred to as an alias (or xtype if the
class extends Ext.Component). The alias/xtype is listed next to the class name of
applicable classes for quick reference.
Framework classes or their members may be specified as private or protected. Else,
the class / member is public. Public, protected, and private are access
descriptors used to convey how and when the class or class member should be used.
Public classes and class members are available for use by any other class or application code and may be relied upon as a stable and persistent within major product versions. Public classes and members may safely be extended via a subclass.
Protected class members are stable public members intended to be used by the
owning class or its subclasses. Protected members may safely be extended via a subclass.
Private classes and class members are used internally by the framework and are not intended to be used by application developers. Private classes and members may change or be omitted from the framework at any time without notice and should not be relied upon in application logic.
static label next to the
method name. *See Static below.Below is an example class member that we can disect to show the syntax of a class member (the lookupComponent method as viewed from the Ext.button.Button class in this case).
Let's look at each part of the member row:
lookupComponent in this example)( item ) in this example)Ext.Component in this case). This may be omitted for methods that do not
return anything other than undefined or may display as multiple possible values
separated by a forward slash / signifying that what is returned may depend on the
results of the method call (i.e. a method may return a Component if a get method calls is
successful or false if unsuccessful which would be displayed as
Ext.Component/Boolean).PROTECTED in
this example - see the Flags section below)Ext.container.Container in this example). The source
class will be displayed as a blue link if the member originates from the current class
and gray if it is inherited from an ancestor or mixed-in class.view source in the example)item : Object in the example).undefined a "Returns" section
will note the type of class or object returned and a description (Ext.Component in the
example)Available since 3.4.0 - not pictured in
the example) just after the member descriptionDefaults to: false)The API documentation uses a number of flags to further commnicate the class member's function and intent. The label may be represented by a text label, an abbreviation, or an icon.
classInstance.method1().method2().etc();false is returned from
an event handler- Indicates a framework class
- A singleton framework class. *See the singleton flag for more information
- A component-type framework class (any class within the Ext JS framework that extends Ext.Component)
- Indicates that the class, member, or guide is new in the currently viewed version
- Indicates a class member of type config
- Indicates a class member of type property
- Indicates a class member of type
method
- Indicates a class member of type event
- Indicates a class member of type
theme variable
- Indicates a class member of type
theme mixin
- Indicates that the class, member, or guide is new in the currently viewed version
Just below the class name on an API doc page is a row of buttons corresponding to the types of members owned by the current class. Each button shows a count of members by type (this count is updated as filters are applied). Clicking the button will navigate you to that member section. Hovering over the member-type button will reveal a popup menu of all members of that type for quick navigation.
Getting and setter methods that correlate to a class config option will show up in the methods section as well as in the configs section of both the API doc and the member-type menus just beneath the config they work with. The getter and setter method documentation will be found in the config row for easy reference.
Your page history is kept in localstorage and displayed (using the available real estate) just below the top title bar. By default, the only search results shown are the pages matching the product / version you're currently viewing. You can expand what is displayed by clicking on the button on the right-hand side of the history bar and choosing the "All" radio option. This will show all recent pages in the history bar for all products / versions.
Within the history config menu you will also see a listing of your recent page visits. The results are filtered by the "Current Product / Version" and "All" radio options. Clicking on the button will clear the history bar as well as the history kept in local storage.
If "All" is selected in the history config menu the checkbox option for "Show product details in the history bar" will be enabled. When checked, the product/version for each historic page will show alongside the page name in the history bar. Hovering the cursor over the page names in the history bar will also show the product/version as a tooltip.
Both API docs and guides can be searched for using the search field at the top of the page.
On API doc pages there is also a filter input field that filters the member rows using the filter string. In addition to filtering by string you can filter the class members by access level, inheritance, and read only. This is done using the checkboxes at the top of the page.
The checkbox at the bottom of the API class navigation tree filters the class list to include or exclude private classes.
Clicking on an empty search field will show your last 10 searches for quick navigation.
Each API doc page (with the exception of Javascript primitives pages) has a menu view of metadata relating to that class. This metadata view will have one or more of the following:
Ext.button.Button class has an alternate class name of Ext.Button). Alternate class
names are commonly maintained for backward compatibility.Runnable examples (Fiddles) are expanded on a page by default. You can collapse and expand example code blocks individually using the arrow on the top-left of the code block. You can also toggle the collapse state of all examples using the toggle button on the top-right of the page. The toggle-all state will be remembered between page loads.
Class members are collapsed on a page by default. You can expand and collapse members using the arrow icon on the left of the member row or globally using the expand / collapse all toggle button top-right.
Viewing the docs on narrower screens or browsers will result in a view optimized for a smaller form factor. The primary differences between the desktop and "mobile" view are:
The class source can be viewed by clicking on the class name at the top of an API doc page. The source for class members can be viewed by clicking on the "view source" link on the right-hand side of the member row.
Sencha Architect makes it easy to save, preview, simulate, and build your application using buttons on the Architect toolbar.
Previewing displays your project in a browser.
Simulating lets you test your Sencha Touch iOS or Android applications within your local development environment without having to deploy your apps to an actual mobile device. For a list of device features that are enabled or disabled, refer to the iOS or Android documentation.
Note: Simulating requires the simulator/emulator to be running for Architec to display your project. Refer to the Android or iOS documentation for information on how to start the Android SDK emulator or the iOS Xcode simulator.
Building an application means packaging it for distribution, so that others can use it. This is necessary to distribute your apps within your company or via the Internet. For Sencha Touch applications, it is often desirable to publish your apps to the Google Play or Apple Store.
Note: Save your project before previewing, building, or simulating your project. Until a project is saved, the preview and build buttons are grayed out.
The Architect build and simulate target features overwrite the packager.json file. Do not change this file when using
Architect. If you are upgrading from a previous version of Architect or Touch where you used that file for build
parameters, back up the file. If the packager.json file from a previous project gets overwritten, you can recover the
file from the .xda file that's created when you first upgrade Architect to a new version. The .xda file is a
compressed file that you can unzip and locate the files.
The Sencha Architect toolbar provides buttons that let you save, preview, build, publish and simulate your app:

Architect for Touch apps may also include a Test (Appurify) button on the Toolbar if enabled:

The Appurify button enables access to the Appurify test environment. For more information, see Using Appurify.
The Save drop-down menu in the toolbar provides different options for how you can save and license your project.
You can also save a project using the Cmd+S keystroke in Mac or the CTRL+S keystroke in Windows and Linux.

Save - Saves the project. Specify the Save Path, Application Name, and Project Name.
Save Project As - Renames a project before saving.
Save Entire Project - (Grayed out until after first save) Forces all files in the project to be re-saved and overwritten, regardless of whether they have been opened or not. A normal Save only writes files for items that have been opened or modified in Architect during the current session.
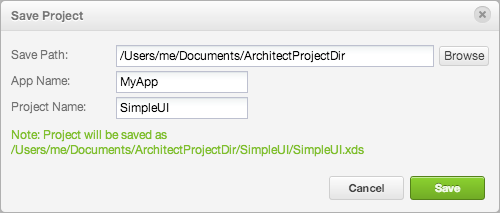
Note: Saving a project assumes you are creating a commercial application, which can be free or sold. To change the license for GPL (open source) or when you have purchased Sencha Complete or Sencha Touch Bundle, see the "Application License" section in the Installation and Setup Guide. On the first save of a project, Architect displays the Save Project menu.
To save your project:
Save Path - Click the Browse button to select the path where you want to save project files.
App Name - Specifies the name of your application. This name appears in the code for your application in the first statement that defines the initial View.
Project Name - Specifies the folder name and filename of your project.
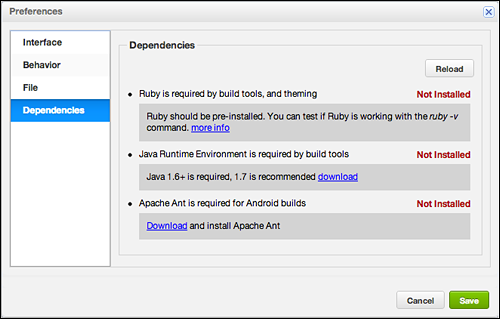
You need the following software to preview and build a project:
Ruby - for Sencha Cmd to use Ruby for CSS/SCSS compilation (deprecated).
Java - Sencha Cmd uses Java.
Apache Ant - Sencha Touch Android projects use Ant to create an Android Package file .apk, which is used to
distribute an application.
Edit > Architect Settings > Dependencies
Sencha Architect > Preferences > Dependencies
The window appears as:
Click the links to install and verify each software package. When complete, the window appears as:
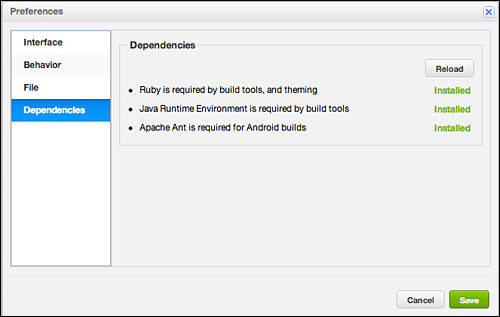
Click Save.
If you have additional JavaScript files that accompany your project, update the
Architect app.classpath variable to specify the relative path to your code directory.
To update app.classpath:
Navigate to the directory where your Architect project is. If you're not sure where this is,
click "Save > Save Project As" for the Save Path.
Change directory to the "{SavePathDir}/.sencha/app"
Make a new directory for your code, for example the app/thirdparty directory. Copy your JavaScript files to
the new directory.
Edit the sencha.cfg file and add a relative path to your new directory name to the app.classpath variable, for example:
app.classpath=${app.dir}/app,${app.dir}/app.js,${app.dir}/thirdparty
A local web server is not required to develop with Sencha Architect, but is required if you want to preview your project on your local machine. If you don't already have a local web server, you can use a server such as XAMPP, or the Sencha Cmd web server, which is included in Sencha Cmd version 3.1.1 and later.
Notes:
PHP does not work with the Sencha Cmd web server. Because Architect uses PHP in some examples, and because the Sencha Cmd web server is not capable of serving outside your computer, we recommend that you use a web server like XAMPP or the Apache web server.
If you install Sencha Cmd for its web server, change directory to the directory where you to serve your
application, and start the Sencha Cmd web server from the command line with the sencha web start command. The
Sencha Cmd web server serves from the http://localhost:1841/ URL. You can also specify an alternate port with t
he -p _portnumber option. The web server runs exclusively in the command line window and continues until you
press "CTRL+C". You can also open a new command window and type the sencha web stop command.
Sencha Touch projects using iOS or Android require a certificate:
Log into Apple's iOS Provisioning Portal and get development and distribution certificates, register your app and get an App ID, and create a provisioning profile. Access requires purchasing a developer's license. You can also download developer tools and the Xcode emulator.
Before requesting a certificate at the Provisioning Portal, generate a Certificate Signing Request (CSR) using the openssl tool provided in Mac OS X, for example:
> openssl req -new -key myprivatekey.key -out mycert.csr
Loading 'screen' into random state - done
You are about to be asked to enter information that will be incorporated into your certificate request.
What you are about to enter is called a Distinguished Name or a DN.
There are quite a few fields, but you can leave some blank.
For some fields there will be a default value,
If you enter '.', the field will be left blank.<br>-----
Country Name <2 letter code> [AU]: US
State or Province Name <full name> [Some-State]: My State
Locality Name <eg, city> []: My City
Organizational Name <eg, company [Internet Widgits Pty Ltd]: MyCompany, Inc
Organizational Unit Name <eg, section> []:
Common Name <eg server FQDN or Your name> []: com.mydomain
Email Address [] [email protected]<br>
Please enter the following 'extra' attributes
to be sent with your certificate request
A challenge password []:
An optional company name []:
After you create your CSR file, navigate to the Apple Development Portal, Certificates section. To create a Certificate, click the Add button and select the certificate type of iOS App Development. You are requested to upload your CSR file. After the upload completes, you can generate and then download your iOS Certificate.
The openssl tool is also available for Windows.
Use the keytool command from the Android SDK to create a certificate for your app:
$ keytool -genkey -v -keystore C:\keys\mykeystore -alias myappkey -keyalg RSA -keysize 2048 -validity 10000
Enter keystore password: <password>
What is your first and last name?
[Unknown]: Polly Hedra
What is the name of your organizational unit?
[Unknown]: App Development
What is the name of your organization?
[Unknown]: MyCompany
What is the name of your City or Locality?
[Unknown]: Silicon City
What is the name of your State or Province?
[Unknown]: California
What is the two-letter country code for this unit?
[Unknown]: US
Is CN=MyPassword, OU=App Development, O=MyCompany, L=Silicon City, ST=California, C=US correct?
[no]: yes<br><br>
Generating 2,048 bit RSA key pair and self-signed certificate (SHA1withRSA) with a validity of 10,000 days
for: CN=MyPassword, OU=App Development, O=MyCompany, L=Silicon City, ST=California, C=US
Enter key password for <myappkey>
(RETURN if same as keystore password):
[Storing C:\keys\mykeystore]
$
Links an Application ID with the iOS certificates and devices authorized to run the application.
Previewing means viewing your project in a web browser such as Chrome or Safari. Previewing requires that you have a web server operating at the time you click the Preview button. To preview:
Create a project directory where your web server can access your project. If you are using the Sencha Cmd web server, the directory can be anywhere on your computer. If you are using another web server, locate the project directory where your web server can access it.
Save your project.
Start your web server.
Click the Preview button in the Architect Toolbar:

When you click the Preview button for an application, the following window appears - after you click Preview, the browser window opens and displays your app. If you have a browser open, Preview adds a tab to the browser.
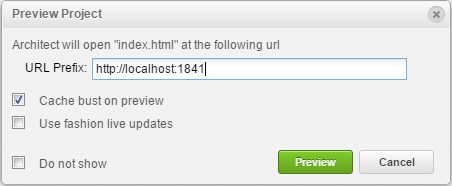
URL Prefix - Type the URL for where your web server serves files on your computer. If you are using the Sencha Cmd web server and started the web server using the default port and in the directory where you serve files, specify the URL as:
http://localhost:1841/<ArchitectProjectName>
If you are using another web server, refer to its documentation for the URL to provide - in most cases,
it's http://localhost/ and the directory where you serve your web applications.
Cache bust on preview - Indicates whether or not to use cached information from the web server. By default, when this option is checked, information is not cached and new information is sent on each page request.
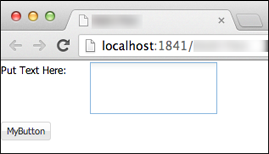
Example Ext JS output that shows the use of the default port number 1841, which the Sencha Cmd web server uses to serve web content:
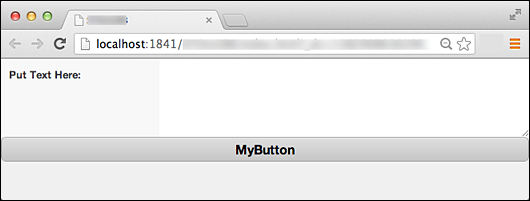
For Touch, the example output appears as:
Building a web app lets you create files for testing or distributing your project to display on a browser. You can change options after building from the "Build web app > Build Settings" menu.
Building a web app:
Optimizes your code to eliminate the parts of the Sencha class library your application doesn't use.
Uses Compass and Sass to compile your CSS and theme styles into an .scss file. The file name uses the App Name
you specified when you saved your project.
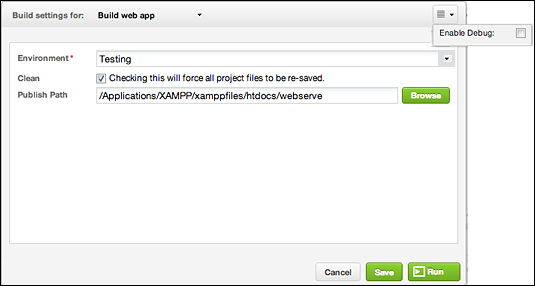 Build web app options:
Environment - Choose Testing to make your the built file readable, which helps you debug your project, or Production, which optimizes and compresses your built project to remove JavaScript classes not used by your application. (Neither option affects your project's source code.)
Clean - Generates an optimized build in which intermediate and output files are deleted.
Publish Path - Specify the path where you want your published project to reside. Click Browse to choose a path.
Action menu:
[DBG] statements in the Architect Output log
that list additional information about each build step.Building a web app generates these files:
app.jsonbootstrap.cssbootstrap.jsbootstrap.jsonbuild.settingssass/example/sass/example/bootstrap.jssass/example/example.csstheme/ext-theme-classic-<IDvalue>.cssThe Output and Log windows provide information about the build.
To build an iOS app for a Sencha Touch project:
Click Build iOS app, and click the App Summary tab:
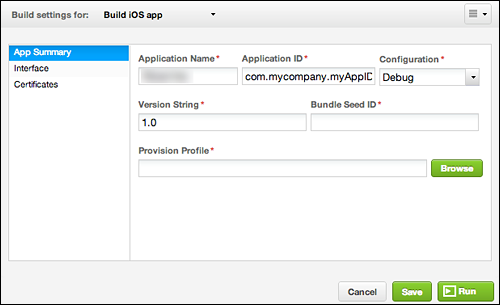
Access the Apple developers portal and obtain an Application Name, Application ID, and Bundle Seed ID. (The Bundle Seed ID is the prefix value found when viewing the Application ID in the developer portal-it's a 10-character string that's the same for all your applications in your account).
If you are submitting your app to an online store for distribution, change Configuration to Release, otherwise, leave the Debug setting.
Click the Provision Profile > Browse the path to your provisioning file.
Click the Interface tab:

Click the Device Type you're targeting or use the default setting for Universal. If your app only runs in
portrait or landscape orientation, click the orientation you don't want. Click the Application Icons sizes for
which you are supplying images. The icon button displays the Open File menu for you to navigate to where your image
files are stored. Image files can be of the .png, .jpg or .gif types, and Architect copies the files to
the resources/images directory of your project.
Click the Certificates tab:
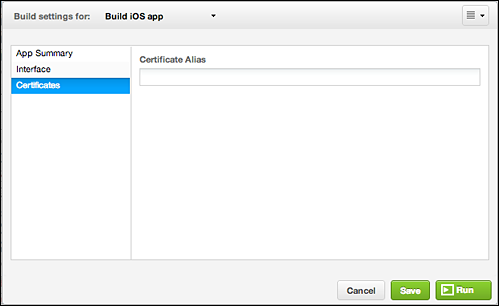
Mac OS: Enter the Certificate Alias available from your access to the Apple developers portal.
In Windows, this screen appears as:
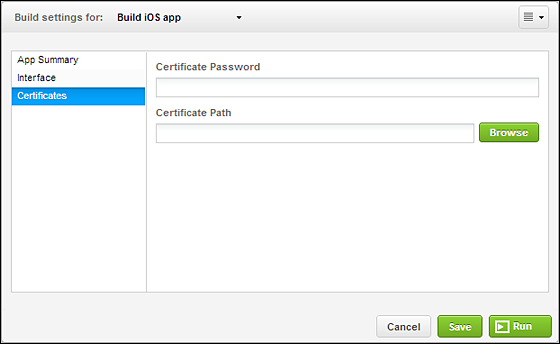
Windows: Enter the Certificate Password and Password Path. You assign the password when you create the certificate and the path is where the certificate is stored on your computer.
To build an Android app for a Sencha Touch project:
Click Build Android app, and click the App Summary tab:
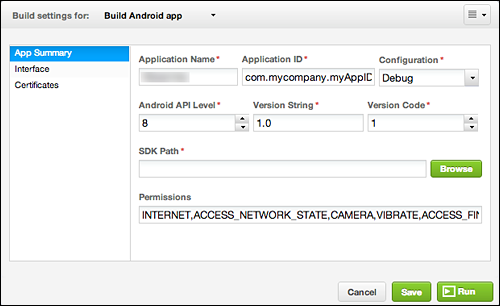
Specify the Application Name and Application ID.
If you are submitting your app to an online store for distribution, change Configuration to Release, otherwise, leave the Debug setting.
Set the Android API Level to the minimum level your app works with. You must ensure that the correct API is installed using the Android SDK Manager. For example, you must have previously installed Android 4.4 to use API level 19.
Set the Version String and Version Code for your app.
Click Browse to locate where you installed your Android SDK. The Android SDK resides where you unzipped the
Android SDK download. The sdk folder inside of the unzipped zip file contains sub-folders such as
tools, build-tools, sources, etc.
Set the permissions relative to the device features your app needs access to. You can find a list of Android permissions in the Android Manifest.permission document.
Click the Interface tab:
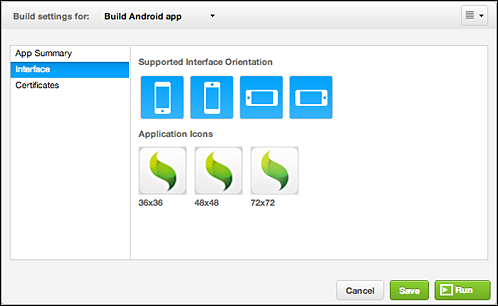
If your app only runs in portrait or landscape orientation, click the orientation you don't want. Click the
Application Icons sizes for which you are supplying images. The icon button displays the Open File menu for you to
navigate to where your image files are stored. Image files can be of the .png, .jpg or .gif types, and
Architect copies the files to the resources/images directory of your project.
Click the Certificates tab:

Specify your certificate password and path to your certificate. For more information on creating a certificate, see the previous section on the Android SDK keytool command.
Start the Android SDK Manager. In Windows, navigate to the Android, SDK directory, right-click SDK Manager.exe, and
click Run as Administrator. In Mac or Linux, change directory to where you unzipped the Android SDK download and in
the tools directory, enter the ./android command.
Check Android SDK Platform-tools and uncheck other options. Click the Install Package button. In the next screen, click Android SDK Platform-tools, revision n.n.n and click Accept.
For Windows, install the Google USB Driver from the Android SDK Manager to help install your app on your mobile
device. Locate the usb_driver_r04-windows.zip file on the web for the device on which you are installing your app. This
file contains Android drivers and contains a device ID for the mobile device. In Windows, disable driver signature
enforcement to install Android drivers for Windows. Search the web for information on this step.
You can make use of Android much easier if you add the paths to the tools and platform-tools directories to your
PATH environment variable.
To get the Android ADB command to communicate with your device, connect the device to your computer and type these commands at the command line:
android update adb
adb kill-server
adb start-server
adb devices
Notes
The android command is in the tools directory and the adb command is in the platform-tools directory (which you need to install separately using the Android SDK Platform-tools package in the Android SDK Manager).
Mac and Linux users should use ./android update adb. First change directory to where you unzipped the Android software distribution, and change directory to the tools directory.
When the adb devices command succeeds, it lists the serial number of the mobile device. For example:
$ adb devices
List of devices attached
42424242    device
Before simulating an app, launch the Xcode Simulator without running an app. When you click Run in Architect, Architect opens your app in the Xcode Simulator. To simulate an iOS app:
Click Simulate on iOS, and click the App Summary tab:

Specify the Application Name and Application ID that you registered in the Apple developers portal. If needed, change the Version String.
Click the Interface tab:
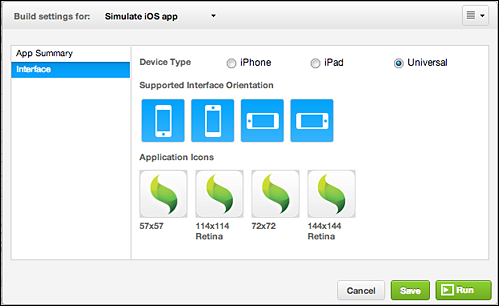
If needed, change the Device Type, or unclick an unsupported orientation, or un-click an icon size.
Click Run to display your app on the Xcode Simulator.
Before emulating an Android app, create an Android virtual device (AVD) and start the Android SDK Emulator. When you click Run in Architect, Architect opens your app in the Android SDK Emulator. To simulate an Android app:
Click Simulate on Android, and click the App Summary tab:
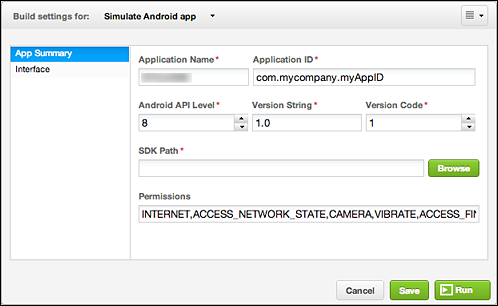
Specify the application name and ID. Change the Android API Level to the maximum Android level that your app supports. To use the emulator, you need to have previously installed all Android levels using the Android SDK Manager that your app supports. For more information, see API Levels. If needed, set the version string and code. Click Browse to set the path to where you installed the Android SDK. Remove any Permissions your app doesn't need.
Click the Interface tab:
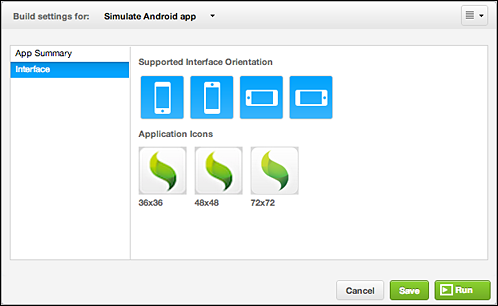
If needed, un-click an unsupported orientation or icon size.
Click Run to display your app on the Android Emulator.
The App Refresh option in the Build menu regenerates project files. This feature runs in your project directory and updates these files with changes in your project:
app.jscmd-packages.jsbootstrap.jsbootstrap.jsonPublishing optimizes your project files for distributing your project. After you publish your project, you can compress the directory and distribute the content as needed.
Note: Publishing does not make a project viewable from a browser. Click the Preview button to make your project visible from a browser:
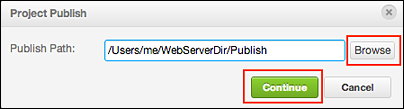
To publish your project:
Create a publish directory where you want your project to be stored.
Click the Publish button:

Click Browse to navigate to your publish directory, and click Continue:
Architect 3.0 and later provides integrated testing for Sencha Touch 2.x applications using the Appurify service, which enables you to test your Sencha Touch application on a real device located in the cloud.
To enable Appurify access:
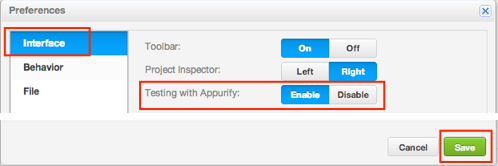
Windows & Linux: Click "Edit > Architect Settings"
Mac OS: Click "Sencha Architect > Preferences"
Click the Interface tab and click Enable for the Testing with Appurify
Click Save
After you save your project, the Appurify button appears in the toolbar as:
Note: You must set up your own Appurify account from within Architect to use Appurify. When you first click the "Appurify" button, use the Register link to sign up with Appurify:
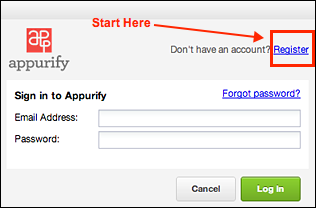 If you try to register directly on the Appurify web site, you will be put on a
wait list. Details of the Appurify pricing and licensing are available on the Appurify website.
If you try to register directly on the Appurify web site, you will be put on a
wait list. Details of the Appurify pricing and licensing are available on the Appurify website.
To test your app using Appurify:
Create and save your Sencha Touch application.
Click the Appurify button on the Toolbar; this button does not appear until you have enabled Appurify in the Settings, and saved your project.
A pop-up window appears for you to specify how to test your application.
Choose Via uploading project files to Appurify to zip the local project files and upload them to Appurify.
If you have a staging site that contains the project to be tested and is public, choose Via URL and supply the complete URL to your project.
Choose Automated Testing to go to a special Appurify page that runs a script to test your application. Appurify provides this page to support Architect 3.0 and later.
Choose the Tunneling option if your application needs to access an internal service such as a data service. This is discussed below.
Click the Launch button to launch an external browser window running the Appurify test facilities for your Architect project. All interactions on that site are supported by Appurify rather than Sencha.
The Tunneling option allows you to test your application against an internal service such as a data server. A service that is inside your corporate firewall may not be accessible to the Appurify testing site. When you select the Tunneling option, Appurify installs a script on your local machine that opens an SSL tunnel that allows the Appurify device to access your internal service. This tunnel is heavily encrypted and secure.
When you first select the Tunneling option, you get a screen to install this script and any software required to run the script on your operating system. After all the software is installed, the Yes and No buttons are enabled.
Click "Yes" and the tunneling script starts in the background.
Note: Whenever the tunneling script is running, you have a button to stop it. You should always close this script when you are done with your testing to avoid possible security leaks.


 Architect | Terms of Use
